Singer 9970 Instruction Manual - Page 22
Selecting Utility, Stitch Pattern
 |
View all Singer 9970 manuals
Add to My Manuals
Save this manual to your list of manuals |
Page 22 highlights
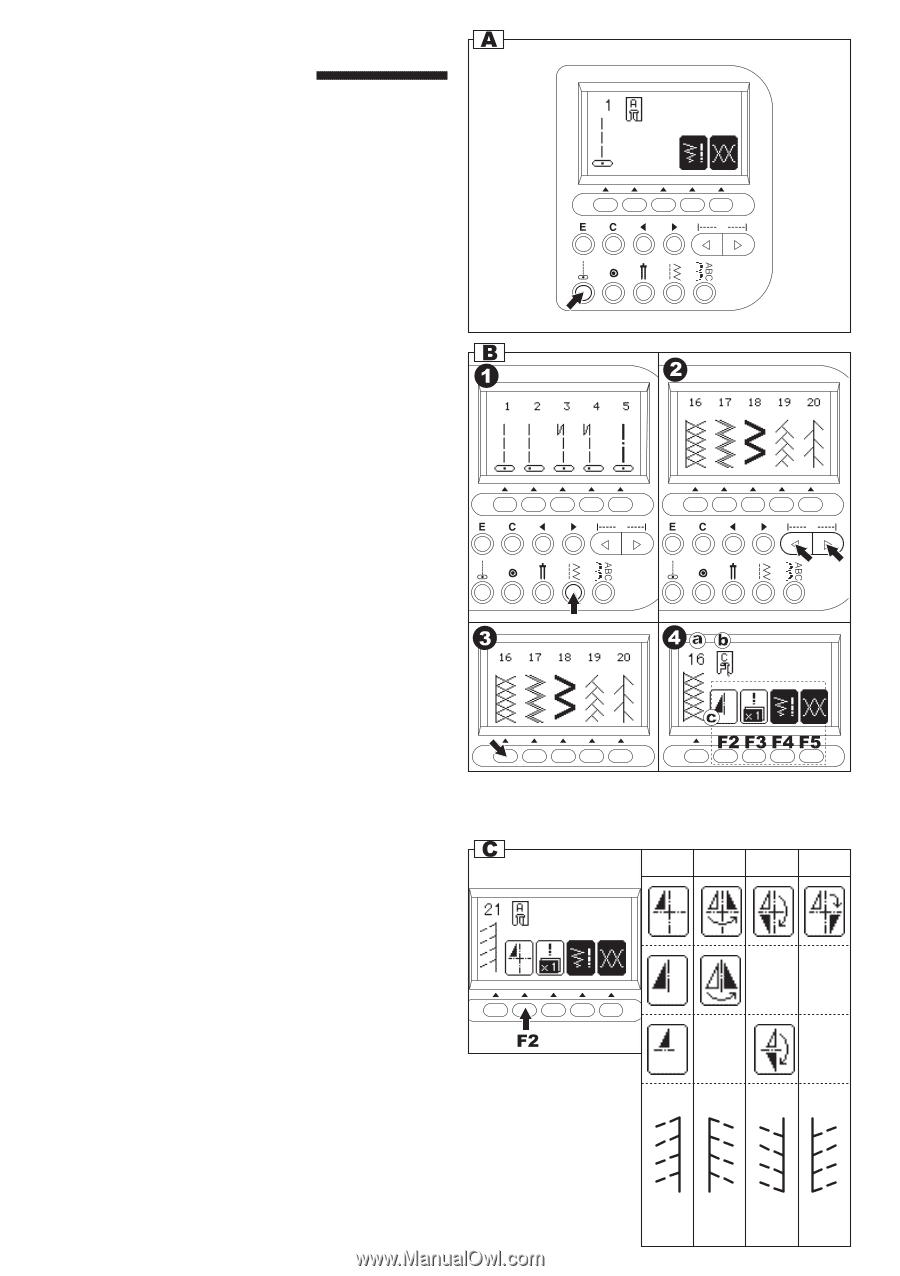
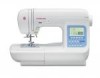
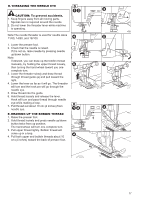
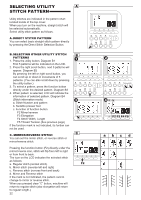
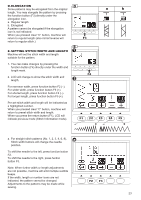
SELECTING UTILITY STITCH PATTERN Utility stitches are indicated in the pattern chart located inside of the top cover. When you turn on the machine, straight stitch will be selected automatically. Select utility stitch pattern as follows. A. DIRECT STITCH PATTERN You can select basic straight stitch pattern directly by pressing the Direct Stitch Selection Button. B. SELECTING OTHER UTILITY STITCH PATTERNS 1. Press the utility button. Diagram B1 First 5 patterns will be indicated on the LCD. 2. Press the right scroll button, next 5 patterns will appear. Diagram B2 By pressing the left or right scroll button, you can scroll up or down in increments of 5 patterns. (You can also scroll down by pressing the utility button.) 3. To select a pattern, press the function button directly under the desired pattern. Diagram B3 4. When pattern is selected, LCD will indicate the information of selected pattern. Diagram B4 (Stitch information mode) a. Stitch Number and pattern b. Suitable presser foot c. Function of function button F2 Mirror/reverse F3 Elongation F4 Stitch Width, Length F5 Thread Tension (See previous page) If the function mark is not indicated, its funtion can not be used. C. MIRROR/REVERSE STITCH You can set the mirror stitch, or reverse stitch or mirror/reverse stitch. Pressing the function button (F2) directly under the mirror/reverse icon, stitch will flip from left to right or from front to back. The icon on the LCD indicates the selected stitch as follows: a. Regular stitch (normal stitch) b. Mirror stitch (reverse left and right) c. Reverse stitch (reverse front and back) d. Mirror and Reverse stitch If the mark is not indicated, the pattern cannot change to mirror or reverse stitch. When you pressed clear "C" button, machine will return to regular stitch (also elongation will return to regular length.) 22 abc d
-
 1
1 -
2
-
3
-
4
-
5
-
6
-
7
-
8
-
9
-
10
-
11
-
12
-
13
-
14
-
15
-
16
-
 17
17 -
 18
18 -
 19
19 -
 20
20 -
 21
21 -
 22
22 -
 23
23 -
 24
24 -
 25
25 -
 26
26 -
 27
27 -
28
-
29
-
30
-
31
-
32
-
33
-
34
-
35
-
36
-
37
-
38
-
39
-
40
-
41
-
42
-
43
-
44
-
45
-
46
-
47
-
48
-
49
-
50
-
51
-
52
-
53
-
54
-
55
-
56
-
57
-
58
-
59
-
60
 |
 |