Singer 9970 Instruction Manual - Page 35
CAUTION: To prevent accidents., A. Note
 |
View all Singer 9970 manuals
Add to My Manuals
Save this manual to your list of manuals |
Page 35 highlights
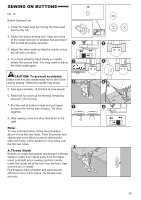
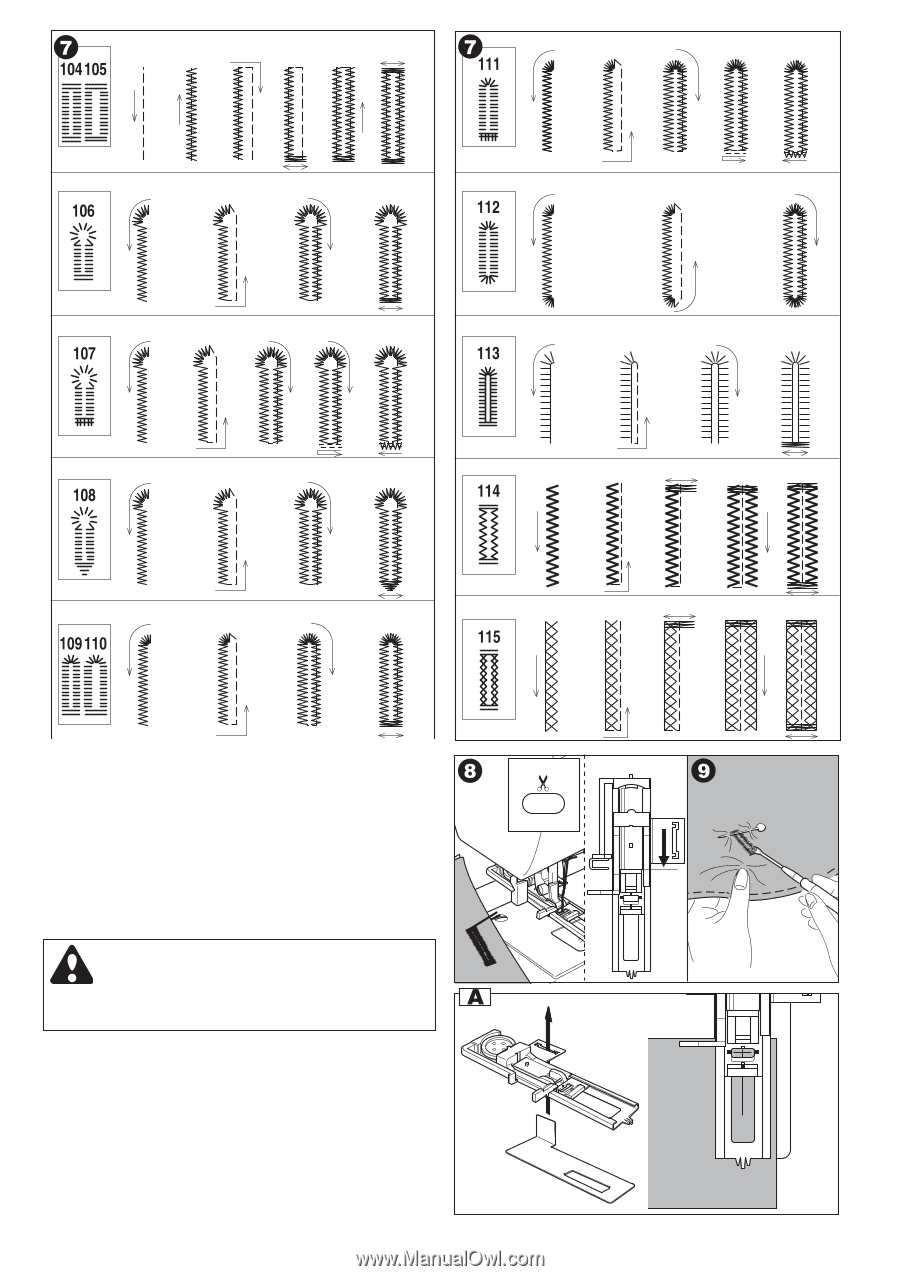
12 3 4 5 6 1 2 3 4 1 2 3 4 5 1 2 3 4 1 2 3 4 1 2 3 4 5 1 2 3 1 2 3 4 1 2 3 4 5 1 2 3 4 5 7. Machine will sew the buttonhole in the order as shown and stop automatically after sewing. 8. Press the thread cutter button and raise the presser foot to remove the fabric. To sew over same buttonhole, raise presser foot to return to original position. 9. Cut center of buttonhole being careful not to cut stitches on either side. Use a pin as a stopper. CAUTION: To prevent accidents. When using seam ripper, do not put your finger in the path of ripper. A. Note: For sewing buttonholes on hard-to-sew fabrics or along the edge of multi-layered garments, install the underplate. Place the fabric between the underplate and buttonhole foot. 35
-
 1
1 -
2
-
3
-
4
-
5
-
6
-
7
-
8
-
9
-
10
-
11
-
12
-
13
-
14
-
15
-
16
-
17
-
18
-
19
-
20
-
21
-
22
-
23
-
24
-
25
-
26
-
27
-
28
-
29
-
 30
30 -
 31
31 -
 32
32 -
 33
33 -
 34
34 -
 35
35 -
 36
36 -
 37
37 -
 38
38 -
 39
39 -
 40
40 -
41
-
42
-
43
-
44
-
45
-
46
-
47
-
48
-
49
-
50
-
51
-
52
-
53
-
54
-
55
-
56
-
57
-
58
-
59
-
60
 |
 |
35
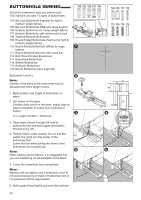
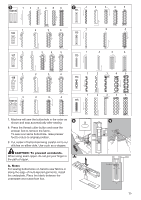
7.
Machine will sew the buttonhole in the order as
shown and stop automatically after sewing.
8.
Press the thread cutter button and raise the
presser foot to remove the fabric.
To sew over same buttonhole, raise presser
foot to return to original position.
9.
Cut center of buttonhole being careful not to cut
stitches on either side. Use a pin as a stopper.
CAUTION: To prevent accidents.
When using seam ripper, do not put your finger in
the path of ripper.
A. Note:
For sewing buttonholes on hard-to-sew fabrics or
along the edge of multi-layered garments, install
the underplate. Place the fabric between the
underplate and buttonhole foot.
1
2
3
4
5
6
1
2
3
4
5
1
2
3
4
1
2
3
4
5
1
2
3
4
1
2
3
4
5
1
2
3
4
1
2
3
4
1
2
3
1
2
3
4
5