Singer 9970 Instruction Manual - Page 44
Snap on the Chenille Stitching Foot.
 |
View all Singer 9970 manuals
Add to My Manuals
Save this manual to your list of manuals |
Page 44 highlights
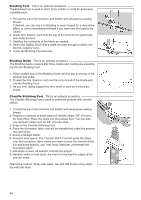
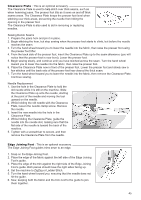
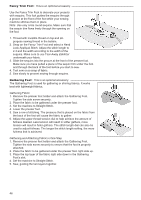
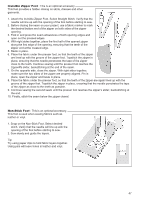
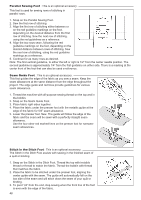
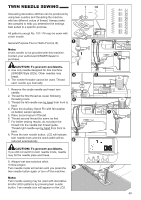
Braiding Foot : This is an optional accessory. The Braiding Foot is used to stitch trims, braids or cords for decorative embellishment. 1. Thread the top of the machine and bobbin with all-purpose sewing thread. If desired, you can use a contrasting or rayon thread for a decorative effect, or use a monofilament thread if you want only the braid to be visible. 2. Guide trim, braid or cord from the top of the foot into the guide hole and under the foot. 3. Stabilize the underside of the fabric as needed. 4. Select the ZigZag Stitch with a width set wide enough to stitch over the trim, braid or cord. 5. Lower the Braiding Foot and sew. Braiding Guide : This is an optional accessory. The Braiding Guide ensures that trims, braids and cording are smoothly fed into the Braiding Foot. 1. Place straight end of the Braiding Guide into the slot at the top of the presser foot ankle. 2. Thread the trim, braid or cord into the curly-Q end of the Guide and into the Braiding Foot. 3. As you sew, lightly support the trim, braid or cord as it enters the Guide. Chenille Stitching Foot : This is an optional accessory. The Chenille Stitching Foot is used to embellish projects with chenille effects. 1. Thread the top of the machine and bobbin with all-purpose sewing thread. 2. Prepare a minimum of three layers of chenille strips, 5/8" (16 mm), for best effect. Place the strips into the presser foot. You can also use narrower strips such as 3/8" (10 mm) wide. 3. Snap on the Chenille Stitching Foot. 4. Place the foundation fabric that will be embellished under the presser foot and strips. 5. Select a Straight Stitch. 6. Sew at a slow speed. The Chenille Stitch Foot will guide the strips over the foundation fabric where you want to have the chenille effect. For additional stability, use Tear Away Stabilizer underneath the foundation fabric. 7. Add strips in rows, as desired, to finish the project. 8. Machine wash on cold cycle, dry warm to help fray the edges of the chenille strips. Alternative method: Spray with water, rub with stiff brush to fray strips, dry with hair dryer. 44
-
 1
1 -
2
-
3
-
4
-
5
-
6
-
7
-
8
-
9
-
10
-
11
-
12
-
13
-
14
-
15
-
16
-
17
-
18
-
19
-
20
-
21
-
22
-
23
-
24
-
25
-
26
-
27
-
28
-
29
-
30
-
31
-
32
-
33
-
34
-
35
-
36
-
37
-
38
-
 39
39 -
 40
40 -
 41
41 -
 42
42 -
 43
43 -
 44
44 -
 45
45 -
 46
46 -
 47
47 -
 48
48 -
 49
49 -
50
-
51
-
52
-
53
-
54
-
55
-
56
-
57
-
58
-
59
-
60
 |
 |
