Singer Expert Finish Instruction Manual 2
Singer Expert Finish Manual
 |
View all Singer Expert Finish manuals
Add to My Manuals
Save this manual to your list of manuals |
Singer Expert Finish manual content summary:
- Singer Expert Finish | Instruction Manual 2 - Page 1
lean Household Steam Iron Auto c EFSNG917.4 instruction manual - Singer Expert Finish | Instruction Manual 2 - Page 2
NOT disassemble the iron. Ship to the nearest authorized SINGER® approved service center for examination hot water or steam. Use caution when you turn a steam iron upside down as there may be cannot be pulled or tripped over. SAVE THESE INSTRUCTIONS WARNING: THE POWER CORD ON THIS PRODUCT CONTAINS - Singer Expert Finish | Instruction Manual 2 - Page 3
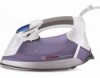
UP Button 13. Temperature DOWN Button E B A. Smart Auto-Off Indicator B. Steam Indicator C. Heating Indicator D. Temperature Level Indicator D E. Fabric Guide TECHNICAL SPECIFICATIONS: Voltage: 120V, 60 Hz Power: 1700 Watts WARNING: TO AVOID FIRE, NEVER LEAVE IRON UNATTENDED WHILE PLUGGED IN. 3 - Singer Expert Finish | Instruction Manual 2 - Page 4
the iron is used. This will disappear quickly. • Particles may emit from the iron the first time it is used. They are not harmful and should disappear after the iron has been used as described above. • Consult the garment's label for temperature instructions or use the chart on page 6 of this manual - Singer Expert Finish | Instruction Manual 2 - Page 5
ironing, always unplug the iron. When you return to ironing, make sure the iron reheats to the desired temperature and the LCD Display stops flashing before continuing. Water Recommendations • SINGER® Home Essentials irons in the iron that can stain clothing. WARNING: ALWAYS MAKE SURE THE IRON IS - Singer Expert Finish | Instruction Manual 2 - Page 6
To cool, adjust the Temperature DOWN (-) until the LCD Display no longer shows a temperature setting. The will begin to flash. • To turn the iron completely off, unplug from the grounded electrical outlet. NOTE: Never yank the cord to disconnect from outlet. Always grasp plug and pull to disconnect - Singer Expert Finish | Instruction Manual 2 - Page 7
INSTRUCTIONS. WE RECOMMEND USING THE CHART BELOW AS A GUIDE. Temperature Control Settings synthetics silk wool cotton linen do not iron MAX • To turn the iron flashing and disappear, indicating that the iron is ready to use. • If steam ironing is desired, a minimum temperature setting of 160 - Singer Expert Finish | Instruction Manual 2 - Page 8
Adjust Button located above the LCD Display to deactivate the steam setting. An audible beep will sound. • To iron garments with a dry iron, SINGER® recommends using this iron with an empty water tank. Steam Ironing WARNING: NEVER IRON OR STEAM CLOTHES WHILE THEY ARE BEING WORN. NEVER DIRECT THE - Singer Expert Finish | Instruction Manual 2 - Page 9
or pressing extra-sharp creases. WARNING: NEVER IRON OR STEAM CLOTHES WHILE THEY ARE BEING WORN. NEVER DIRECT THE STEAM JET AT PEOPLE OR ANIMALS. • Follow the instructions as described in the "Steam Ironing" section. • While steam ironing, press the Burst of Steam button every 4 to 5 seconds. Most - Singer Expert Finish | Instruction Manual 2 - Page 10
. • DO NOT SPRAY SILK. Auto clean Cool Mist Spray Button Cool Mist Spray 3-Way Smart Auto-Off The SINGER® Expert Finish™ II Iron is equipped with an automatic shut-off. The Smart Auto-Off switches the iron off if it has been left unattended. NOTE: Auto-Off is not an on/off switch. Always unplug - Singer Expert Finish | Instruction Manual 2 - Page 11
Anti-Calc cartridge is designed to reduce the buildup of mineral substances in the water which occurs during steam ironing, thereby extending the life of your SINGER® Expert Finish™ II Iron. However, please note that the anti-calc cartridge will not completely stop the natural process of lime scale - Singer Expert Finish | Instruction Manual 2 - Page 12
wipe all water from the soleplate with an old towel, as the water and minerals may leave stains. NOTE: Before using the iron after self-cleaning, test the steam and burst of steam on an old towel or cloth that can be discarded. Auto clean Self-Cleaning Button Emptying and Storing • Unplug the - Singer Expert Finish | Instruction Manual 2 - Page 13
- do not fill past the MAX line on water tank. • The iron may not be hot enough - set the temperature to MAX ••• 200º C . • Over use of Burst of Steam - allow more time between bursts. If troubleshooting does not solve the problem, please call SINGER® at 1-800-4SINGER (1-800-474-6437). 13 - Singer Expert Finish | Instruction Manual 2 - Page 14
EXPERT FINISH™ II STEAM IRON IMPORTANT: SAVE THIS DOCUMENT AND KEEP IT IN A SAFE PLACE What Does This Limited Warranty Cover? The SINGER® Expert Finish™ II Steam Iron or other instructions for the IRON, misuse, or events beyond our control. • ANY IMPLIED WARRANTY APPLICABLE TO THE IRON, INCLUDING - Singer Expert Finish | Instruction Manual 2 - Page 15
under the warranty may be obtained by returning the IRON with: 1. This original warranty document; and 2. Proof of purchase (such as the purchase receipt) to: SINGER Sewing Company ATTN: Service Department 1224 Heil Quaker Boulevard LaVergne, TN 37086 What If I Have Questions About The Warranty - Singer Expert Finish | Instruction Manual 2 - Page 16
lean Plancha a Vapor para Uso Doméstico Auto c EFSNG917.4 Manual de Instrucciones 16 - Singer Expert Finish | Instruction Manual 2 - Page 17
la seguridad. 7. Para evitar el riesgo de una descarga eléctrica, NO desarme la plancha. Envíela al centro de servicio aprobado y autorizado SINGER® más cercano para que la examinen y la arreglen. La reparación o el armado incorrectos puede crear un riesgo de incendio, descarga eléctrica o lesión al - Singer Expert Finish | Instruction Manual 2 - Page 18
Conozca su Plancha SINGER® 4 5 3 lean 2 Auto c 1 6 7 8 9 10 11 1. Rociador 12 13 2. Botón de Regulación del E. Guía de Telas ESPECIFICACIONES TÉCNICAS: Voltaje: 120 V, 60 Hz Consumo: 1700 vatios ADVERTENCIA: PARA EVITAR INCENDIOS, NUNCA DEJE LA PLANCHA DESATENDIDA MIENTRAS ESTÁ CONECTADA - Singer Expert Finish | Instruction Manual 2 - Page 19
. • Consulte la etiqueta de la prenda para conocer las instrucciones de temperatura o utilice las recomendaciones presentadas en la tabla de la página 22 de este manual. 19 - Singer Expert Finish | Instruction Manual 2 - Page 20
caliente a la temperatura deseada y que la pantalla de cristal líquido (LCD) deje de parpadear. Recomendaciones Sobre el Agua • Las planchas Home Essentials de SINGER® están diseñadas para ser utilizadas con agua del grifo. • Si el agua es especialmente dura o si usa un ablandador de agua, use agua - Singer Expert Finish | Instruction Manual 2 - Page 21
Encendido y Apagado de la Plancha • Para encender la plancha, enchúfela en un tomacorriente. Un pitido audible indicará que la plancha está encendida. La pantalla de cristal líquido (LCD) se iluminará y comenzará a titilar. • Para enfriar la plancha, disminuya la temperatura (-) hasta que la - Singer Expert Finish | Instruction Manual 2 - Page 22
Cómo Seleccionar la Temperatura CONSULTE LA ETIQUETA DE LA PRENDA PARA CONOCER LAS INSTRUCCIONES SOBRE LA TEMPERATURA. RECOMENDAMOS USAR LA TABLA A CONTINUACIÓN COMO GUÍA. Temperature Control Settings sintéticos seda lana algodón lino no se planchan MAX • Para encender la plancha, enchúfela en - Singer Expert Finish | Instruction Manual 2 - Page 23
del vapor presione el botón regulador del vapor ubicado arriba de la pantalla LCD. Sonará un pitido audible. • Para planchar prendas en seco, SINGER® recomienda utilizar esta plancha con el tanque de agua vacío. Planchado con Vapor ADVERTENCIA: NUNCA PLANCHE O APLIQUE VAPOR A LA ROPA CUANDO SE TENGA - Singer Expert Finish | Instruction Manual 2 - Page 24
Expulsión de Vapor Esta función es ideal para quitar arrugas rebeldes o fijar plisados muy marcados. ADVERTENCIA: NUNCA PLANCHE O APLIQUE VAPOR A LA ROPA CUANDO SE TENGA PUESTA. NUNCA APUNTE EL CHORRO DE VAPOR HACIA PERSONAS O ANIMALES. • Siga las instrucciones descritas en la sección "Planchado a - Singer Expert Finish | Instruction Manual 2 - Page 25
la manera usual. • NO ROCÍE LA SEDA. Auto clean Botón de Rociado Frío Rociado Frío Apagado Automático Inteligente de 3 Formas La plancha Expert Finish™ II de SINGER® está equipada con una función de apagado automático. El apagado automático inteligente apaga la plancha si se ha quedado encendida - Singer Expert Finish | Instruction Manual 2 - Page 26
minerales en el agua que se genera durante el planchado con vapor, y por lo tanto prolonga la vida útil de la plancha Expert Finish™ II de SINGER®. Sin embargo, tenga en cuenta que el cartucho antisarro no detendrá totalmente el proceso natural de la acumulación de sarro calcáreo. LIMPIEZA - Singer Expert Finish | Instruction Manual 2 - Page 27
• Para apagar la plancha completamente, desenchúfela del tomacorriente. • Sostenga la plancha en posición horizontal sobre una pileta con la suela apuntando lejos del cuerpo y presione y mantenga el botón de autolimpieza. De los agujeros de la suela saldrán agua y vapor, lo que hará que se limpien - Singer Expert Finish | Instruction Manual 2 - Page 28
••• 200º C. • Uso excesivo de la expulsión de vapor; deje pasar más tiempo entre las expulsiones. Si las sugerencias de esta sección no resuelven el problema, llame a SINGER® al 1-800-4SINGER (1-800-474-6437). 28 - Singer Expert Finish | Instruction Manual 2 - Page 29
: CONSERVE ESTE DOCUMENTO Y GUÁRDELO EN UN LUGAR SEGURO ¿Qué cubre esta garantía limitada? Se garantiza que la plancha a vapor Expert Finish™ II de SINGER® está libre de defectos de materiales y mano de obra. ¿Qué vigencia tiene esta garantía limitada? La garantía del cableado y los componentes - Singer Expert Finish | Instruction Manual 2 - Page 30
devolviendo la PLANCHA con: 1. Este documento de garantía original y 2. El comprobante de compra (por ejemplo, el recibo de compra) a: SINGER Sewing Company ATTN: Service Department 1224 Heil Quaker Boulevard LaVergne, TN 37086 ¿Qué debo hacer si tengo preguntas sobre la garantía? Si tiene alguna - Singer Expert Finish | Instruction Manual 2 - Page 31
lean Fer à Vapeur Domestique Auto c EFSNG917.4 manuel d'utilisation 31 - Singer Expert Finish | Instruction Manual 2 - Page 32
LES INSTRUCTIONS AVANT D'UTILISER L'APPAREIL. Veuillez conserver ces instructions dans un doit être remplacé par le fabricant ou par un agent de service autorisé pour éviter les risques d'accident. 7. Pour éviter Expédier au centre de réparation agréé Singer® le plus proche pour l'examen et la - Singer Expert Finish | Instruction Manual 2 - Page 33
Apprendre à Connaître Votre Fer SINGER® 5 4 3 6 7 8 2 9 Auto c lean 1 10 11 1. Embout du Jet 12 13 2. Indicateur du Niveau de Température D E. Guide pour Tissus CARACTÉRISTIQUES TECHNIQUES: Tension: 120 V, 60 Hz Alimentation: 1700 Watts MISE EN GARDE: POUR ÉVITER LES INCENDIES, - Singer Expert Finish | Instruction Manual 2 - Page 34
D'UTILISATION Avant la Première Utilisation • Retirer tout film ou autocollant de protection de la semelle et du fer. • Lire toutes les instructions de sécurité et d'utilisation. • Remplir le réservoir d'eau comme décrit dans la section « Remplissage du Réservoir d'Eau ». • Pour mettre le fer sous - Singer Expert Finish | Instruction Manual 2 - Page 35
le fer se réchauffe au niveau désiré et que l'écran LCD cesse de clignoter avant de poursuivre. Recommandations en Matière de l'Eau • Les fers SINGER® Home Essentials sont conçus pour être utilisés avec l'eau du robinet. • Si votre eau est particulièrement dure ou si vous utilisez un adoucisseur - Singer Expert Finish | Instruction Manual 2 - Page 36
Mettre le Fer Sous ou Hors Tension • Pour mettre le fer sous tension, le brancher dans une prise électrique raccordée à la terre. Un signal sonore signalera que le fer est sous tension. L'écran ACL s'allumera et le symbole commencera à clignoter. • Pour faire refroidir le fer, appuyer sur la - Singer Expert Finish | Instruction Manual 2 - Page 37
Régler la Température CONSULTER L'ÉTIQUETTE DU VÊTEMENT POUR LES INSTRUCTIONS CONCERNANT LA TEMPÉRATURE NOUS RECOMMANDONS D'UTILISER LE TABLEAU CI-COMME UN GUIDE. Temperature Control Settings synthétique soie laine coton lin ne pas repasser MAX • Pour mettre le fer sous tension, le brancher - Singer Expert Finish | Instruction Manual 2 - Page 38
de l'écran ACL pour activer le réglage de la vapeur. Le fer émettra un signal sonore. • Pour repasser les vêtements avec un fer sec, SINGER® recommande d'utiliser de ce fer avec un réservoir d'eau vide. Repassage à Vapeur MISE EN GARDE: NE JAMAIS REPASSER OU DÉFROISSER À LA VAPEUR DES VÊTEMENTS - Singer Expert Finish | Instruction Manual 2 - Page 39
À LA VAPEUR DES VÊTEMENTS ALORS QU'ILS SONT PORTÉS. NE JAMAIS DIRIGER LE JET DE VAPEUR SUR DES PERSONNES OU DES ANIMAUX. • Suivre les instructions telles que décrites dans la section « Repassage à Vapeur ». • Tenir le fer en position verticale, 15 à 30 cm de distance du vêtement. • Appuyer sur la - Singer Expert Finish | Instruction Manual 2 - Page 40
Commande du Jet de Vapeur Froide Jet de Vapeur Froide Interrupteur d'Arrêt Automatique Intelligent à Trois Voies Le fer à repasser Expert Finish™ II de SINGER® est équipé d'un interrupteur d'arrêt automatique. L'interrupteur d'arrêt automatique intelligent met le fer hors tension s'il est laiss - Singer Expert Finish | Instruction Manual 2 - Page 41
substances minérales dans l'eau qui se produit pendant le repassage à vapeur, prolongeant ainsi la durée de vie de votre fer Expert Finish™ II SINGER®. Toutefois, veuillez prendre note que la cartouche anti-calcaire n'arrêtera pas complètement le processus naturel de l'accumulation des incrustants - Singer Expert Finish | Instruction Manual 2 - Page 42
• Tenir le fer horizontalement au-dessus d'un évier, diriger la semelle dans la direction opposée à vous, enfoncer et maintenir enfoncée la commande d'auto-nettoyage. La vapeur et l'eau chaude s'écouleront par les trous de la semelle, évacuant le tartre et les minéraux qui se sont accumulés dans la - Singer Expert Finish | Instruction Manual 2 - Page 43
MAX ••• 200º C. Le fer émet des petites particules ou une odeur • C'est normal - Suivre les instructions pour la première utilisation. • L'eau peut devoir être remplacée. • Accumulation de dépôts de minéraux soudre le problème, veuillez communiquer avec SINGER® au 1-800-4SINGER (1-800-474-6437). 43 - Singer Expert Finish | Instruction Manual 2 - Page 44
Que Couvre Cette Garantie Limitée? Le fer à vapeur SINGER® Expert Finish™ II est garanti contre tout défaut matériel ou de fabrication les Autres Exclusions ou Limitations? • Selon les termes de cette garantie, le service après-vente peut être obtenu uniquement dans les 48 États contigus, en Alaska - Singer Expert Finish | Instruction Manual 2 - Page 45
tre obtenu en retournant le FER avec: 1. L'original de ce document de garantie et 2. La preuve d'achat (telle que le reçu) à: SINGER Sewing Company ATTN: Service Department 1224 Heil Quaker Boulevard LaVergne, TN 37086 Que Dois-Je Faire si j'Ai des Questions Relatives à la Garantie? Si vous avez des
-
 1
1 -
 2
2 -
 3
3 -
 4
4 -
 5
5 -
 6
6 -
 7
7 -
8
-
9
-
10
-
11
-
12
-
13
-
14
-
15
-
16
-
17
-
18
-
19
-
20
-
21
-
22
-
23
-
24
-
25
-
26
-
27
-
28
-
29
-
30
-
31
-
32
-
33
-
34
-
35
-
36
-
37
-
38
-
39
-
40
-
41
-
42
-
43
-
44
-
45
 |
 |

instruction manual
Household Steam Iron
A
u
t
o
c
l
e
a
n
EFSNG917.4