Singer Professional 5 Serger 14T968DC Instruction Manual 3
Singer Professional 5 Serger 14T968DC Manual
 |
View all Singer Professional 5 Serger 14T968DC manuals
Add to My Manuals
Save this manual to your list of manuals |
Singer Professional 5 Serger 14T968DC manual content summary:
- Singer Professional 5 Serger 14T968DC | Instruction Manual 3 - Page 1
14T968DC - Singer Professional 5 Serger 14T968DC | Instruction Manual 3 - Page 2
14T968DC 14T968DC SINGER es una marca registrada de The Singer Company Limited o sus filiales. 2008 The Singer Company Limited o sus filiales. Reservados todos los derechos. - Singer Professional 5 Serger 14T968DC | Instruction Manual 3 - Page 3
2 - Singer Professional 5 Serger 14T968DC | Instruction Manual 3 - Page 4
3 - Singer Professional 5 Serger 14T968DC | Instruction Manual 3 - Page 5
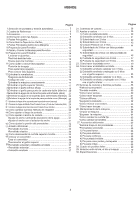
1.Selección de puntadas y tensión automática ... 22. Ajustes y costura ... 4 - Singer Professional 5 Serger 14T968DC | Instruction Manual 3 - Page 6
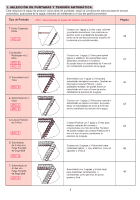
1. SELECCIÓN DE PUNTADAS Y TENSIÓN AUTOMÁTICA Esta máquina es capaz de producir varios tipos de puntadas, según la combinación seleccionada de tensión automática, posiciones de la aguja, métodos de enhebrado y el uso del garfio/convertidor. ATD : seleccionado el ajuste de tensión automática 39 ATD: - Singer Professional 5 Serger 14T968DC | Instruction Manual 3 - Page 7
ATD : seleccionado el ajuste de tensión automática 47 ATD: I 48 ATD: B 48 ATD: A 51 ATD: K 51 ATD: H 52 ATD: J 55 ATD: C 6 - Singer Professional 5 Serger 14T968DC | Instruction Manual 3 - Page 8
7 - Singer Professional 5 Serger 14T968DC | Instruction Manual 3 - Page 9
44 6 G2 NL 45 7 ANNL 46 8 I NNL 47 9 BNNL 48 10 ANNL 48 2.8mm 11 KNNC 51 5.6mm 12 HNNC 51 5.6mm 13 J NNC 52 4.0mm 14 C1 NL 55 ATD: 3, 6, 8 seleccionadas, usar la lanzadera. *Con las opciones 1, 11, 12, 13 seleccionadas, girar la cuchilla superior hacia abajo, mover el - Singer Professional 5 Serger 14T968DC | Instruction Manual 3 - Page 10
13. Cubierta de la cuchilla 1 1 5 5 1 1 1 1 1 2 3 1 5 (en la máquina) 1 en el cartón 1 en el cartón 1 4 5 6 7 8 9 10 12 11 13 9 - Singer Professional 5 Serger 14T968DC | Instruction Manual 3 - Page 11
1 18. Selector de la tensión automática 19. Placa guía de la costura 2 34 5 6 7 18 16 8 19 9 15 14 12 10 10 13 11 - Singer Professional 5 Serger 14T968DC | Instruction Manual 3 - Page 12
20. 21. 22. 23. 23 20 21 22 11 - Singer Professional 5 Serger 14T968DC | Instruction Manual 3 - Page 13
1 2 73 21 8 5 6 4 9 OFF ON 12 - Singer Professional 5 Serger 14T968DC | Instruction Manual 3 - Page 14
1 2 3 13 - Singer Professional 5 Serger 14T968DC | Instruction Manual 3 - Page 15
14 - Singer Professional 5 Serger 14T968DC | Instruction Manual 3 - Page 16
A B C D E CDE D B AB A B E C D 15 - Singer Professional 5 Serger 14T968DC | Instruction Manual 3 - Page 17
16 - Singer Professional 5 Serger 14T968DC | Instruction Manual 3 - Page 18
1 2 3 4 9 5 8 7 6 C L 1 2 2 3 3 17 - Singer Professional 5 Serger 14T968DC | Instruction Manual 3 - Page 19
8 4 9 9 5 8 7 6 1 2 3 4 10 5 9 8 7 6 1 2 2 18 - Singer Professional 5 Serger 14T968DC | Instruction Manual 3 - Page 20
3 3 10 9 8 7 4 5 6 4 8 5 7 6 9 A 10 D B C 19 - Singer Professional 5 Serger 14T968DC | Instruction Manual 3 - Page 21
10 11 9 1 2 3 4 5 6 7 8 1 2 2 3 3 20 - Singer Professional 5 Serger 14T968DC | Instruction Manual 3 - Page 22
4 5 9 6 7 8 10 A 11 D B C 1 6 7 85 2 3 4 9 21 - Singer Professional 5 Serger 14T968DC | Instruction Manual 3 - Page 23
1 2 2 3 3 7 6 8 22 4 5 9 - Singer Professional 5 Serger 14T968DC | Instruction Manual 3 - Page 24
1 2 3 6 7 8 54 9 1 2 2 23 - Singer Professional 5 Serger 14T968DC | Instruction Manual 3 - Page 25
3 3 7 6 8 4 5 9 9 24 - Singer Professional 5 Serger 14T968DC | Instruction Manual 3 - Page 26
1 2 3 6 7 8 54 9 1 2 2 3 3 25 - Singer Professional 5 Serger 14T968DC | Instruction Manual 3 - Page 27
7 6 8 4 5 9 9 1 6 7 8 5 2 3 4 9 26 - Singer Professional 5 Serger 14T968DC | Instruction Manual 3 - Page 28
1 2 2 3 3 7 6 8 4 5 9 27 - Singer Professional 5 Serger 14T968DC | Instruction Manual 3 - Page 29
9 1 6 7 8 5 2 3 4 9 1 2 2 28 - Singer Professional 5 Serger 14T968DC | Instruction Manual 3 - Page 30
3 3 7 6 8 9 4 5 9 29 - Singer Professional 5 Serger 14T968DC | Instruction Manual 3 - Page 31
30 - Singer Professional 5 Serger 14T968DC | Instruction Manual 3 - Page 32
4 3 N 2 6.0 mm (15/64") 4.0 mm (10/64") 8.8 mm (11/32") 5 mm (13/64") 7 mm (17/64") 3 mm (1/8") 5 mm (3/16") 7.8 mm (5/16") 9.8 mm (3/8") 31 - Singer Professional 5 Serger 14T968DC | Instruction Manual 3 - Page 33
5 4 N 2 1 32 - Singer Professional 5 Serger 14T968DC | Instruction Manual 3 - Page 34
2.0 1.5 N 0.8 0.6 2.0 1.5 N 0.8 0.6 33 - Singer Professional 5 Serger 14T968DC | Instruction Manual 3 - Page 35
2.0 1.5 N 0.8 0.6 34 - Singer Professional 5 Serger 14T968DC | Instruction Manual 3 - Page 36
1 2 1 2 35 - Singer Professional 5 Serger 14T968DC | Instruction Manual 3 - Page 37
36 - Singer Professional 5 Serger 14T968DC | Instruction Manual 3 - Page 38
N R N R 37 - Singer Professional 5 Serger 14T968DC | Instruction Manual 3 - Page 39
38 - Singer Professional 5 Serger 14T968DC | Instruction Manual 3 - Page 40
22. AJUSTES Y COSTURA ATD:D La tensión se ajusta automáticamente al seleccionar el tipo de puntada deseado con el selector de tensión automático (ATD). Se puede hacer un ajuste fino de la tensión por medio de las palancas de ajuste fino según las siguientes variables: Poner el selector de tensión - Singer Professional 5 Serger 14T968DC | Instruction Manual 3 - Page 41
40 - Singer Professional 5 Serger 14T968DC | Instruction Manual 3 - Page 42
La tensión se ajusta automáticamente al seleccionar el tipo de puntada deseado con el selector de tensión automático (ATD). Se puede hacer un ajuste fino de la tensión por medio de las palancas de ajuste fino según las siguientes variables: Poner el selector de tensión automática en la pos. D o G - Singer Professional 5 Serger 14T968DC | Instruction Manual 3 - Page 43
La tensión se ajusta automáticamente al seleccionar el tipo de puntada deseado con el selector de tensión automático (ATD). Se puede hacer un ajuste fino de la tensión por medio de las palancas de ajuste fino según las siguientes variables: ATD:E Poner el selector de tensión automática en la pos. - Singer Professional 5 Serger 14T968DC | Instruction Manual 3 - Page 44
La tensión se ajusta automáticamente al seleccionar el tipo de puntada deseado con el selector de tensión automático (ATD). Se puede hacer un ajuste fino de la tensión por medio de las palancas de ajuste fino según las siguientes N variables: 2~4 Poner el selector de tensión automática en la - Singer Professional 5 Serger 14T968DC | Instruction Manual 3 - Page 45
ATD:F La tensión se ajusta automáticamente al seleccionar el tipo de puntada deseado con el selector de tensión automático (ATD). Se puede hacer un ajuste fino de la tensión por medio de las palancas de ajuste fino según las siguientes N variables: 2~4 Poner el selector de tensión automá - Singer Professional 5 Serger 14T968DC | Instruction Manual 3 - Page 46
to the following variables: N 2~4 Set auto tension dial to G as shown on illustration and test sew on a sample of your fabric. When the lower looper thread tension is too loose; -Move the lower looper thread tension fine tuning lever (red) toward a higher position. When the left needle - Singer Professional 5 Serger 14T968DC | Instruction Manual 3 - Page 47
ATD:A La tensión se ajusta automáticamente al seleccionar el tipo de puntada deseado con el selector de tensión automático (ATD). Se puede hacer un ajuste fino de la tensión por medio N de las palancas de ajuste fino según las siguientes 2~4 variables: Poner el selector de tensión automática - Singer Professional 5 Serger 14T968DC | Instruction Manual 3 - Page 48
ATD:I La tensión se ajusta automáticamente al seleccionar el tipo de puntada deseado con el selector de tensión automático (ATD). Se puede hacer un ajuste fino de la tensión por medio de las palancas de ajuste fino según las siguientes N variables: 2~4 Poner el selector de tensión automá - Singer Professional 5 Serger 14T968DC | Instruction Manual 3 - Page 49
La tensión se ajusta automáticamente al seleccionar el tipo de puntada deseado con el selector de tensión automático (ATD). Se puede hacer un ajuste fino de la tensión por medio de las palancas de ajuste fino según las siguientes variables: ATD:B Poner el selector de tensión automática en la pos. - Singer Professional 5 Serger 14T968DC | Instruction Manual 3 - Page 50
C D B A E 2 3 4 5 6 1 2 25mm (1" ) 49 - Singer Professional 5 Serger 14T968DC | Instruction Manual 3 - Page 51
50 - Singer Professional 5 Serger 14T968DC | Instruction Manual 3 - Page 52
La tensión se ajusta automáticamente al seleccionar el tipo de puntada deseado con el selector de tensión automático (ATD). Se puede hacer un ajuste fino de la tensión por medio R de las palancas de ajuste fino según las siguientes N~4 variables: C Poner el selector de tensión automática en - Singer Professional 5 Serger 14T968DC | Instruction Manual 3 - Page 53
ATD:J La tensión se ajusta automáticamente al seleccionar el tipo de puntada deseado con el selector de tensión automático (ATD). Se puede hacer un ajuste fino de la tensión por medio R de las palancas de ajuste fino según las siguientes N~4 variables: C Poner el selector de tensión automá - Singer Professional 5 Serger 14T968DC | Instruction Manual 3 - Page 54
53 - Singer Professional 5 Serger 14T968DC | Instruction Manual 3 - Page 55
N 2 1 54 - Singer Professional 5 Serger 14T968DC | Instruction Manual 3 - Page 56
R 1~2 L Poner el selector de tensión automática en la pos. A como se muestra en la imagen y probar a coser con una muestra del tejido. ATD:A Poner el selector de tensión automática en la pos. C como se muestra en la imagen y probar a coser con una muestra del tejido. ATD:C 55 - Singer Professional 5 Serger 14T968DC | Instruction Manual 3 - Page 57
R 1~2 Poner el selector de tensión automática en la pos. E como se muestra en la imagen y probar a coser con una muestra del tejido. ATD:E Poner el selector de tensión automática en la pos. D como se muestra en la imagen y probar a coser con una muestra del tejido. ATD:D 56 - Singer Professional 5 Serger 14T968DC | Instruction Manual 3 - Page 58
57 - Singer Professional 5 Serger 14T968DC | Instruction Manual 3 - Page 59
58 - Singer Professional 5 Serger 14T968DC | Instruction Manual 3 - Page 60
1 2 A 59 - Singer Professional 5 Serger 14T968DC | Instruction Manual 3 - Page 61
4 1 2 60 - Singer Professional 5 Serger 14T968DC | Instruction Manual 3 - Page 62
A 2 cm 2 cm A 61 - Singer Professional 5 Serger 14T968DC | Instruction Manual 3 - Page 63
62 - Singer Professional 5 Serger 14T968DC | Instruction Manual 3 - Page 64
63 - Singer Professional 5 Serger 14T968DC | Instruction Manual 3 - Page 65
A B C D 64 - Singer Professional 5 Serger 14T968DC | Instruction Manual 3 - Page 66
0.5~1mm a b c d b 65 - Singer Professional 5 Serger 14T968DC | Instruction Manual 3 - Page 67
66 - Singer Professional 5 Serger 14T968DC | Instruction Manual 3 - Page 68
67 - Singer Professional 5 Serger 14T968DC | Instruction Manual 3 - Page 69
68 - Singer Professional 5 Serger 14T968DC | Instruction Manual 3 - Page 70
69 - Singer Professional 5 Serger 14T968DC | Instruction Manual 3 - Page 71
70 - Singer Professional 5 Serger 14T968DC | Instruction Manual 3 - Page 72
71 - Singer Professional 5 Serger 14T968DC | Instruction Manual 3 - Page 73
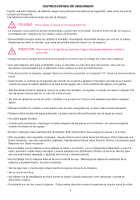
No utilice los dispositivos eléctricos como residuo municipal, use el servicio de reciclaje. Contacte con su gobierno local para información sobre los sistemas de reciclaje disponibles. Si los dispositivos eléctricos se tiran en vertederos, es posible que sustancias peligrosas se filtren en el agua - Singer Professional 5 Serger 14T968DC | Instruction Manual 3 - Page 74
G5P30
-
 1
1 -
 2
2 -
 3
3 -
 4
4 -
 5
5 -
 6
6 -
 7
7 -
8
-
9
-
10
-
11
-
12
-
13
-
14
-
15
-
16
-
17
-
18
-
19
-
20
-
21
-
22
-
23
-
24
-
25
-
26
-
27
-
28
-
29
-
30
-
31
-
32
-
33
-
34
-
35
-
36
-
37
-
38
-
39
-
40
-
41
-
42
-
43
-
44
-
45
-
46
-
47
-
48
-
49
-
50
-
51
-
52
-
53
-
54
-
55
-
56
-
57
-
58
-
59
-
60
-
61
-
62
-
63
-
64
-
65
-
66
-
67
-
68
-
69
-
70
-
71
-
72
-
73
-
74
 |
 |
14T968DC