Singer The SINGER 160 Instruction Manual 4
Singer The SINGER 160 Manual
 |
View all Singer The SINGER 160 manuals
Add to My Manuals
Save this manual to your list of manuals |
Singer The SINGER 160 manual content summary:
- Singer The SINGER 160 | Instruction Manual 4 - Page 1
HL LI - 0 0 00 0 mZ cc z 00z 0W mO 0) C - Singer The SINGER 160 | Instruction Manual 4 - Page 2
be folowed, including the following: Read all instructions before using (this appliance) DANGER To reduce the service center for examination, repair, electrical or mechanical adjustment. 4. Never operate the appliance with any air openings blocked. Keep ventilation open ings of the sewing machine - Singer The SINGER 160 | Instruction Manual 4 - Page 3
area, such as threading needle, changing needle, threading bobbin, or changing presser foot, etc. 6. Always unplug sewing machine from the electrical outlet when removing covers. lubricating, or when making any other user servicing adjustments mentioned in the instruction manual. 7, Never operate on - Singer The SINGER 160 | Instruction Manual 4 - Page 4
. 23 Accessories 4 Setting up your machine 5 Accessory tray, Free arm 6 Bobbin winding 7 Removing bobbin case 8 Inserting bobbin case 9 Threading upper thread, Threading for twin needle 10 Bringing up the bobbn thread 11 Changing sewing direction (turning corners) 12 Changing - Singer The SINGER 160 | Instruction Manual 4 - Page 5
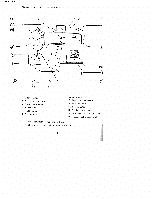
-up lever 3. Thread tension dial 4. Presser foot 5. Shuttle cover 6. Accessory tray 7. Spool pins 8. Bobbin winder spindle 9. Stitch length dial 10, Reverse button 11 Needle clamp screw 12. Stitch width dial (model 160) ia Presser foot pressure dial 1. Use a soft cloth to clean the machine. 2 Do - Singer The SINGER 160 | Instruction Manual 4 - Page 6
02/01/2008 Bobbin winder spindle Bobbin winder stopper Upper thread guide Stop Handwheel cover plate Presser foot lever clamp screw Levelling of machine Down Up -3- - Singer The SINGER 160 | Instruction Manual 4 - Page 7
Blind stitch hem foot Oiler Zipper foot Screwdriver Seam ripper Tij .1l hi Needle #11 #14 We reserve the right to change the machine equipment and the assortment of acces sories without prior notice, or make modifications to the performance or design. Such modifications, however, will always - Singer The SINGER 160 | Instruction Manual 4 - Page 8
02/01/2008 etting up your machine Changing light bulb Sewing light / On the base of the machine there is a rating plate with information about voltage and frequency. Be fore you connect the machine to an electrical outlet make sure that the voltage indicated on the rating plate conforms to that of - Singer The SINGER 160 | Instruction Manual 4 - Page 9
the direction of the arrow. Free arm 1. Keep the accessory tray on the machine when you want a large working surface. Remove the tray when you want to use the free arm. 2. The free arm is particularly use ful for sewing cuffs, sleeves, pant legs and other tubular garments. a Slip e.g. a pants' leg - Singer The SINGER 160 | Instruction Manual 4 - Page 10
When the bobbin is full, the stop motion knob must be tightened, 5 cm thread Push the bobbin winder spindle in the direction of the arrow. When the bobbin winding bobbin winding become uneven loosen the screw on the up per thread guide and adjust up or down until the bobbin winding is balanced, -F - Singer The SINGER 160 | Instruction Manual 4 - Page 11
on the bobbin case and pull the bobbin case out of the machine. 3. Release the lat-h and the bobbin wilt fall out. Inserting the bobbin cm Thread tension spring 1. Pull out abt.5cm thread from the bobbin and insert the bobbin into the bobbin case as iflu strated. 2. Guide the thread th rough - Singer The SINGER 160 | Instruction Manual 4 - Page 12
02/01/2008 E 1. Raise the needle to its highest position and pull the thread to the front. Open the latch and hold it. 2. Hold the latch open, put the bobbin case on the centre pin in the shuttle and release the latch. - - Singer The SINGER 160 | Instruction Manual 4 - Page 13
02/01/2008 Thread the machme from A to I as per Itustraoon. Twin needle threading - Singer The SINGER 160 | Instruction Manual 4 - Page 14
02/01/2008 Bringing up th bobbin thread 1. Hold the upper thread with your left hand and turn the hand lever has reached its highest position. Pull the upper thread lightly and the bobbin thread is brought up in a loop. 4 2. Pull out both threads and bring them under the presser foot to the rear of - Singer The SINGER 160 | Instruction Manual 4 - Page 15
enter the fabric and raise the presser foot. Turn the fabric around the needle in the new direction. 2. Lower the presser foot and continue to sew. Changing presser foot The presser feet are of the snap-on type. Remove the presser foot 1. Raise the needle to its highest position. 2. Raise the - Singer The SINGER 160 | Instruction Manual 4 - Page 16
tension is adjusted through turning the thread tension dial. Incorrect Wrong side of fabri Upper thread The lower thread tension can be adjusted th rough turning the screw on the bobbin case slightly to the right (clockwise) to increase the tension. Turn to the left (counter-clockwise) to loosen - Singer The SINGER 160 | Instruction Manual 4 - Page 17
or difficulties in guiding the fabric. 3. When darnrng or sewing freehand embroidery the pressure must be released. Set at 0. 0 Stitch length and stitch width LI Stitch length With this dial the stitch length can be set be tween 0 and 4. LI Stitch width (model 160 - Singer The SINGER 160 | Instruction Manual 4 - Page 18
02/01/2008 Drop feed Push downwards to lower the feed dog. Push upwards to raise the feed dog. Changing needle Needle clamp screw Tighten Loosen 1. Raise the needle to its highest POSitIOn. 2. Loosen the needle clamp screw and remove the needle. 3. Turn the flat side of the needle away from you - Singer The SINGER 160 | Instruction Manual 4 - Page 19
9 - - pEaJL iaMO pUE liddn UO aZ!S awes aqi asn SAEMf'f jiON PJt4 :iiaqiuAs jo uonoD AAaH (9Ltt)OOL-06 P!JaiW iPOD 'Aoinpioo 'paas wtu AAaH piii DiSaL4TuAs iO UOUO (EL) 08 awopiEqRb AoJnpJo3 NbH 'OOM wia 'uus 'ulidod u0fl03 wnipa sqiuAs Jo UOUO3 U41 [ adA psaJt.J (ot 8)01 09 zIs UM - Singer The SINGER 160 | Instruction Manual 4 - Page 20
02/01/2008 Recommended settings Model 160 Stitch Stitch selection A Straight stitch A Zigzag BCD Buttonhole E Overlock stitch F Smocking stitch G Pullover stitch LI H Reinforced straight stitch II I H Reinforced zigzag I Overcast stitch J Three-step - Singer The SINGER 160 | Instruction Manual 4 - Page 21
02/01/2008 Recommended settings - Model 140 Stitch Stitch selection A Straight stitch B-F Zigzag GHI Buttonhole 2 1 j Blind stitch K Three-step zigzag > L Overlock stitch H II I M Reinforced straight stitch Free-hand embroidery [ Stitch length Presser foot Rem 0.4 0-4 - Singer The SINGER 160 | Instruction Manual 4 - Page 22
Stopping to sew 2. Hold both threads abt. 10 cm to toe rear of the machine during the sewing. 5. It is adivsable to testsew on a scrap piece of the fabric you intend to use so you can change the settings,' if necessary. NOTE! 1. If you turn the handwheel manually always turn it towards you 2. Guide - Singer The SINGER 160 | Instruction Manual 4 - Page 23
02/01/2008 1. 2. 3. 4. SPRReraaewiisssseetottthhhteeehernpeevreeenesdrdssleeeorftbfouothtoietttos nsaheniaadgmnhdp.eusstlel wpoous3ti-t4tihosnet.iftcahberisc in to reverse. the rear of the machine. 5. Cut the thread by means of the thread cutter. - Singer The SINGER 160 | Instruction Manual 4 - Page 24
stitch is the most commonly used stitch. 2. The zigzag presser foot is used for both straight and z,gzag stitching. 3. For light fabrics use a short sutch length. Zigzag stitching Stitch selector position (model 160) rnn Stitch selector position (model 140') Model 160 Set the stitch width dial - Singer The SINGER 160 | Instruction Manual 4 - Page 25
02/01/2008 %.tV%*I %nfl*b Eli] Use those stitches to overcast edges. Be sure to trim the edges beforehand. Reinforced straight stitching Lii Use this stich with knits, tricot and other elastic fabrics. The reinforced straight stitch is very strong and thus useful for J seams subjected to - Singer The SINGER 160 | Instruction Manual 4 - Page 26
in the far left position. Make sure that the needle only catches one thread of the folded edge (21. If not,re-position the fabric. When make sure that the edge guide on the presser foot (3) follows the folded edge (2) through turning the roller (4). Continue to sew and guide the fabric carefully to - Singer The SINGER 160 | Instruction Manual 4 - Page 27
02/01/2008 Adjust the stitch width (model 160) and the edge gude on the presser foot in order to get the best possible result. The needle fails to reach the folded edge (A) The needle enters the fabric too far to the left (B) Correct result - Singer The SINGER 160 | Instruction Manual 4 - Page 28
folded seam allo wance with the zipper teeth as close to the fold as possible and stitch zipper to fabric close to the fold. aeqin sewing at the bottom of the zipper. (7 4. Position the zipper foot to the right of the needle. Before you begin to - Singer The SINGER 160 | Instruction Manual 4 - Page 29
. 4. Turn the handwheel towards you and make sure that the needle enters both holes of the button. You may need to readjust the stitch width. 5. Sew 6 to 8 stitches. 6. Pull both threads to the underside and tie. Bridging stitches Use those to join two pieces of fabric edge to edqe. - Singer The SINGER 160 | Instruction Manual 4 - Page 30
length dial as per recommendation, the stitch width dial on 4 (rrdel 160> and the thread tension dial within the area indicated on the dial. Step Stitch selector 1. Model 160 Select position B Model 140 Select position G 2. Sew the right column (in reverse> fl 3. Raise the needle 2 4. Model - Singer The SINGER 160 | Instruction Manual 4 - Page 31
.nntdCeahrnadtnhgepeuptlorlestthsheeer hemmer foot. foot, Secure hem into the hemmer foot through oulling the threads. 3. 4. Lower the presser foot and sew the hem. When sewing, guide the fabric a little to the left so that it really runs into the - Singer The SINGER 160 | Instruction Manual 4 - Page 32
fabric in an embroi dery hoop, stretching it as much as possible. Place the hoop under the needle and lower the presser bar. Twin needle 4 Thread the machine as for normal sewing but with two threads. NOTE! The stitch width must NOT exceed 3 mm as otherwise a needle breakage will be the result. - Singer The SINGER 160 | Instruction Manual 4 - Page 33
foot as shown. Edge guide 1. Use the edge guide when sewing a long seam at the same distance from the fabric edge. 2. Attach the edge guide to the right of the stitch plate and adjust the distance. 3. Run the machine with the fabric edge slightly touching the guide. Position the guide at an angle to - Singer The SINGER 160 | Instruction Manual 4 - Page 34
02/01/2008 Maintenance çieaninq anu uttiti, A B () 1. Raise the needle to ts highest position. 2. Take out the bobbin case. 3, Turn the latch A as illustrated. 4. Remove the shuttle race cover. 5. Remove the shuttle. b. Clean and oil the shuttle race and the A verse order the parts - Singer The SINGER 160 | Instruction Manual 4 - Page 35
problems Problem Fabric does not move Breaking needle Breaking upper thread Breaking bobbin thread Machine Use correct needle and thread Re-thread machine - - Loosen upper thread tension Insert new needle - - Polish of burrs or replace stitch plate Loosen bobbin thread tension - - Re-thread machine
-
 1
1 -
 2
2 -
 3
3 -
 4
4 -
 5
5 -
 6
6 -
 7
7 -
8
-
9
-
10
-
11
-
12
-
13
-
14
-
15
-
16
-
17
-
18
-
19
-
20
-
21
-
22
-
23
-
24
-
25
-
26
-
27
-
28
-
29
-
30
-
31
-
32
-
33
-
34
-
35
 |
 |
0
0
00
0
m
Z
cc
L
z
H
00
z
LI
0W
mO
-
0)
C