Snapper RE110 Operater's Manual - Page 19
WARNING, Maintenance - 28
 |
View all Snapper RE110 manuals
Add to My Manuals
Save this manual to your list of manuals |
Page 19 highlights
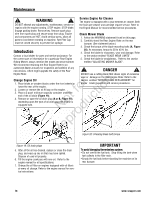
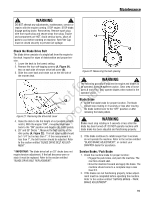
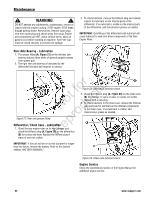
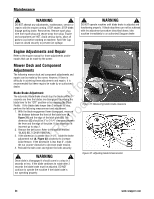
Maintenance ! WARNING ! DO NOT attempt any adjustments, maintenance, service or repairs with the engine running. STOP engine. STOP blade. Engage parking brake. Remove key. Remove spark plug wire from spark plug and secure away from plug. Engine and components are HOT. Avoid serious burns, allow all B parts to cool before working on machine. Fuel Filler Cap must be closed securely to prevent fuel spillage. A Check the Blade Drive Belt The blade drive consists of a single belt from the engine to the deck. Inspect for signs of deterioration and proper ten- sion. 1. Lower the deck to the lowest setting. 2. Remove the four self-tapping screws (A, Figure 21), two on each side of mower drive belt cover (B). 3. Slide the cover back and rotate out on the left side of Figure 22: Measuring the belt spacing the mower deck. for tion A t c B No odu Figure 21: Removing the drive belt cover r 4. Raise the deck to the 3rd height of cut position (middle p notch). With the engine "OFF", move the blade lever e back to the "ON" position and depress the blade pedals. 5. 28" and 30" Decks *: Measure the belt spacing at the R idler pulley (A, Figure 22). The belt spacing (B) should ! WARNING ! The following procedure requires the engine and blades to be operated. Exercise extreme caution. Clear area of loose parts & tools first. Only operate blades when seated in the operator's seat. Blade Brake 1. Check the blade brake for proper function. The blade should stop rotating in 3 seconds or less after moving the blade control lever to the "OFF" position or after releasing the blade pedals. ! WARNING ! Blades must stop rotating in 3 seconds or less after the blade has been turned off. DO NOT operate machine until blade brake has been adjusted and functioning properly. be 1-1/4" but no less than 1". If the measurement is 2. If the blade continues to rotate longer than 3 seconds less than 1", the belt tension should be adjusted. Refer do not operate the machine. Refer to the section entitled to the section entitled "BLADE DRIVE BELT ADJUST- "BLADE BRAKE ADJUSTMENT", or contact your MENT". SNAPPER dealer for assistance. * IMPORTANT: The blade drive belt on 33" decks does not require tension adjustment. If the belt becomes worn or slack it must be replaced. Refer to the section entitled "BLADE DRIVE BELT REPLACEMENT". Service Brake / Park Brake 1. Check the machine brake for proper function: Engage the park brake, and push the machine. The rear tires should skid. Drive the machine forward and apply the brake. The machine should come to a complete stop in less than 5 ft. 2. If the brakes are not functioning properly, brake adjustment must be completed before operating the machine. Refer to the section entitled "SERVICE BRAKE - PARK BRAKE ADJUSTMENT". 19
-
 1
1 -
2
-
3
-
4
-
5
-
6
-
7
-
8
-
9
-
10
-
11
-
12
-
13
-
 14
14 -
 15
15 -
 16
16 -
 17
17 -
 18
18 -
 19
19 -
 20
20 -
 21
21 -
 22
22 -
 23
23 -
 24
24 -
25
-
26
-
27
-
28
-
29
-
30
-
31
-
32
-
33
-
34
-
35
-
36
 |
 |