Sony Ericsson R520m User Guide - Page 8
When to Charge the Battery, Charging the Battery - ericsson battery
 |
View all Sony Ericsson R520m manuals
Add to My Manuals
Save this manual to your list of manuals |
Page 8 highlights
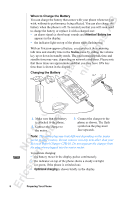
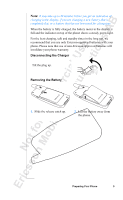
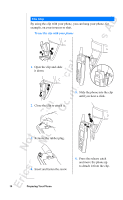
EricssonNoMtofboilreCCoommmmerucniiaclatUisoens AB When to Charge the Battery You can charge the battery that comes with your phone whenever you wish, without its performance being affected. You can also charge the battery when the phone is off. To remind you that you will soon need to charge the battery or replace it with a charged one: • an alarm signal (a short beep) sounds and Attention! Battery low appears in the display. • the indicator light on top of the phone starts flashing red. With an Ericsson-approved battery, you can check the remaining talk time and standby time in the Status menu by sliding the volume key up or down in standby mode. The total remaining talk time and standby time may vary, depending on network conditions. Please note that these times are approximate and that you may have 10% less time than is shown in the display. Charging the Battery 1. Make sure that the battery is attached to the phone. 2. Connect the charger to the mains. 3. Connect the charger to the phone as shown. The flash symbol on the plug must face upwards. Note: The mains plug may look different depending on the mains socket in your country. Do not connect it to any item other than your Ericsson Travel Charger CTR-10. Do not separate the charger from the plug when plugged into the mains socket. To indicate charging: • the battery meter in the display pulses continuously. • the indicator on top of the phone shows a steady red light (or green, if the phone is switched on). • Optimized charging is shown briefly in the display. 8 Preparing Your Phone
-
 1
1 -
2
-
 3
3 -
 4
4 -
 5
5 -
 6
6 -
 7
7 -
 8
8 -
 9
9 -
 10
10 -
 11
11 -
 12
12 -
 13
13 -
14
-
15
-
16
-
17
-
18
-
19
-
20
-
21
-
22
-
23
-
24
-
25
-
26
-
27
-
28
-
29
-
30
-
31
-
32
-
33
-
34
-
35
-
36
-
37
-
38
-
39
-
40
-
41
-
42
-
43
-
44
-
45
-
46
-
47
-
48
-
49
-
50
-
51
-
52
-
53
-
54
-
55
-
56
-
57
-
58
-
59
-
60
-
61
-
62
-
63
-
64
-
65
-
66
-
67
-
68
-
69
-
70
-
71
-
72
-
73
-
74
-
75
-
76
-
77
-
78
-
79
-
80
-
81
-
82
-
83
-
84
-
85
-
86
-
87
-
88
-
89
-
90
-
91
-
92
-
93
-
94
-
95
-
96
-
97
-
98
-
99
-
100
-
101
-
102
-
103
-
104
-
105
-
106
-
107
-
108
-
109
-
110
-
111
-
112
-
113
-
114
-
115
-
116
-
117
-
118
-
119
-
120
-
121
-
122
-
123
-
124
-
125
-
126
-
127
-
128
-
129
-
130
-
131
-
132
-
133
-
134
-
135
-
136
-
137
-
138
-
139
-
140
-
141
-
142
-
143
-
144
-
145
-
146
-
147
-
148
-
149
-
150
-
151
-
152
 |
 |
