Sony CAV-M1000ES Installation Manual Integrated A/V System
Sony CAV-M1000ES Manual
 |
View all Sony CAV-M1000ES manuals
Add to My Manuals
Save this manual to your list of manuals |
Sony CAV-M1000ES manual content summary:
- Sony CAV-M1000ES | Installation Manual Integrated A/V System - Page 1
AV System Installation Manual Owner's Record The model and serial numbers are located on the rear panel. Record the model and serial numbers in the spaces provided below. Refer to them whenever you call upon your Sony dealer regarding this product. Model No. Serial No. CAV-M1000ES 2004 Sony - Sony CAV-M1000ES | Installation Manual Integrated A/V System - Page 2
, you may call; Sony Customer Information Service Center 1-800-222-7669 or http://www.sony.com/ The number below is for the FCC related matters only. Regulatory Information Declaration of Conformity Trade name: SONY Model No.: CAV-M1000ES Responsible Party: Sony Electronics Inc. Address: 16450 - Sony CAV-M1000ES | Installation Manual Integrated A/V System - Page 3
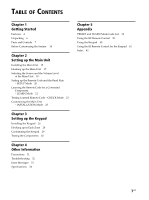
Controls 7 Before Customizing the System 14 Chapter 2 Setting up 19 Setting up the Remote Code and the Baud Rate - SETUP Mode 20 Learning the Remote Code for a Connected Component - Zone 28 Customizing the Keypad 29 Testing the Components 30 Chapter 4 Other Information Precautions 31 Troubleshooting - Sony CAV-M1000ES | Installation Manual Integrated A/V System - Page 4
and the output components by using a Keypad in each zone and an RF Remote Control in the main zone. This Custom Integrated AV System allows you to - Distribute audio/video signals from eight independent sources to six separate zones. - Control volume adjustment, such as muting, bass and treble - Sony CAV-M1000ES | Installation Manual Integrated A/V System - Page 5
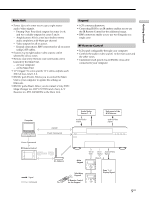
Zones: Up to six zones receive up to eight source audio/video signals. - Preamp Outs: Four fixed outputs for zones 1 to 4, and two variable outputs for zones 5 and 6. - Amplification: All six zones have built-in stereo connect a Sony DVD Mega Changer (ex. DVP-CX777ES) and a Sony A/V Receiver (ex. - Sony CAV-M1000ES | Installation Manual Integrated A/V System - Page 6
The CAV-M1000ES system includes the following components: • CAV-M1000ES Main Unit • RM-TP100 RF Remote Control • RMB-TP100 Charger cradle for the RF Remote Control • Ferrite core • AN-M1000 RF Antenna • AC power cord • Plug-in 4-terminal screw-type connector for speaker (6) • Installation Manual - Sony CAV-M1000ES | Installation Manual Integrated A/V System - Page 7
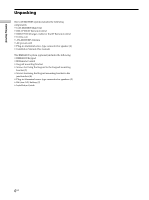
Getting Started Parts and Controls Front panel of the Main Unit 12 3 4 5 6 CHECK LEARN SETUP ZONE SOURCE SELECT RS232C PROGRAM ENTER MODE BACK CANCEL ZONE VOLUME ALL ZONE MUTING 7 8 9 q; qa qs qd qf 1 ?/1 (POWER) switch Press to turn the power on or off. 2 Learning IR window Used - Sony CAV-M1000ES | Installation Manual Integrated A/V System - Page 8
to control the eight source components individually. IR signals received from a zone will be routed to the IR sensor of the d) AUDIO IN (page 17) RCA jacks for stereo line level audio input from a source component. e) system or motorized screen. qk CONTROL A1II (page 17) Hooks up to a Sony CD - Sony CAV-M1000ES | Installation Manual Integrated A/V System - Page 9
Mega Changer (ex. DVP-CX777ES) or a Sony A/V Receiver (ex. STR-DA5000ES). Use an RS232C cross cable for the connection. ws AC IN (page 18) Hooks up the supplied AC power cord to AC IN. RF Remote Control 1 6 2 MUTING VOLUME SYSTEM OFF 3 4 CHANNEL 5 1 MUTING Press to mute the audio. 2 VOLUME - Sony CAV-M1000ES | Installation Manual Integrated A/V System - Page 10
qg 1 IR sensor Receives IR signals from the IR Remote Control for the Keypad (supplied) to control both source components and the system. 2 SELECT Press to window Displays the selected source, the zone volume level, the zone and the system status, and other system status information. qs v/V (SCROLL - Sony CAV-M1000ES | Installation Manual Integrated A/V System - Page 11
the speakers in a zone. qk OUT (page 28) Connects a CAT5 straight cable to the IN jack of the subsidiary Keypad when used in a single room. ql IR IN emitter. w; MODE switch (page 28) When using two Keypads in a single room, set this switch to SUB on the subsidiary Keypad. wa FROM AMPLIFIER (page 28 - Sony CAV-M1000ES | Installation Manual Integrated A/V System - Page 12
source. qa TOP MENU/GUIDE Press to display the zone. wk F1 A button reserved for source components. wl F2 A button reserved for source components. e; FOLDER Press to move to the FOLDER screen while using a DVD player. ea TV/VIDEO Press to switch signals between TV input and Video input of the Sony - Sony CAV-M1000ES | Installation Manual Integrated A/V System - Page 13
1 2 3 4 5 6 7 8 9 q; qa qs qd qf * qg SLEEP DIMMER TV 1234 5678 9 0 >10 ENTER SELECT LOCK DISC PAGE SOURCE DOWN UP TOP MENU/ GUIDE MENU MUTING VOLUME DISPLAY RETURN/EXIT TV VOL TV CH FOLDER F1 TV/VIDEO F2 * qh qj qk * ql w; wa ws wd wf wg wh - Sony CAV-M1000ES | Installation Manual Integrated A/V System - Page 14
The following chart gives an overview of how to set up the Main Unit system. Setting up the Main Unit - Install the Main Unit. (page 15) Control, please consult your nearest Sony dealer. Planning the system Before setting up the system, plan the system configuration. 1 Decide the source components - Sony CAV-M1000ES | Installation Manual Integrated A/V System - Page 15
. • Place a board under the Main Unit if it is located on a carpet to allow adequate ventilation on the bottom. • Make sure the weight is equally distributed on each of its four feet. • Do not place anything on the top of the Main Unit that might block the ventilation holes and cause - Sony CAV-M1000ES | Installation Manual Integrated A/V System - Page 16
fan (55 CFM) centered 2 inches (50.8 mm) behind the Main Unit Installing the RF Antenna Mount the RF Antenna in an appropriate place in the room where the RF Remote Control is to be used. For details on how to make the connection, refer to "RF Antenna hookup" on page 18 - Sony CAV-M1000ES | Installation Manual Integrated A/V System - Page 17
OUT L VARIABLE PRE OUT R VIDEO OUT L SPEAKERS (CLASS 2 WIRING) ZONE 1 SPEAKERS (CLASS 2 WIRING) ZONE 2 SPEAKERS (CLASS 2 WIRING) ZONE 3 SPEAKERS (CLASS 2 WIRING) ZONE 4 SPEAKERS (CLASS 2 WIRING) ZONE 5 SPEAKERS (CLASS 2 WIRING) ZONE 6 DVP AUX RS232C SPEAKERS IMPEDANCE USE 4-16 K IJ C ~AC - Sony CAV-M1000ES | Installation Manual Integrated A/V System - Page 18
connection jack of the Main Unit and each audio input of the external A/V receiver. Use RCA audio cables. VIDEO OUT jack (G) Hook up the VIDEO OUT IR emitter to the component sensor. Zone related cables hookups SPEAKERS jack (I) Hook up the SPEAKERS jack of each ZONE connection jack of the Main Unit - Sony CAV-M1000ES | Installation Manual Integrated A/V System - Page 19
SETUP mode. r Tip Even when you connect several DVD players to the Main Unit, you can distinguish each of them by the source number displayed on the far right side in the display window. Adjusting the volume in each zone 1 Press ZONE+ or ZONE - repeatedly to select a zone. 2 Press ZONE VOLUME - Sony CAV-M1000ES | Installation Manual Integrated A/V System - Page 20
as follows: "PC SETUP R r" y "BAUD RATE SET R r" 4 Press ENTER. "READY!" appears in the display window. You are now ready to transfer data between the Main Unit and your computer. 5 Set up the Main Unit using the CAV-M1000ES Editor software . For details, see the Operating Instructions of the - Sony CAV-M1000ES | Installation Manual Integrated A/V System - Page 21
remote code that you want to enter is not preset in the SETUP mode. Learning the remote code - CODE LEARNING 1 Press MODE r Note SOURCE or COMMON components, which have been set to learn command codes on PC SETUP, appear with an exclamation mark (!) at the left side of the display window. 4 Press - Sony CAV-M1000ES | Installation Manual Integrated A/V System - Page 22
Setting up the Main Unit Learning the Remote Code for a Connected Component - LEARN Mode ... ... You can add new remote codes using EXPAND CODE. Adding a new remote key - EXPAND CODE 1 Press MODE repeatedly until "Tt" appears in the display window, then press ENTER. "WHICH MENU?" - Sony CAV-M1000ES | Installation Manual Integrated A/V System - Page 23
. Viewing disc information - DISC SEARCH By connecting a Sony DVD Mega Changer to an RS232C jack, or a Sony CD Mega Changer to CONTROL A1II, you can view disc the disc information. "COMPLETED!" appears after the information has been received, and a DVD Mega Changer or a CD Mega Changer turns - Sony CAV-M1000ES | Installation Manual Integrated A/V System - Page 24
CANCEL when you have finished. The display window returns to the NORMAL mode. Note In a zone where SOURCE INPUT OFFSET is ON, the actual volume level is lower than the displayed volume level. Locking the settings - SETUP LOCK You can lock in the settings under which have been entered into the Main - Sony CAV-M1000ES | Installation Manual Integrated A/V System - Page 25
an FM/AM Receiver (STR), a DVD Mega Changer, an RF Remote Control, or the Keypad. 1 Turn off the power. 1 Press and hold ZONE - and CANCEL information of the FM/AM RECEIVER (STR). Y DVD SYS. [X.XX]: displays the version information of the DVD MEGA CHANGER (system control). DVD IF. - Sony CAV-M1000ES | Installation Manual Integrated A/V System - Page 26
. 2 Attach the Keypad mounting bracket to the junction box with the supplied screws at the four points as shown below. Proceed to the steps in "Zone related cables hookups" on page 18 before mounting the Keypad. Note The Keypad mounting bracket may not fit easily over some junction boxes. In this - Sony CAV-M1000ES | Installation Manual Integrated A/V System - Page 27
3 Insert the top of the Keypad onto the mounting bracket first, in the direction of the arrow 1 until it clicks, then push the bottom of the Keypad onto the bracket in the direction of the arrow 2. Removing the Keypad 1 Remove the screws that hold the Keypad and the Keypad mounting bracket. 2 Press - Sony CAV-M1000ES | Installation Manual Integrated A/V System - Page 28
for these hookups are as follows. • A CAT5 cable has been installed for each zone's Keypad. • Two pairs of 12 to 18 AWG speaker cords for each pair of IN jack of the Keypad in each zone. To install two Keypads in the same zone You can install two Keypads in a single room. 1 Set the MODE switch to - Sony CAV-M1000ES | Installation Manual Integrated A/V System - Page 29
You can adjust bass and treble to optimize the acoustic conditions in each zone. 1 Turn off the power. 2 Press and hold MUTING and PAGE simultaneously, and then press POWER. The LCD panel changes to the Bass and Treble setup mode. 3 Press the corresponding SELECTION button to adjust the bass and the - Sony CAV-M1000ES | Installation Manual Integrated A/V System - Page 30
Testing the Components It is recommended that you test all the components before you finish with the installation of the entire system in each zone so as not to encounter any problems after the installation is completed. Check to see if the Main Unit, the installed components, and the Keypad operate - Sony CAV-M1000ES | Installation Manual Integrated A/V System - Page 31
help you understand and maintain your system. Precautions On safety • Should any • The AC power cord must be changed only at a qualified service shop. • The unit is not disconnected from the AC power problems concerning the Main Unit, please consult your nearest Sony dealer. Other Information 31US - Sony CAV-M1000ES | Installation Manual Integrated A/V System - Page 32
this troubleshooting guide to help you to remedy the problem. Should any problem persist, consult your nearest Sony dealer is (are) fully inserted into the jacks on both the receiver and the component. There is no sound, or only a very low SETUP mode and the LEARN mode. Other Information 32US - Sony CAV-M1000ES | Installation Manual Integrated A/V System - Page 33
on the Display window of the Main Unit, check the following table to solve the problem. If any problem persists, consult your nearest Sony dealer. Message Cause Corrective action PROTECTOR ZONE1 Protective device in zone 1 has been activated. Turn off the Main Unit and check the speaker hookup - Sony CAV-M1000ES | Installation Manual Integrated A/V System - Page 34
CAV-M1000ES MHz) General 12V trigger: Power requirements: Power consumption: Dimensions: Mass: 300 mA max each zone, total 1.2 A max 120 V 60 Hz 540 W 430 ✕ 175 ✕ 433 mm ( system: Liquid crystal size: Liquid crystal touch panel 5.2 inches (320 ✕ 240 dots) Touch panel: Resistance sensible system - Sony CAV-M1000ES | Installation Manual Integrated A/V System - Page 35
and concise information about operating the system. PRESET and LEARN Mode Code List Following tables show preset remote control code for each source and common component. You can preset the remote control code using the CAV-M1000ES Editor and the RM-TP100 Editor software on your computer. You can - Sony CAV-M1000ES | Installation Manual Integrated A/V System - Page 36
gray can be preset only by a Sony product. Those codes marked in light gray below can be preset into the Sony products and the products of other Return 27 Code ID #027 Menu Menu 28 Code ID #028 Top menu/Guide Top menu 29 Code ID #028 Display Display 30 Code ID #030 Folder Folder - Sony CAV-M1000ES | Installation Manual Integrated A/V System - Page 37
ID #027 Menu 28 Code ID #028 Top menu/Guide 29 Code ID #028 Display 30 Code ID #030 only with the RF Remote Control Notes • Sony's DVD MEGA and TUNER (STR) are the enter a remote control code for a TUNER (STR), connect its 2ND ROOM output to the source input of the Main Unit. • CD MEGA is - Sony CAV-M1000ES | Installation Manual Integrated A/V System - Page 38
Sony product. Those codes marked in light gray below can be preset into the Sony Cursor left Cursor Enter Return/Exit Menu Top menu/Guide Display - 31 Code ID #031 32 Code ID Execute - Input - - - Input + - - Night - - Multi ch - - Multi ch 2 - - Trg on - - Trg off - - - Sony CAV-M1000ES | Installation Manual Integrated A/V System - Page 39
system on or off 1 Press SYSTEM OFF. "ALL OFF", "MAIN OFF", and "RETURN" appear on the touch panel. 2 Press "ALL OFF" when you want to turn off all zones or down. Doing so may solve the problem. Some kind of trouble has occurred. Contact your nearest Sony dealer. The internal battery is being charged - Sony CAV-M1000ES | Installation Manual Integrated A/V System - Page 40
the muting, press MUTING again or VOLUME +. Appendix IR sensor Receives IR signals from the IR Remote Control for Keypad (supplied). SELECT VOLUME Display window Shows the selected source, zone volume level, zone and system status, and other system status information. SELECT Press to select - Sony CAV-M1000ES | Installation Manual Integrated A/V System - Page 41
the LCD window. The selected source is activated. SELECT ./> X H SLEEP DIMMER TV ?/1 1234 5678 9 0 >10 ENTER SELECT LOCK DISC PAGE SOURCE DOWN UP m/M TOP MENU/ GUIDE MENU MUTING VOLUME DISPLAY RETURN/EXIT TV VOL TV CH FOLDER F1 TV/VIDEO F2 x MUTING VOLUME Appendix 41US - Sony CAV-M1000ES | Installation Manual Integrated A/V System - Page 42
11 H, I Hookup AC power cord Keypad 18, 28 IR emitter 17, 18 Output components RF Antenna 18 Source components Speaker 18, 28 TV monitor 28 Zone related cables 18, 39 18 17 18 IN jack 11 Initializing all the settings 25 INSTALLATION mode 23 Installing Keypad 26 Main Unit 15 RF - Sony CAV-M1000ES | Installation Manual Integrated A/V System - Page 43
10, 12 PC SETUP 20 Planning the system 14 PLAY button 10 SYSTEM OFF switch 9 T, U, V, W, X, Y, Z Testing Components 30 Learned remote code 23 TOP MENU/GUIDE button 12 TO SPEAKERS jack 11, 28 Treble 29 Troubleshooting ZONE VOLUME +/- button 7 ZONE +/- button 7 Numeral 12 V - Sony CAV-M1000ES | Installation Manual Integrated A/V System - Page 44
Información complementaria 44 Sony Corporation Printed in Malaysia
-
 1
1 -
 2
2 -
 3
3 -
 4
4 -
 5
5 -
 6
6 -
 7
7 -
8
-
9
-
10
-
11
-
12
-
13
-
14
-
15
-
16
-
17
-
18
-
19
-
20
-
21
-
22
-
23
-
24
-
25
-
26
-
27
-
28
-
29
-
30
-
31
-
32
-
33
-
34
-
35
-
36
-
37
-
38
-
39
-
40
-
41
-
42
-
43
-
44
 |
 |

4-253-728-
11
(2)
Custom Integrated
AV System
2004 Sony Corporation
CAV-M1000ES
Installation Manual
Owner’s Record
The model and serial numbers are located on the rear panel.
Record the model
and serial numbers in the spaces provided below. Refer to them whenever you
call upon your Sony dealer regarding this product.
Model No.
Serial No.