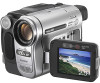
Sony CCD-TRV238E User Manual
Sony CCD-TRV238E Manual
 |
View all Sony CCD-TRV238E manuals
Add to My Manuals
Save this manual to your list of manuals |
Sony CCD-TRV238E manual content summary:
- Sony CCD-TRV238E | User Manual - Page 1
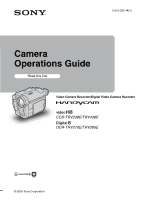
2-515-260-14(1) Camera Operations Guide Read this first Video Camera Recorder/Digital Video Camera Recorder CCD-TRV238E/TRV438E DCR-TRV270E/TRV285E © 2005 Sony Corporation - Sony CCD-TRV238E | User Manual - Page 2
disposed of correctly, you will help prevent potential negative consequences for the service or the shop where you purchased the product. Applicable Accessories: Remote Commander. Notes on use Note on a cassette tape You can use standard 8 mm and Hi8 , Digital8 video cassettes on your camcorder - Sony CCD-TRV238E | User Manual - Page 3
camcorder. Notes on using this manual • The images of the LCD screen and the viewfinder used on this manual are captured using a digital still camera, and thus may appear different from what you see. • In this instruction manual, each model is indicated as follows. CCD-TRV238E: TRV238E CCD - Sony CCD-TRV238E | User Manual - Page 4
of Contents CCD-TRV238E: CCD-TRV438E: TRV238E DCR-TRV270E: TRV270E TRV438E DCR-TRV285E: TRV285E Read this first 2 Quick Start Guide Recording movies 8 Recording/Playing back with ease 10 Getting started Step 1: Checking supplied items 11 Step 2: Charging the battery pack 12 Using an outside - Sony CCD-TRV238E | User Manual - Page 5
recorded on a tape 33 Playing back in various modes 34 Playing back with ease - Easy Handycam 35 Various playback functions 36 Displaying the screen indicators 36 Displaying the date/time and camera settings data - Data code ( TRV270E/285E 36 Playing the picture on a TV 38 Locating a scene - Sony CCD-TRV238E | User Manual - Page 6
" battery pack 96 About i.LINK 97 Maintenance and precautions 98 Specification 101 Quick Reference Identifying parts and controls ...........104 Index 111 For TRV270E/285E: Two operating instructions are supplied with your camcorder: • Camera Operations Guide (This manual) • "First Step Guide - Sony CCD-TRV238E | User Manual - Page 7
7 - Sony CCD-TRV238E | User Manual - Page 8
Start Guide Recording movies 1 Attach the charged battery pack to the camcorder. To charge the battery, see page 12. a Lift up the viewfinder. b Slide the battery pack in the direction of the arrow until it clicks. 2 Insert a cassette into the camcorder. a Slide the OPEN/ b Insert the cassette - Sony CCD-TRV238E | User Manual - Page 9
your camcorder (p. 104). b Press OPEN and open the LCD panel. c While pressing the green button, slide the POWER switch down to light up the CAMERA lamp . The power turns on. d Press REC START/STOP. Recording starts. To change to standby mode, press REC START/STOP again. You can also use - Sony CCD-TRV238E | User Manual - Page 10
for even first time users by providing only the basic functions for recording/playback. Press EASY when recording/ playing back. EASY lights up in blue (1) and screen font size increases (2) during Easy Handycam operation. Easy Handycam operation ON For details, see instructions for each operation - Sony CCD-TRV238E | User Manual - Page 11
lead (1) USB cable (1) ( TRV270E/285E) Lens cap (1) See page 104 on how to attach the lens cap. Shoulder strap (1) See page 107 on how to attach the shoulder strap. Rechargeable battery pack NP-FM30 (1) CD-ROM "Picture Package Ver.1.5" (1) ( TRV270E/285E) Camera Operations Guide (This manual - Sony CCD-TRV238E | User Manual - Page 12
pack You can charge the battery by attaching the "InfoLITHIUM" battery pack (M series) to your camcorder. b Notes • You cannot use batteries other than the "InfoLITHIUM" battery pack (M series) (p. 96). • Do not short-circuit the DC plug of the AC Adaptor or battery terminals with any metallic - Sony CCD-TRV238E | User Manual - Page 13
of the arrow while pressing the BATT (battery) release button down. b Note • If you do not use the battery pack for a long time, use up the battery pack completely before storing it. See page 96 about storage of the battery pack. BATTERY INFO BATTERY CHARGE LEVEL 0% 50% 100% REC TIME AVAILABLE - Sony CCD-TRV238E | User Manual - Page 14
-QM91D 360 Recording time when recording with the LCD screen on Approximate number of minutes available when you use a fully charged battery pack at 25°C (77°F). For TRV238E/438E: Battery pack Continuous Typical* recording recording time time NP-FM30 115 55 (supplied) NP-FM50 185 90 NP - Sony CCD-TRV238E | User Manual - Page 15
AC Adaptor as the power source when you do not want the battery to run out. While you are using the AC Adaptor, the battery pack will not lose its charge even when it is attached to your camcorder. PRECAUTION Even if your camcorder is turned off, AC power (mains) is still supplied to it - Sony CCD-TRV238E | User Manual - Page 16
the LCD screen facing out. • If you are using the battery pack for power source, you can adjust the brightness Use the viewfinder when the battery is running out, or when the screen is hard to see. Press OPEN and open the LCD panel. SEL/PUSH EXEC dial Open the LCD panel 90 degrees to the camcorder - Sony CCD-TRV238E | User Manual - Page 17
on your camcorder. b Note • If you do not use your camcorder for about 3 months, the built-in rechargeable battery gets discharged and MANUAL SET PROGRAM AE P EFFECT AUTO SHTR STBY [MENU] : END 4 Turn the SEL/PUSH EXEC dial to select (SETUP MENU), then press the dial. SETUP MENU CLOCK SET USB - Sony CCD-TRV238E | User Manual - Page 18
indicator. To hide the date and/or time indicator, press DATE and/or TIME again. Step 6: Inserting a cassette tape You can use standard 8 mm and Hi8 , Digital8 video cassettes on your camcorder. For details on these cassettes (such as writeprotection), see page 95. b Notes • Do not force the - Sony CCD-TRV238E | User Manual - Page 19
automatically comes out. 2 Take out the cassette, then press . The cassette compartment automatically slides back in. 3 Close the lid. OPEN SEL/PUSH EXEC dial POWER switch 1 Turn on your camcorder. 2 Press OPEN to open the LCD panel. 3 Press MENU. MANUAL SET PROGRAM AE P EFFECT AUTO SHTR - Sony CCD-TRV238E | User Manual - Page 20
to select [ LANGUAGE], then press the dial. SETUP MENU STBY CLOCK SET USB STREAM DEUTSCH LTR SIZE LANGUAGE ENGL I SH DEMO MODE ENG [ S I MP , then press the dial. 7 Press MENU. z Tip • Your camcorder offers [ENG [SIMP]] (simplified English) for when you cannot find your native tongue among - Sony CCD-TRV238E | User Manual - Page 21
Slide the POWER switch up to (CHG) OFF. z Tip • If you do not use your camcorder for a long time, remove the cassette and store it. Indicators displayed during recording The indicators will not be recorded on the tape. For TRV238E/438E: 1 23 4 60min SP REC 0:00:00 6 5 ,continued Recording 21 - Sony CCD-TRV238E | User Manual - Page 22
when you set the POWER switch to CAMERA and insert a cassette. F Hi8 format ( TRV238E/438E) This appears while recording Hi8 format tapes. G Time code/Tape counter (hour: minute: second)/Tape photo recording ( TRV270E/285E) b Notes • Before changing the battery pack, slide the POWER switch up to - Sony CCD-TRV238E | User Manual - Page 23
zoom buttons on LCD frame, support the LCD panel with your hand. Using the built-in light 1 cm (approx. 1/2 inch)* 80 cm (approx. 2 5/8 feet)* You can use the built-in light to suit your shooting situation. The recommended distance between the subject and camcorder is about 1.5 m (5 feet). Built - Sony CCD-TRV238E | User Manual - Page 24
you do not use your camcorder, turn the built- in light off and remove the battery pack to properly. Recording in mirror mode b Notes For TRV238E/438E: • appears in the viewfinder and on camcorder while you record them. DATE TIME CCD-TRV438E Open the LCD panel 90 degrees to the camcorder - Sony CCD-TRV238E | User Manual - Page 25
can record still images. Before recording, follow steps 1 to 7 in "Getting started" (p. 11 - p. 19). OPEN PHOTO 3 Slide the POWER switch to select the CAMERA mode. Slide the POWER switch while pressing the green button. 4 Press and hold PHOTO lightly. You will hear a small beep sound, and the - Sony CCD-TRV238E | User Manual - Page 26
• You cannot switch from/to Easy Handycam operation during recording. • For TRV270E/285E: During Easy Handycam operation, you cannot connect the USB cable to your camcorder. • For TRV270E/285E: You cannot use Easy Handycam operation together with USB Streaming. • All the settings return to their - Sony CCD-TRV238E | User Manual - Page 27
, you can avoid backlight shadows on people next to the window by manually fixing the exposure to that of the wall side of the room. When to prevent the subject from becoming shadowed. BACK LIGHT Press BACK LIGHT in CAMERA mode. . appears. To cancel the back light function, press BACK LIGHT - Sony CCD-TRV238E | User Manual - Page 28
NightShot plus function in bright places. This may cause a malfunction. • You cannot use the NightShot plus function together with: - [PROGRAM AE] - Manual exposure • Adjust the focus manually when it is hard to focus automatically. • Do not cover the infrared port with your fingers or other objects - Sony CCD-TRV238E | User Manual - Page 29
a subject in the background. Tips for focusing manually • It is easier to focus on the subject when you use the zoom function. Move the power zoom lever . - To record a stationary subject using a tripod. Recording FOCUS SEL/PUSH EXEC dial 1 Press FOCUS in CAMERA mode. 9 appears. 2 Turn the - Sony CCD-TRV238E | User Manual - Page 30
Recording a picture using various effects [STRIPE FADER] This feature is for TRV238E/438E only. FADER REC START/ gradually changes from color to black-and-white. 1 Slide the POWER switch to select the CAMERA mode. 2 Press FADER until the desired fader indicator flashes in the standby mode (to fade - Sony CCD-TRV238E | User Manual - Page 31
CAMERA mode, then press TITLE. Select a desired title from the displayed titles (2 original titles that you have created before and the preset titles that have been stored in your camcorder to select the title you want to insert, then press the dial. To insert an original title, turn the SEL/ PUSH - Sony CCD-TRV238E | User Manual - Page 32
not sound. • When you are using your camcorder on the battery pack and do not operate it 1 to continue superimposing the title. • For TRV238E/438E: The date and time, or either cassette after you have recorded on the tape. END SEARCH POWER switch 1 Slide the POWER switch to select the CAMERA - Sony CCD-TRV238E | User Manual - Page 33
a recorded cassette inserted into your camcorder. When you want to play back the recorded picture on your TV, see page 38. For TRV238E/438E/ TRV285E: You can control playback using the Remote Commander. OPEN POWER switch z Tip • Performing Easy Handycam operation, even first time users can play - Sony CCD-TRV238E | User Manual - Page 34
( TRV238E/438E) E Hi8 format ( TRV238E/438E) This appears while playing back Hi8 format tapes. F Time code (hour: minute: second: frame) or tape counter (hour: minute: second) ( TRV270E/285E) b Note • For TRV270E/285E: If you use a standard 8 mm tape, be sure to play back the tape on your camcorder - Sony CCD-TRV238E | User Manual - Page 35
For TRV238E/438E/ TRV285E: You can operate those operations and SLOW y on the Remote Commander. To cancel Easy Handycam operation Press EASY again. b Notes For TRV270E/285E: • During Easy Handycam operation, you cannot connect the USB cable to your camcorder. • You cannot use Easy Handycam operation - Sony CCD-TRV238E | User Manual - Page 36
appear/disappear as you press the button. z Tips • For TRV238E/438E/ TRV285E: You can display the screen indicators by pressing DISPLAY , [DISPLAY], then [V-OUT/LCD] (p. 59). Displaying the date/time and camera settings data - Data code ( TRV270E/285E) During playback, you can view the - Sony CCD-TRV238E | User Manual - Page 37
settings data Follow steps 2 to 4, and select [OFF] in step 5. Camera settings data display In the date/time data display, the date and time is displayed in the same area. If you record the picture without - Sony CCD-TRV238E | User Manual - Page 38
the picture on a TV For TRV238E/438E: Connect your camcorder to a TV using the supplied A/V connecting cable as shown in the following illustration. Connect the supplied AC Adaptor to the wall socket for the power supply (p. 12). Refer also to the instruction manuals supplied with the devices to be - Sony CCD-TRV238E | User Manual - Page 39
you want to play the sound in monaural mode, use a connecting cable (optional) for that purpose. If your TV/VCR has a 21-pin connector (EUROCONNECTOR) To play back movies, connect your camcorder to the TV/VCR, using the 21-pin adaptor (optional). For TRV238E/438E: For TRV270E/285E: TV/VCR TV/VCR - Sony CCD-TRV238E | User Manual - Page 40
for and displayed. To cancel the operation Press STOP on the Remote Commander. b Notes • If one day's recording is less than 2 minutes, your camcorder may not accurately find the point where the recording date changes. • The Date search will not function correctly when there is a blank section - Sony CCD-TRV238E | User Manual - Page 41
Playing back still images in sequence - Photo scan You can also locate still images one after another and display each image for 5 seconds automatically. SEARCH M. . / > STOP 1 Slide the POWER switch repeatedly to select the PLAY/EDIT mode. 2 Press SEARCH M. on the Remote Commander repeatedly to - Sony CCD-TRV238E | User Manual - Page 42
Customizing Your Camcorder Changing the menu settings You can change various settings or make detailed adjustments using the menu dial to select the desired menu, then press the dial. MANUAL SET (p. 43) CAMERA SET (p. 46) PLAYER SET (p. 50) ( TRV238E/438E/ TRV270E) VCR SET (p. 50) ( TRV285E) LCD - Sony CCD-TRV238E | User Manual - Page 43
Using the (MANUAL SET) menu - PROGRAM AE/P EFFECT, etc. You can select items listed below in the MANUAL SET menu. To select these items, see "Changing the menu settings" (p. 42). The default settings are marked with G. The settings you can adjust vary depending on the power mode of your camcorder. - Sony CCD-TRV238E | User Manual - Page 44
camcorder is adjusted to focus only on distant subjects. b Note • When you set the NIGHTSHOT PLUS switch to ON, [PROGRAM AE] does not work. For TRV238E/ appears when each effect is selected. GOFF NEG.ART Select when not using the Picture effect setting. Select to record/play the picture with the - Sony CCD-TRV238E | User Manual - Page 45
edited using picture effects to another tape (p. 62). AUTO SHTR GON OFF Select to automatically activate the electronic shutter to adjust the shutter speed when recording in bright conditions. Select when recording without using the electronic shutter. Customizing Your Camcorder Customizing - Sony CCD-TRV238E | User Manual - Page 46
Using the (CAMERA SET) menu - 16:9 WIDE/STEADYSHOT, etc. You can select items listed below in the CAMERA SET menu. To select these items, see "Changing the menu settings" (p. 42). The default settings are marked with G. The settings you can adjust vary depending on the power mode of your camcorder. - Sony CCD-TRV238E | User Manual - Page 47
:9 FULL] mode) to watch on the 16:9 wide-screen TV. Refer also to the manuals supplied with your TV. In [CINEMA] mode When viewed on the LCD screen/viewfinder When viewed on a 16:9 wide screen TV* Customizing Your Camcorder When viewed on a standard TV** In [16:9 FULL] mode When viewed on the - Sony CCD-TRV238E | User Manual - Page 48
or time indicator will be widened on wide- screen TVs. • For TRV438E: The SteadyShot does not work. If you set [16:9 FULL] in watch on a 16:9 wide-screen TV ([16:9 WIDE] mode). Refer also to the manuals supplied with your TV. When viewed on the LCD screen When viewed on a 16:9 Your Camcorder - Sony CCD-TRV238E | User Manual - Page 49
to deactivate the SteadyShot function. Select to shoot a stationary subject with a tripod, or when using a conversion lens (optional). Natural pictures are produced. b Note • For TRV270E/285E: Camera-shake cannot be completely compensated for in the following cases: - When recording in a dark - Sony CCD-TRV238E | User Manual - Page 50
cassette on this camcorder. However, you cannot record a dual sound track on this camcorder. • The setting returns to [STEREO] when you disconnect the power source from your camcorder for more than 5 minutes. EDIT For TRV238E/438E: Picture degradation is minimized when you dub or edit a tape using - Sony CCD-TRV238E | User Manual - Page 51
tape on which you have dubbed repeatedly or recorded TV game signals. DNR For GON OFF TRV238E/438E: Select to eliminate color noise in the picture. Select to minimize picture artifacts in be heard when you disconnect the power source from your camcorder for more than 5 minutes. Customizing Your - Sony CCD-TRV238E | User Manual - Page 52
Standard brightness. BRIGHT Select to brighten the LCD screen. b Notes • When you connect your camcorder to outside power sources, [BRIGHT] is automatically selected for the setting. • When you select [BRIGHT], battery life is reduced by about 10 percent during recording. LCD COLOR Turn the SEL - Sony CCD-TRV238E | User Manual - Page 53
to increase the recording time from that of the SP mode (2 times longer for TRV238E/438E, 1.5 times longer for TRV270E/ 285E) (Long Play). The use of Sony cassettes is recommended to get the most out of your camcorder. b Notes • If you record in the LP mode, a mosaic-like noise may appear or - Sony CCD-TRV238E | User Manual - Page 54
• For about 8 seconds after you turn on your camcorder with the cassette inserted, and your camcorder calculates the remaining amount of tape. • For about 8 subject a little. For TRV285E: Operate your camcorder using the Remote Commander to prevent camera shake. GOFF ON Select to record in the - Sony CCD-TRV238E | User Manual - Page 55
of flowers blooming, etc., with this function. Connect your camcorder to the wall socket using the supplied AC Adaptor during the operation. [a] [a] 5 frames from the selected time. z Tips • If you adjust the focus manually, you may be able to record clear pictures even if the light changes (p. - Sony CCD-TRV238E | User Manual - Page 56
it back to [ON] in the menu settings. USB STREAM For TRV270E/285E: You can connect a USB cable (supplied) to your camcorder, and view the picture displayed on the screen of your camcorder on your computer (USB Streaming). For details, refer to "First Step Guide" in the supplied CD-ROM. GOFF ON - Sony CCD-TRV238E | User Manual - Page 57
will be suspended in situations such as those described below. - When a cassette is inserted. - When a mode other than CAMERA is selected. • If [A.SHUT OFF] is set to [5 min] when the camcorder is used on the battery pack, the power will be turned off after approximately 5 minutes (p. 58 - Sony CCD-TRV238E | User Manual - Page 58
Select to display the camera setting data during playback. (p. 36) WORLD TIME You can adjust the time difference when using your camcorder abroad. Set the time while you do not operate your camcorder, the camcorder is automatically turned off to prevent the battery from becoming consumed. Select to - Sony CCD-TRV238E | User Manual - Page 59
TRV238E/438E/ TRV285E: Select when using the Remote Commander supplied with your camcorder. Select to deactivate the Remote Commander to prevent your camcorder camera recording lamp on the front of your camcorder during recording. Select this setting in the following recording situations. The camera - Sony CCD-TRV238E | User Manual - Page 60
the picture recorded on your camcorder on other recording devices (p. 62). For TRV285E, you can also record the picture from a VCR to a tape on your camcorder (p. 67). Connect your camcorder to a VCR as shown in the following illustration. A/V connecting cable (supplied) Signal flow Yellow Black - Sony CCD-TRV238E | User Manual - Page 61
(p. 59). • For TRV238E/438E: When you are connecting your camcorder to a stereo device, connect the audio plug of the A/V connecting cable to the left (white the VCR. To use an i.LINK cable for connection For TRV270E/285E: Use an i.LINK cable (optional) to connect your camcorder to other device - Sony CCD-TRV238E | User Manual - Page 62
set it to the input mode. 3 Prepare your camcorder for playback. • Insert the recorded cassette. • Slide the POWER switch to select the PLAY/EDIT mode. 4 Start the playback on your camcorder, and record it on the VCR. Refer to the operating instructions supplied with your VCR for details. 5 When the - Sony CCD-TRV238E | User Manual - Page 63
VCR that does not support [IR SETUP] codes. 1 Connect your VCR to your camcorder as a recording device (p. 60). 2 Prepare your VCR for recording. • Insert a cassette for recording. • Set to the operating instructions supplied with your VCR for details on operation. ,continued Dubbing/Editing 63 - Sony CCD-TRV238E | User Manual - Page 64
the dial. [IR SETUP] code list The following [IR SETUP] codes are recorded on your camcorder by default. (It is set at "3" as the default setting.) Manufacturing company [IR SETUP] code Sony Aiwa Akai Alba Amstrad Baird Blaupunkt Bush CGM Clatronic Daewoo Ferguson Fisher Funai Goldstar Goodmans - Sony CCD-TRV238E | User Manual - Page 65
89 10, 36 26 91, 92 76, 100 36, 47 40, 93 47, 70, 84, 92 47 58, 83 Step 2: Selecting the title You can insert a title. You can select one of the 8 preset titles and the 2 custom titles. See steps 1 to 4 on page 31 to create original titles. 1 Turn the - Sony CCD-TRV238E | User Manual - Page 66
Engage rec pause. [EASY DUB]:END NORMAL 2 Turn the SEL/PUSH EXEC dial to select [EXECUTE], then press the dial. When dubbing ends, your camcorder and VCR stop automatically. Then the display returns to the Easy Dubbing initial screen. To stop dubbing during editing Press (stop) on your - Sony CCD-TRV238E | User Manual - Page 67
a VCR ( TRV285E) You can record and edit pictures from a VCR on a tape inserted in your camcorder. Insert a cassette for recording in your camcorder. 1 Connect your VCR to your camcorder (p. 61). Use an i.LINK cable (optional) for connection. 2 Slide the POWER switch repeatedly to select the PLAY - Sony CCD-TRV238E | User Manual - Page 68
VCR has one. 3 Prepare your camcorder (playing device). • Insert a cassette for editing. • Slide the POWER dial. When connecting with an i.LINK cable After selecting [i.LINK], go on to "Step 2: Adjusting the instructions supplied with your VCR for details on operation. 68 Dubbing/Editing - Sony CCD-TRV238E | User Manual - Page 69
. You can skip this setting if you have set up your VCR before using the following procedure. You can adjust the synchronization of your camcorder and the VCR to avoid not recording the starting scene. 1 Remove the cassette from your camcorder. Prepare a pen and paper to take notes. 2 Set the VCR to - Sony CCD-TRV238E | User Manual - Page 70
to a tape in a VCR, go through the procedures described in Steps 1 and 2 (p. 67 to p. 69) beforehand. 1 Prepare a cassette. Insert a tape to be played back into the camcorder. Insert a cassette for recording into your VCR. 2 Press MENU. 3 Turn the SEL/PUSH EXEC dial to select (OTHERS), then press - Sony CCD-TRV238E | User Manual - Page 71
VCR to the recording pause. Skip this step if your camcorder is connected via an i.LINK cable. 11Turn the SEL/PUSH EXEC dial to select [START], then To save a program without using it to record Press MENU in step 11. The program is stored in memory until the cassette is ejected. To erase programs - Sony CCD-TRV238E | User Manual - Page 72
. Software and features available for Macintosh computers differ from those available for Windows computers. For details, refer to chapter 6 of "First Step Guide" on CD-ROM. For "First Step Guide," see the next section. z Tip • There are 2 ways to connect your camcorder to a computer. - USB cable - Sony CCD-TRV238E | User Manual - Page 73
users b Note • When you connect your camcorder to a Macintosh computer using a USB cable, you cannot copy pictures recorded on a tape to the computer. To copy recordings from a tape, connect your camcorder to the computer with an i.LINK cable and use the standard software in the OS. When using - Sony CCD-TRV238E | User Manual - Page 74
later (QuickTime 5 recommended) • Other: Disc drive Installing the software and "First Step Guide" on a computer ( TRV270E/285E) You need to install the software etc., with the supplied CD-ROM on your computer before connecting your camcorder and your computer. Once you install it, the installation - Sony CCD-TRV238E | User Manual - Page 75
, a message appears notifying you that "First Step Guide" cannot be installed automatically with the InstallShield Wizard. In such a case, manually copy "First Step Guide" to your computer according to the message instructions. Using with your computer ,continued Using with your computer 75 - Sony CCD-TRV238E | User Manual - Page 76
displayed. In such a case, skip to step 12. 2 Click [Next]. 11Click [Next] to install the "First Step Guide." 3 Click [Finish]. 12Click [Next], then follow the on-screen instructions to install ImageMixer VCD2. 14Make sure [Yes, I want to restart my computer now.] is checked, then click [Finish - Sony CCD-TRV238E | User Manual - Page 77
the unzipped [ImageMixerVCD2_Install]. 9 When the user acceptance screen is displayed, enter your name and password. The installation of ImageMixer VCD2 starts. For details on how to use ImageMixer VCD2, refer to the software's on-line help. 1 Confirm that your camcorder is not connected to the - Sony CCD-TRV238E | User Manual - Page 78
Guide]. Starting up on a Macintosh computer Double-click "FirstStepGuide.pdf." z Tip • To view the PDF, Adobe Reader is needed. If it is not installed on your computer, you can download it from the Adobe Systems web page: http://www.adobe.com/ For inquires about this software Pixela User Support - Sony CCD-TRV238E | User Manual - Page 79
BURN DVD/VCD b Note • You can only use an i.LINK cable for this operation. You cannot use a USB cable. You can create DVDs when you connect your camcorder to a Sony VAIO series computer* that supports "Click to DVD" via an i.LINK cable (optional). The picture is automatically copied and written - Sony CCD-TRV238E | User Manual - Page 80
switch repeatedly to select the PLAY/ EDIT mode. Use the supplied AC Adaptor as the power source since it takes a few hours to create a DVD. 3 Insert a recorded cassette into your camcorder. 4 Connect your camcorder to a computer via an i.LINK cable (optional). b Note • When you connect your - Sony CCD-TRV238E | User Manual - Page 81
in a format other than Digital8 format. Using with your computer To cancel the operation Press BURN DVD/VCD. b Notes • You cannot cancel the operation after [Finalizing DVD.] is displayed on the LCD screen of your camcorder. • Do not disconnect the i.LINK cable or set the POWER switch to another - Sony CCD-TRV238E | User Manual - Page 82
If you run into any problem using your camcorder, use the following table to troubleshoot the problem. If the problem Overall operations persists, remove the power source and contact your Sony dealer. If "C:ss:ss" is displayed on the LCD screen or the viewfinder, the self-diagnosis display - Sony CCD-TRV238E | User Manual - Page 83
to turn the power on again. (p. 15) Or use the AC adaptor. A problem occurs when the camcorder is connected to the AC Adaptor. cTurn off the power, and disconnect the AC Adaptor from the wall socket. Then, connect it again. Cassette tapes Troubleshooting Symptom Cause and/or Corrective Actions - Sony CCD-TRV238E | User Manual - Page 84
your camcorder, the camcorder is automatically turned off. Slide the POWER switch down to turn the power on again (p. 15). Or use the AC Adaptor. • The battery pack is discharged. (p. 12) For TRV438E/ TRV270E/ 285E: The SteadyShot does not function. cSet [STEADYSHOT] to [ON] in the (CAMERA SET - Sony CCD-TRV238E | User Manual - Page 85
problem persists, contact your Sony dealer or local authorized Sony service facility. Playback Troubleshooting TRV238E/438E, or the red and white plugs for TRV270E/285E of the A/V connecting cable are connected as well. (p. 38) The sound breaks off. cClean the head using the cleaning cassette - Sony CCD-TRV238E | User Manual - Page 86
) menu. (p. 59) • The input signal is not PAL. (p. 67) cSet the input selector on the VCR correctly, then check the connection between your camcorder and the VCR. (p. 60) cWhen your camcorder is connected to a DV device that is not a Sony product via an i.LINK cable, select [IR] in step 9 of "Step - Sony CCD-TRV238E | User Manual - Page 87
your camcorder to a Macintosh computer using a USB cable, you cannot copy pictures recorded on a tape to the computer. To copy recordings from a tape, connect your camcorder to the computer with an i.LINK cable and use the standard software in the OS. Troubleshooting ,continued Troubleshooting 87 - Sony CCD-TRV238E | User Manual - Page 88
appear on the screen of the Windows computer when using the USB cable. Cause and/or Corrective Actions cThe USB driver has been registered incorrectly as the computer was connected to your camcorder before the installation of the USB driver was completed. Follow the procedure below to install the - Sony CCD-TRV238E | User Manual - Page 89
/285E: The image does not appear on the screen of the Windows computer when using the USB cable. Cause and/or Corrective Actions For Windows 2000 Log on as Administrators. 1 Check that your camcorder is connected to a computer. 2 Right-click [My Computer], then click [Properties]. The [System - Sony CCD-TRV238E | User Manual - Page 90
TRV270E/285E: The image does not appear on the screen of the Windows computer when using the USB cable. For TRV270E/285E: [Cannot start Easy Handycam with USB connected] appears on the screen of your camcorder. Cause and/or Corrective Actions For Windows XP Log on as Administrators. 1 Check that - Sony CCD-TRV238E | User Manual - Page 91
when the camcorder is connected to the Windows computer via a USB cable. cChange the settings for your computer environment as described in the following procedures: 1 Select [Start], [Programs] ([All Programs] for Windows XP), [Picture Package], [Handycam Tools], and [USB Streaming Tool], then - Sony CCD-TRV238E | User Manual - Page 92
authorized Sony service facility. C:04:ss cA battery pack that is not an "InfoLITHIUM" battery pack is being used. Use an "InfoLITHIUM" battery pack. (p. 96) C:21:ss cMoisture condensation has occurred. Remove the cassette and leave your camcorder for at least 1 hour, then re-insert the cassette - Sony CCD-TRV238E | User Manual - Page 93
is low. cCharge the battery. (p. 12) Old battery. Use a new one. Z Re-attach the power source. cSee page 96. - % Z Moisture condensation. Eject the cassette cSee page 99. % Moisture condensation. Turn off for 1H. cSee page 99. Q Insert a cassette. Z Reinsert the cassette. Q Z The tape is - Sony CCD-TRV238E | User Manual - Page 94
/60 Hz. On TV color systems Your camcorder is a PAL system-based camcorder. If you want to view the playback picture on a TV, it must be a PAL system-based TV (see following list) with the AUDIO/ VIDEO input jack. System Used in PAL PAL - M PAL - N SECAM NTSC Australia, Austria, Belgium, China - Sony CCD-TRV238E | User Manual - Page 95
When you play back If the cassette you play back on your camcorder contains copyright signals, you cannot copy it to a tape in another video camera connected to your camcorder. For TRV285E: When you record You cannot record software on your camcorder that contains copyright control signals for - Sony CCD-TRV238E | User Manual - Page 96
not be able to charge it efficiently. • After charging is complete, either disconnect the cable from the DC IN jack on your camcorder or remove the battery pack. To use the battery pack effectively • Battery pack performance decreases when the surrounding temperature is 10°C (50°F) or below, and - Sony CCD-TRV238E | User Manual - Page 97
camcorder in tape recording standby until the power goes off. About battery life • The battery life is limited. Battery capacity drops little by little as you use it more and more, and as time passes. When the available battery time is shortened considerably, a probable cause is that the battery - Sony CCD-TRV238E | User Manual - Page 98
is compatible with DV device or not. For details on precautions and compatible application software, refer also to the operating instructions for the device to be connected. About the required i.LINK cable Use the Sony i.LINK 4-pin-to-4-pin cable (during DV dubbing). i.LINK and are trademarks of - Sony CCD-TRV238E | User Manual - Page 99
cannot obtain a clear image even after using a cleaning cassette, it might be because the video head is worn. Please contact your Sony dealer or local authorized Sony service facility to have the video head replaced. • For TRV238E/438E: If the following problem occurs, clean the video heads for 10 - Sony CCD-TRV238E | User Manual - Page 100
Use a cleaning cassette.] appears on the screen during recording. • For TRV270E/285E: If the following problem occurs, clean the video heads for 10 seconds with the Sony V8-25CLD cleaning cassette pre-installed rechargeable battery Your camcorder has a pre-installed rechargeable battery to retain the - Sony CCD-TRV238E | User Manual - Page 101
PAL color, CCIR standards Usable cassette 8 mm video format cassette Tape speed For TRV238E/438E using 90 min. Hi8/ Digital8 video cassette) Approx. 5 min Viewfinder Electric viewfinder (monochrome) Image device For TRV238E/438E: 3.0 mm (1/6 type) CCD 4-pin connector, S100 USB jack For TRV270E/285E: - Sony CCD-TRV238E | User Manual - Page 102
d) Mass (Approx.) 780 g (1 lb 11 oz) main unit only 890 g (1 lb 15 oz) including the NP-FM30 rechargeable battery pack, Hi8/ Digital8 cassette, lens cap, and shoulder strap Supplied accessories See page 11. AC Adaptor AC-L15A/L15B Power requirements AC 100 - 240 V, 50/60 Hz Current consumption 0.35 - Sony CCD-TRV238E | User Manual - Page 103
Recording system Playback system Audio recording AUDIO/VIDEO jack DV Interface USB jack SteadyShot Remote sensor z Provided - Not provided CCD- TRV238E TRV438E Hi8 Hi8 Hi8/8 Hi8/8 Monaural Monaural OUT OUT - - - - - z z z TRV270E Digital8 Digital8 Stereo OUT OUT z z - DCRTRV285E - Sony CCD-TRV238E | User Manual - Page 104
SEARCH button (p. 32) H Speaker I Viewfinder (p. 2, 16) If you attach the large capacity battery pack NP-QM71D/QM91D (optional) to the camcorder, extend and lift up the viewfinder and adjust its angle. J Battery pack K LIGHT button (p. 23) L FADER button (p. 30) M BACK LIGHT button (p. 27) N FOCUS - Sony CCD-TRV238E | User Manual - Page 105
(p. 23) B Lens C Infrared ray emitter (p. 63, 68)/ For TRV238E/438E/ TRV285E: Remote sensor D Camera recording lamp (p. 21, 26) E Microphone F NIGHTSHOT PLUS switch (p. OUT Interface (p. 61) D For TRV270E/285E: (USB) jack E For TRV238E/438E: A/V OUT jack (p. 38, 60) ,continued Quick Reference 105 - Sony CCD-TRV238E | User Manual - Page 106
VCD, see "First Step Guide" in the supplied CD-ROM. For TRV238E/438E: EASY DUB (Easy Dubbing CAMERA mode lamp (p. 15) I PLAY/EDIT mode lamp (p. 15) J For TRV285E: Rec buttons (p. 67) REC (rec) K For TRV238E/438E: COUNTER RESET button (p. 21) L For TRV238E/438E: TIME button (p. 18, 24) M For TRV238E - Sony CCD-TRV238E | User Manual - Page 107
Eyecup C Cassette lid D OPEN/EJECT lever (p. 18) E Tripod receptacle Make sure that the length of the tripod screw is less than 5.5 mm (7/32 inch). Otherwise, you cannot attach the tripod securely, and the screw may damage your camcorder. Quick Reference A Power zoom lever (p. 23) B BATT (battery - Sony CCD-TRV238E | User Manual - Page 108
TRV238E/438E: To remove the insulation sheet Insulation sheet For TRV285E: To change the button-type battery 1 While pressing on the tab, inset your fingernail into the slit to pull out the battery case. Tab 2 Remove the button-type lithium battery. A Transmitter After turning on your camcorder - Sony CCD-TRV238E | User Manual - Page 109
or equivalent type recommended by the manufacturer. Discard used batteries according to the manufacturer's instructions. b Notes on the Remote Commander • A button-type lithium battery (CR2025) is used in the Remote Commander. Do not use batteries other than CR2025. • Point the remote sensor away - Sony CCD-TRV238E | User Manual - Page 110
vary depending on your camcorder model. Example: Indicators in the CAMERA mode Time code (p. 21)/Tape counter (p. 21)/Selfdiagnosis (p. 92)/Tape photo recording (p. 25) 60min STBY 0:00:00 Indicators Q E Z 9 . () Meanings Warning (p. 92) Manual exposure (p. 27) Manual focus (p. 29) Back light - Sony CCD-TRV238E | User Manual - Page 111
Guide........... 73, 74 Focus 29 Frame recording (FRAME REC 54 Full charge 12 G Grip belt 3 H Hi8/standard 8 mm system 95 HiFi SOUND 50 I i.LINK 97 i.LINK cable ... 61, 67, 72, 79 ImageMixer VCD2 74 "InfoLITHIUM" battery Menu 42 CAMERA SET........... 46 LCD SET 52 MANUAL SET .......... 43 - Sony CCD-TRV238E | User Manual - Page 112
O On-line help 77, 78 Operation confirmation beep See BEEP ORC 53 P PAL 94 Photo scan 41 Photo search 40 Picture Zoom Time code 21 Title 31 TV color systems 94 U USB cable 72 USB jack 105 USB Streaming (USB STREAM) .........56 Using abroad 94 V Video head 99 Viewfinder 16 Volume 33 W - Sony CCD-TRV238E | User Manual - Page 113
- Sony CCD-TRV238E | User Manual - Page 114
- Sony CCD-TRV238E | User Manual - Page 115
- Sony CCD-TRV238E | User Manual - Page 116
Printed in Japan
-
 1
1 -
 2
2 -
 3
3 -
 4
4 -
 5
5 -
 6
6 -
 7
7 -
8
-
9
-
10
-
11
-
12
-
13
-
14
-
15
-
16
-
17
-
18
-
19
-
20
-
21
-
22
-
23
-
24
-
25
-
26
-
27
-
28
-
29
-
30
-
31
-
32
-
33
-
34
-
35
-
36
-
37
-
38
-
39
-
40
-
41
-
42
-
43
-
44
-
45
-
46
-
47
-
48
-
49
-
50
-
51
-
52
-
53
-
54
-
55
-
56
-
57
-
58
-
59
-
60
-
61
-
62
-
63
-
64
-
65
-
66
-
67
-
68
-
69
-
70
-
71
-
72
-
73
-
74
-
75
-
76
-
77
-
78
-
79
-
80
-
81
-
82
-
83
-
84
-
85
-
86
-
87
-
88
-
89
-
90
-
91
-
92
-
93
-
94
-
95
-
96
-
97
-
98
-
99
-
100
-
101
-
102
-
103
-
104
-
105
-
106
-
107
-
108
-
109
-
110
-
111
-
112
-
113
-
114
-
115
-
116
 |
 |

2-515-260-
14
(1)
© 2005 Sony Corporation
Camera
Operations Guide
Read this first
Video Camera Recorder/Digital Video Camera Recorder
CCD-TRV238E/TRV438E
DCR-TRV270E/TRV285E