Sony CDX-4005 Operating Instructions (primary manual)
Sony CDX-4005 - Fm/am Compact Disc Player Manual
 |
View all Sony CDX-4005 manuals
Add to My Manuals
Save this manual to your list of manuals |
Sony CDX-4005 manual content summary:
- Sony CDX-4005 | Operating Instructions (primary manual) - Page 1
the unit. Record these numbers in the space provided below. Refer to these numbers whenever you call upon your Sony dealer regarding this product. Model No. Serial No. For installation and connections, see the supplied installation/connections manual. CDX-4000X CDX-4005 © 2000 Sony Corporation - Sony CDX-4005 | Operating Instructions (primary manual) - Page 2
installation. This equipment generates, uses, and can radiate radio frequency energy and, if not installed and used in accordance with the instructions, may cause harmful interference to radio or problems concerning your unit that are not covered in this manual, please consult your nearest Sony - Sony CDX-4005 | Operating Instructions (primary manual) - Page 3
on this unit. • You cannot play a CD-R that is not finalized (Finalization is necessary for a recorded CDR disc to be played on the audio CD player). • You cannot play CD-RWs (rewritable CDs) on this player. When you play 8 cm (3 in.) CDs Use the optional Sony compact disc single adaptor (CSA-8) to - Sony CDX-4005 | Operating Instructions (primary manual) - Page 4
7 How to use the menu 7 Setting the clock 7 CD Player Listening to a CD 8 Playing a CD in various modes 10 Radio Memorizing stations automatically - Best Tuning Memory (BTM 10 Memorizing Information Maintenance 17 Dismounting the unit 18 Specifications 19 Troubleshooting guide 20 4 - Sony CDX-4005 | Operating Instructions (primary manual) - Page 5
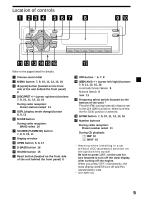
REP SHUF 1 2 3 4 5 6 CDX-4000X/4005 Refer to the pages listed for details. 1 11, 12, 15, 16 Automatic Music Sensor 9 Manual Search 9 Seek 11 qg Frequency select switch (located radio reception: Preset number select 11 During CD playback: (1) REP 10 (2) SHUF 10 *1 Warning when installing - Sony CDX-4005 | Operating Instructions (primary manual) - Page 6
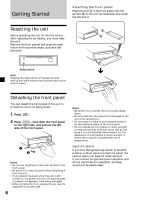
Getting Started Attaching the front panel Place the hole A in the front panel onto the spindle B on the unit as illustrated, then push the left side in. Resetting the unit A Before operating the unit for the first time or B after replacing the car battery, you must reset the unit. Remove the - Sony CDX-4005 | Operating Instructions (primary manual) - Page 7
Turning the unit on/off Turning on the unit Press (SOURCE) or insert a CD in the unit. For details on operation, refer to page 8 (CD player) and page 10 (radio). Turning off the unit Press (OFF) to stop CD/MD playback or FM/ AM reception (the key illumination and display remain on). Press (OFF) for - Sony CDX-4005 | Operating Instructions (primary manual) - Page 8
can be turned off. (See "Changing the sound and display settings" on page 16.) Track number Elapsed playing time When the last track on the CD is over The track number indication returns to "1," and playback restarts from the first track of the - Sony CDX-4005 | Operating Instructions (primary manual) - Page 9
(ENTER). To cancel Auto Scroll, select "A.SCRL-OFF" in step 3. Note For some CD TEXT discs with very many characters, the following cases may happen: - Some of the To locate succeeding tracks Locating a specific point in a track - Manual Search During playback, press and hold either side of (SEEK/ - Sony CDX-4005 | Operating Instructions (primary manual) - Page 10
Play starts. To return to normal play mode, select "SHUFOFF." Radio Memorizing stations automatically - Best Tuning Memory (BTM) The unit selects tuner. Each time you press (SOURCE), the source changes as follows: Tuner y CD 2 Press (MODE) repeatedly to select the band. Each time you press (MODE), - Sony CDX-4005 | Operating Instructions (primary manual) - Page 11
you know the frequency of the station you want to listen to, press and hold either side of (SEEK/AMS) until the desired frequency appears (manual tuning). 11 - Sony CDX-4005 | Operating Instructions (primary manual) - Page 12
. In such cases, some FM stereo broadcasts may become monaural. If you would like to hear such broadcasts in stereo, manually switch to the "WIDE" setting. 1 During radio reception, press (MENU), then press either side of (PRST) repeatedly until "IF AUTO" appears. 2 Press the (+) side of (SEEK/AMS - Sony CDX-4005 | Operating Instructions (primary manual) - Page 13
-bar) for each character. Displaying the station name Press (DSPL) during radio reception. Each time you press (DSPL), the item changes as follows: erase other names. 5 Press (MENU) twice. The unit returns to the normal radio reception mode. Note When you erase all of the station names, "NO NAME - Sony CDX-4005 | Operating Instructions (primary manual) - Page 14
) By pushing in and rotating the control (the PRESET/DISC control) (SOURCE) (MODE) Each time you press (SOURCE), the source changes as follows: Tuner t CD Pressing (MODE) changes the operation in the following ways: Tuner: FM1 t FM2 t FM3 t AM1 t AM2 By rotating the control (the SEEK/AMS control - Sony CDX-4005 | Operating Instructions (primary manual) - Page 15
Changing the operative direction The operative direction of controls is factoryset as shown below. To increase To decrease If you need to mount the rotary commander on the right hand side of the steering column, you can reverse the operative direction. Press (SOUND) for two seconds while pushing the - Sony CDX-4005 | Operating Instructions (primary manual) - Page 16
Changing the sound and display settings The following items can be set: SET (setting) •CLOCK (page 8) •BEEP - to turn the beeps on or off. •RM (Rotary Commander) - to change the operative direction of the controls of the rotary commander. - Select "NORM" to use the rotary commander as the factory- - Sony CDX-4005 | Operating Instructions (primary manual) - Page 17
connection and replace the fuse. If the fuse blows again after replacement, there may be an internal malfunction. In such a case, consult your nearest Sony dealer. Cleaning the connectors The unit may not function properly if the connectors between the unit and the front panel are not clean. In - Sony CDX-4005 | Operating Instructions (primary manual) - Page 18
Dismounting the unit 1 Press the clip inside the front cover with a thin screwdriver, and gently pry the front cover free. 2 Repeat step 1 on the left side. The front cover is removed. 3 Use a thin screwdriver to push in the clip on the left side of the unit, then pull out the left side of the unit - Sony CDX-4005 | Operating Instructions (primary manual) - Page 19
lb. 10 oz.) Parts for installation and connections (1 set) Front panel case (1) Rotary commander RM-X4S Design and specifications are subject to change without notice. AM Tuning range Antenna terminal Intermediate frequency Sensitivity CDX-4000X 530 - 1,710 kHz CDX-4005 AM tuning interval: 9 kHz - Sony CDX-4005 | Operating Instructions (primary manual) - Page 20
Troubleshooting guide The following checklist will help you remedy the problems you may encounter with your unit. Before going through the checklist below, check the connection and operating procedures. General Problem Cause/Solution No sound. •Cancel the ATT function. •Set the fader control - Sony CDX-4005 | Operating Instructions (primary manual) - Page 21
Radio reception Problem Preset tuning is not possible. Automatic tuning is not possible. The the existing antenna booster. For details, consult your dealer. The broadcast signal is too weak. t Use manual tuning. •Tune in the frequency accurately. •The broadcast signal is too weak. t Set to the MONO - Sony CDX-4005 | Operating Instructions (primary manual) - Page 22
22 - Sony CDX-4005 | Operating Instructions (primary manual) - Page 23
23 - Sony CDX-4005 | Operating Instructions (primary manual) - Page 24
24Sony Corporation Printed in Korea
-
 1
1 -
 2
2 -
 3
3 -
 4
4 -
 5
5 -
 6
6 -
 7
7 -
8
-
9
-
10
-
11
-
12
-
13
-
14
-
15
-
16
-
17
-
18
-
19
-
20
-
21
-
22
-
23
-
24
 |
 |
Operating Instructions
© 2000
Sony Corporation
US
FM
/
AM
Compact Disc
Player
CDX-4000X
CDX-4005
For installation and connections, see the supplied installation/connections manual.
Owner’s Record
The model and serial numbers are located on the bottom of the unit.
Record these numbers in the space provided below.
Refer to these numbers whenever you call upon your Sony dealer regarding this
product.
Model No.
Serial No.
3-043-292-
11
(1)