Sony CPD-E400 Operating Instructions
Sony CPD-E400 Manual
 |
View all Sony CPD-E400 manuals
Add to My Manuals
Save this manual to your list of manuals |
Sony CPD-E400 manual content summary:
- Sony CPD-E400 | Operating Instructions - Page 1
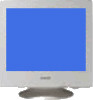
4-074-104-12 (1) Trinitron® Color Computer Display Operating Instructions US Mode d'emploi FR Manual de instrucciones ES CS CPD-E400 © 1999 Sony Corporation - Sony CPD-E400 | Operating Instructions - Page 2
Do not open the cabinet. Refer servicing to qualified personnel only. FCC Notice with the instructions, may specifications: SPECIFICATIONS Plug Type Nema-Plug 5-15p Cord Type SVT or SJT, minimum 3 × 18 AWG Length Maximum 15 feet Rating No.: Sony CPD-E400 Sony Electronics Inc. 1 Sony Drive, - Sony CPD-E400 | Operating Instructions - Page 3
14 Technical Features 15 Preset and user modes 15 Power saving function 15 Troubleshooting 15 If thin lines appear on your screen (damper wires 15 On-screen messages 15 Trouble symptoms and remedies 16 Self-diagnosis function 18 Specifications 18 Appendix i Preset mode timing table i 3 - Sony CPD-E400 | Operating Instructions - Page 4
, be sure that it is compatible with your local power supply. For the customers in the U.S.A. If you do not use the appropriate cord, this monitor will not conform to mandatory FCC standards. Example of plug types for 100 to 120 V AC for 200 to 240 V AC • Before disconnecting the power - Sony CPD-E400 | Operating Instructions - Page 5
input 1 connector (HD15) (y1) (page 6) The control button is used to display the menu and make This connector inputs RGB video signals (0.700 Vp-p, US adjustments to the monitor, including brightness and contrast positive) and sync signals. adjustments. 12345 3 1 (power) switch and indicator - Sony CPD-E400 | Operating Instructions - Page 6
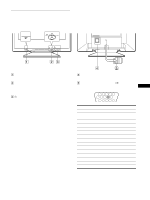
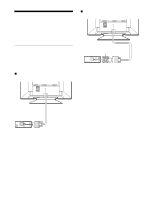
G3 adapter (for beige system) (1) • Setup Disk (1) • Warranty card • Notes on cleaning the screen's surface • This instruction manual Step 1: Connect your monitor to your computer Turn off the monitor and computer before connecting. Note Do not touch the pins of the video signal cable connector as - Sony CPD-E400 | Operating Instructions - Page 7
also download the information by accessing the web site of the graphics board's manufacturer. For customers using Windows NT4.0 Monitor setup in Windows NT4.0 does not use the display driver. Refer to the Windows NT4.0 instruction manual for further details on adjusting the resolution, refresh rate - Sony CPD-E400 | Operating Instructions - Page 8
after about 30 seconds. To reset to English Press the RESET button while the LANGUAGE menu is displayed on the screen. Customizing Your Monitor You can make numerous adjustments to your monitor using the on-screen menu. Navigating the menu Press the center of the control button to display the main - Sony CPD-E400 | Operating Instructions - Page 9
of the current input signal are displayed in the main MENU. If the signal matches one of this monitor's factory preset modes, the resolution is also displayed. MENU OK MENU COLOR CENTER CONV GEOM EXIT HELP LANG SIZE OPTION the resolution of the current input signal 68 . 7kHz / 85Hz 1024 768 - Sony CPD-E400 | Operating Instructions - Page 10
. 1 Move the control button in any direction. The BRIGHTNESS/CONTRAST menu appears on the screen. BR I GHTNESS / CONTRAS T 31 85 2 Move the control button m/M to adjust the brightness ( ), and - Sony CPD-E400 | Operating Instructions - Page 11
high. This adjustment is useful for matching the monitor's colors to a printed picture's colors. simply set the sRGB "ON" in the COLOR menu. However, in order to display the sRGB colors brightness ( ) and contrast (6) are automatically set to "31" and "85" respectively. If you change the brightness - Sony CPD-E400 | Operating Instructions - Page 12
menu appears on the screen. 3 Move the control button m/M to select the desired adjustment item. Adjust the selected item according to the following instructions. Degaussing the screen The monitor is automatically demagnetized (degaussed) when the power is turned on. To manually degauss the monitor - Sony CPD-E400 | Operating Instructions - Page 13
and information about this monitor. If your monitor is displaying symptoms that match those listed in the HELP menu, follow the on-screen instructions to resolve the problem. If the symptoms do not match those listed in the HELP menu or if the problem persists, see "Trouble symptoms and remedies" on - Sony CPD-E400 | Operating Instructions - Page 14
to jump directly to the CONVERGENCE menu. When the CONVERGNECE menu is displayed, the contrast, brightness and moire adjustment settings are the screen manually. Move the control button , to jump directly to the OPTION menu, then select (DEGAUSS). Resetting the adjustments This monitor has the - Sony CPD-E400 | Operating Instructions - Page 15
on the screen. To solve the problem, see "Trouble symptoms and remedies" on page 16. INFORMATION OUT OF SCAN RANGE Input signal condition The input signal condition OUT OF SCAN RANGE indicates that the input signal is not supported by the monitor's specifications. NO INPUT SIGNAL indicates that - Sony CPD-E400 | Operating Instructions - Page 16
95/98 • If you replaced an old monitor with this monitor, reconnect the old monitor and do the following. Install the supplied Setup Disk (page 7) and select this monitor ("CPD-E400") from among the Sony monitors in the Windows 95/98 monitor selection screen. If using a Macintosh system • Check - Sony CPD-E400 | Operating Instructions - Page 17
edges Monitor buttons MENU Example I NFORMA T I ON b MODE L : CPD - E 4 0 0 SER NO : 1 2 3 4 5 6 7 MANUF ACTURED : 1 9 9 9 - 5 2 If the problem persists, call your authorized Sony dealer and give the following information. US • Model name: CPD-E400 • Serial number • Name and specifications - Sony CPD-E400 | Operating Instructions - Page 18
) indicator and inform your authorized Sony dealer of the monitor's condition. Be sure to note the model name and serial number of your monitor. Also note the make and model of your computer and video board. Specifications CRT Viewable image size Resolution Maximum Recommended Standard image area - Sony CPD-E400 | Operating Instructions - Page 19
Table des Matières • Trinitron® est une marque commerciale déposée de Sony Corporation. • Macintosh est une marque commerciale sous licence d'Apple Computer, Inc., déposée aux Etats-Unis et dans d'autres pays. • Windows® et MS-DOS sont des - Sony CPD-E400 | Operating Instructions - Page 20
ci-dessous. Pour localiser le centre du rayon de pivotement du moniteur, alignez le centre de l'écran du moniteur sur les points de centrage du support. Pour faire pivoter le moniteur horizontalement ou verticalement, saisissez-le des deux mains par la base. Veillez à ne pas vous coincer les doigts - Sony CPD-E400 | Operating Instructions - Page 21
Identification des composants et des commandes Pour plus de détails, reportez-vous aux pages indiquées entre parenthèses. Avant RESET MENU RESET MENU Arrière AC IN (HD15) 1 1 Touche RESET (réinitialisation) (page 14) Cette touche réinitialise les réglages aux valeurs par défaut. 2 Manette de - Sony CPD-E400 | Operating Instructions - Page 22
Installation Avant de mettre ce moniteur en service, vérifiez si tous les accessoires suivants se trouvent bien dans le carton: • Cordon d'alimentation • En faisceau avec l'adaptateur G3 de courant (pour système beige) (1) • - Sony CPD-E400 | Operating Instructions - Page 23
PC pour la première fois, il se peut que l'assistant d'installation s'affiche à l'écran. Cliquez plusieurs fois de suite sur "Next" suivant les instructions de l'assistant jusqu'à ce que le moniteur Plug & Play soit automatiquement sélectionné de façon à ce que vous puissiez utiliser ce moniteur. Si - Sony CPD-E400 | Operating Instructions - Page 24
faut est l'anglais. 1 Appuyez au centre de la manette de commande. Voir page 9 pour plus d'informations sur l'utilisation de la manette de commande. MENU MENU OK MENU COUL. CENTRE CONV GEOM SORTIR AIDE LANG TAILLE OPTION 2 Déplacez la manette de commande de façon à mettre LANG en évidence et - Sony CPD-E400 | Operating Instructions - Page 25
monter (M), vers l'avant pour descendre (m) et vers la gauche ( - Sony CPD-E400 | Operating Instructions - Page 26
de commande vers le haut ou le bas m/M pour régler la luminosité ( ), et vers la gauche ou la droite - Sony CPD-E400 | Operating Instructions - Page 27
Tous les autres réglages sont enregistrés dans la mémoire pour le signal d'entrée en cours. 1 Appuyez au centre de la manette de commande. Le MENU principal apparaît à l'écran. 2 Déplacez la manette de commande pour mettre GEOM en évidence et appuyez à nouveau au centre de la manette de commande. Le - Sony CPD-E400 | Operating Instructions - Page 28
évidence et appuyez à nouveau au centre de la manette de commande. Le menu CONVERGENCE apparaît à l'écran. 3 Déplacez d'abord la manette de commande Procédez au réglage du paramètre sélectionné en suivant les instructions ci-dessous. Démagnétisation de l'écran L'écran du moniteur est automatiquement - Sony CPD-E400 | Operating Instructions - Page 29
appuyez à nouveau au centre de la manette de commande. FR Des instructions ou des informations sur la façon de résoudre le problème apparaissent à l'écran. Les différentes options de ce menu sont expliquées ci-dessous. RESOLUTION RECOMMANDEE Si l'image ne remplit pas l'écran jusqu'aux bords ou - Sony CPD-E400 | Operating Instructions - Page 30
distordue, essayez de régler la géométrie de l'image. Déplacez la manette de commande vers la droite , pour accéder directement au menu GEOMETRIE. IMAGE FLOUE L'image peut paraître floue lorsque les signaux rouge et bleu ne sont pas correctement alignés, provoquant l'apparition d'ombres rouges ou - Sony CPD-E400 | Operating Instructions - Page 31
cette section avant de faire appel au service d'assistance technique. Si de fines lignes est l'élément essentiel qui rend les tubes image Trinitron uniques en permettant le passage d'une plus grande indique que le signal d'entrée n'est pas supporté par les spécifications du moniteur. PAS ENTREE - Sony CPD-E400 | Operating Instructions - Page 32
installation fournie (page 7) et sélectionnez ce moniteur ("CPD-E400") parmi les moniteurs Sony dans l'écran de sélection de moniteur Windows 95 , Macintosh 16" Color, etc.) et la fréquence du signal d'entrée sont supportés par ce moniteur (Appendix). Même si la fréquence est comprise dans la plage - Sony CPD-E400 | Operating Instructions - Page 33
relatives à ce moniteur. MENU Exemple I NFORMA T I ONS b MODE L : CPD - E 4 0 0 SER NO : 1 2 3 4 5 6 7 MANUF ACTURED : 1 9 9 9 - 5 2 Si le problème persiste, appelez votre revendeur Sony agréé et fournissez-lui les informations suivantes. • Désignation du modèle: CPD-E400 • Numéro de - Sony CPD-E400 | Operating Instructions - Page 34
moniteur passe en mode d'économie d'énergie. MENU Si les quatre barres de couleur apparaissent l'indicateur 1 (alimentation) et informez votre revendeur Sony agréé de l'état du moniteur. Notez é 24 mm (central) 19 pouces mesurés en diagonale Déflexion de 90 degrés Trinitron FD Taille de l' - Sony CPD-E400 | Operating Instructions - Page 35
Índice • Trinitron® es una marca comercial registrada de Sony Corporation. • Macintosh es una marca comercial de mencionan en cada caso en este manual. Precauciones 4 Identificación de los componentes y los controles 5 Instalación 6 Paso 1: Conexión del monitor al ordenador 6 Paso 2: Conexi - Sony CPD-E400 | Operating Instructions - Page 36
, asegúrese de que es compatible con el suministro de alimentación local. Para los usuarios en EE.UU. Si no utiliza el cable apropiado, este monitor no cumplirá con las normas obligatorias de la FCC. Ejemplo de tipos de enchufes para 100 a 120 V CA para 200 a 240 V CA • Antes de desconectar - Sony CPD-E400 | Operating Instructions - Page 37
RESET MENU Parte posterior AC IN (HD15) 1 1 Botón RESET (restauración) (página 14) Este botón recupera los valores de fábrica. 2 Botón de control (página 9) El botón de control se utiliza para mostrar el menú y realizar ajustes del monitor, incluidos los de brillo y contraste. 3 Interruptor - Sony CPD-E400 | Operating Instructions - Page 38
Disco de instalación (1) • Tarjeta de garantía • Notas sobre la limpieza de la superficie de la pantalla • Este manual de instrucciones Paso 1: Conexión del monitor al ordenador Apague el monitor y el ordenador antes de realizar la conexión. Nota No toque los terminales del conector del cable de se - Sony CPD-E400 | Operating Instructions - Page 39
de la tarjeta gráfica. Para los usuarios que utilicen Windows NT4.0 En la instalación del monitor en Windows NT4.0 no se utiliza el controlador de pantalla. Consulte el manual de instrucciones de Windows NT4.0 para obtener información detallada sobre el ajuste de la resolución, la frecuencia - Sony CPD-E400 | Operating Instructions - Page 40
la imagen. GEOMETR I A 26 4 AYUDA (página 13) Seleccione el menú AYUDA para visualizar sugerencias e información útiles sobre este monitor. AYUDA VOL VER A MENU PR I NC I PA L RESOL UC I ON RECOMENDADA PARPADEO L I NEA F I NA HOR I ZONT A L FORMA D I S TORS I ONADA D E S E N F OC A DO DECOLORAC - Sony CPD-E400 | Operating Instructions - Page 41
principal. Si la señal se corresponde con uno de los modos predefinidos en fábrica de este monitor, también aparecerá la resolución. MENU OK MENU COLOR CENTRO CONV GEOM SALIR AYUDA LANG TAMAÑO OPCION resolución de la señal de entrada actual 68 . 7kHz / 85Hz 1024 768 frecuencias horizontal - Sony CPD-E400 | Operating Instructions - Page 42
la imagen (CENTRO) Este ajuste se almacena en la memoria para la señal de entrada actual. 1 Pulse el centro del botón de control. El MENU principal aparece en pantalla. 2 Desplace el botón de control para resaltar CENTRO y vuelva a pulsar el centro de dicho botón. El menú TAMAÑO/CENTRO aparece en - Sony CPD-E400 | Operating Instructions - Page 43
al de entrada actual. 1 Pulse el centro del botón de control. El MENU principal aparece en pantalla. 2 Desplace el botón de control para resaltar GEOM es alta. Este ajuste resulta útil para hacer coincidir los colores del monitor con los de una imagen impresa. Este ajuste se almacena en la memoria - Sony CPD-E400 | Operating Instructions - Page 44
señales de entrada. 1 Pulse el centro del botón de control. El MENU principal aparece en pantalla. 2 Desplace el botón de control para resaltar CONV la convergencia. Ajustes complementarios (OPCION) Es posible desmagnetizar el monitor, ajustar el nivel de cancelación de muaré, cambiar la posici - Sony CPD-E400 | Operating Instructions - Page 45
la página 16. 1 Pulse el centro del botón de control. El MENU principal aparece en pantalla. 2 Desplace el botón de control para resaltar AYUDA Si la señal de entrada se corresponde con uno de los modos de este monitor predefinidos en fábrica, aparecerán la resolución y la frecuencia de barrido de la - Sony CPD-E400 | Operating Instructions - Page 46
Desplace el botón de control , para acceder directamente al menú OPCION y, a continuación, seleccione (DESMAGNET). Restauración de los ajustes Este monitor dispone de los siguientes métodos de restauración. Utilice el botón RESET para restaurar los ajustes. RESET Restauración de una sola opción de - Sony CPD-E400 | Operating Instructions - Page 47
misma señal de entrada. Nota para los usuarios de Windows Consulte el manual de la tarjeta de vídeo o el programa de utilidades suministrado con la ón) Las líneas que se aprecian en la pantalla son normales en el monitor Trinitron y no son ningún fallo de funcionamiento. Son las sombras de los - Sony CPD-E400 | Operating Instructions - Page 48
7) y seleccione este monitor ("CPD-E400") entre los monitores Sony mostrados en la pantalla de selección de monitores de Windows 95/98. conectado • Consulte el manual de la tarjeta gráfica para obtener información sobre el ajuste adecuado del monitor. • Confirme que este monitor admite el modo gr - Sony CPD-E400 | Operating Instructions - Page 49
ón de este monitor. MENU Ejemplo I NFORMAC I ON b MODE L : CPD - E 4 0 0 SER NO : 1 2 3 4 5 6 7 MANUF ACTURED : 1 9 9 9 - 5 2 Si el problema persiste, póngase en contacto con un proveedor Sony autorizado y proporciónele la siguiente información. • Nombre del modelo: CPD-E400 • Número de - Sony CPD-E400 | Operating Instructions - Page 50
tecla del teclado. RESET MENU Indicador 1 (alimentación) monitor. Tome nota también del fabricante y del modelo del ordenador y de la tarjeta de vídeo. Especificaciones TRC Paso de la rejilla de apertura de 0,24 mm (central) 19 pulgadas, medida diagonal 90 grados de deflexión FD Trinitron - Sony CPD-E400 | Operating Instructions - Page 51
Preset mode timing table No. Resolution Horizontal Vertical Graphics (dots × .2 kHz 75 Hz Macintosh 19" Color 17 1024 × 768 68.7 kHz 85 Hz VESA 18 1152 × 864 67.5 kHz 75 Hz VESA 19 1152 × 864 77.5 feature of this monitor will automatically provide an optimal image for the screen as long as - Sony CPD-E400 | Operating Instructions - Page 52
Sony Corporation Printed in U.S.A.
-
 1
1 -
 2
2 -
 3
3 -
 4
4 -
 5
5 -
 6
6 -
 7
7 -
8
-
9
-
10
-
11
-
12
-
13
-
14
-
15
-
16
-
17
-
18
-
19
-
20
-
21
-
22
-
23
-
24
-
25
-
26
-
27
-
28
-
29
-
30
-
31
-
32
-
33
-
34
-
35
-
36
-
37
-
38
-
39
-
40
-
41
-
42
-
43
-
44
-
45
-
46
-
47
-
48
-
49
-
50
-
51
-
52
 |
 |

4-074-104-
12
(1)
© 1999 Sony Corporation
Trinitron
Color
Computer Display
Operating Instructions
Mode d’emploi
Manual de instrucciones
US
FR
ES
CS
CPD-E400