Sony DAV-DZ175 Operating Instructions
Sony DAV-DZ175 Manual
 |
View all Sony DAV-DZ175 manuals
Add to My Manuals
Save this manual to your list of manuals |
Sony DAV-DZ175 manual content summary:
- Sony DAV-DZ175 | Operating Instructions - Page 1
4-165-483-11(1) DVD Home Theatre System Operating Instructions DAV-DZ170/DZ171/DZ175 ©2010 Sony Corporation - Sony DAV-DZ175 | Operating Instructions - Page 2
(servicing) instructions in Sony dealer regarding this product. Model No. DAV-DZ170/ DAVDZ171/DAV manual could void your authority to operate this equipment. Important Safety Instructions 1) Read these instructions. 2) Keep these instructions. 3) Heed all warnings. 4) Follow all instructions - Sony DAV-DZ175 | Operating Instructions - Page 3
or registered trademarks of HDMI Licensing LLC. "DVD-RW," "DVD-R," "DVD+RW," "DVD+R," "DVD VIDEO," and the "CD" logos are trademarks. "BRAVIA" is a trademark of Sony Corporation. "PLAYSTATION" is a trademark of Sony Computer Entertainment Inc. MPEG Layer-3 audio coding technology and patents - Sony DAV-DZ175 | Operating Instructions - Page 4
Instructions describe the controls on the remote. You can also use the controls on the unit if they have the same or similar names as those on the remote. • The Control Menu items may vary depending on the area. • "DVD" may be used as a general term for a DVD VIDEO, DVD+RW/ DVD+R, and DVD-RW/ DVD - Sony DAV-DZ175 | Operating Instructions - Page 5
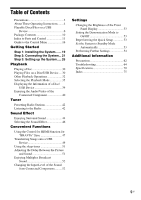
Device 39 Enjoying the Audio/Video of the Connected Component 40 Tuner Presetting Radio Stations 42 Listening to the Radio 42 Sound Effect Enjoying Surround Sound 44 Selecting the Sound Effect 46 Convenient Functions Using the Control for HDMI Function for "BRAVIA" Sync 47 Transferring Songs - Sony DAV-DZ175 | Operating Instructions - Page 6
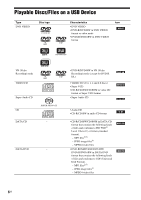
/Files on a USB Device Type DVD VIDEO Disc logo Characteristics Icon • DVD VIDEO • DVD-R/DVD-RW in DVD VIDEO format or video mode • DVD+R/DVD+RW in DVD VIDEO format VR (Video Recording) mode VIDEO CD Super Audio CD CD DATA CD - DATA DVD - 6US • DVD-R/DVD-RW in VR (Video Recording) mode - Sony DAV-DZ175 | Operating Instructions - Page 7
Graphics disc • DVD Audio • DATA CD/DATA DVD that does not contain MP3 files, JPEG image files, or MPEG4 video files • DATA CD/DATA DVD that is created in Packet Write format • DVD-RAM • Blu-ray Disc Also, the system cannot play the following discs: • A DVD VIDEO with a different region code (page - Sony DAV-DZ175 | Operating Instructions - Page 8
some playback features may not be available. Be sure to read the operating instructions of the DVD or VIDEO CD. Notes about playable files • The system can recognize up to 200 folders, including albums (folders) that do not contain audio files, JPEG image files, or video files. When more than 200 - Sony DAV-DZ175 | Operating Instructions - Page 9
this data may generate a loud noise which could damage your speaker system. • The following can increase the time it takes to start playback: - when a DATA CD/DATA DVD/USB device is recorded with a complicated tree structure. - when the audio files, JPEG image files, or video files in another folder - Sony DAV-DZ175 | Operating Instructions - Page 10
Package Contents Main unit Speaker packages • DAV-DZ170/DAV-DZ171 • DAV-DZ175 • Speaker cords (1 set) (red/white/green/gray/blue) • Foot pads (1 set) Accessories • Remote commander (remote) (1) • FM wire antenna (aerial) (1) or • HDMI cable (1) (DAV-DZ171 only) • R6 (size AA) batteries (2) • - Sony DAV-DZ175 | Operating Instructions - Page 11
here when using the remote. D MASTER VOLUME control Adjusts the system's volume. E REC TO USB (page 49) Transfers tracks/MP3 files onto a USB device. Lights up during transfer of tracks/MP3 files. F (USB) port (pages 24, 30) Used for connecting a USB device or iPod. G AUDIO IN jack (page 24) Used - Sony DAV-DZ175 | Operating Instructions - Page 12
indicator B SLEEP indicator Flashes when the sleep timer is set. C System status display D TUNED indicator (Radio only) Lights up when a station is received. E ST indicator (Radio only) Lights up when stereo sound is received. F HDMI indicator Lights up when a signal is established between a TV and - Sony DAV-DZ175 | Operating Instructions - Page 13
TV/CABLE ANTENNA COAXIAL 75 FM A SPEAKERS jacks (page 21) B HDMI OUT jack (page 22) C TV/CABLE (DIGITAL IN OPTICAL/ COAXIAL) jacks (page 22) D COMPONENT VIDEO OUT jacks (page 22) E VIDEO OUT jack (page 22) F TV/CABLE (AUDIO IN R/L) jacks (page 22) G ANTENNA (COAXIAL 75Ω FM) jack (page 24) 13US - Sony DAV-DZ175 | Operating Instructions - Page 14
Remote control 7 ONE-TOUCH THEATER PLAY TV BRAVIA Sync 1 2 3 DVD/CD FM USB 4 TV/ CABLE 7 TIME/ TEXT CLEAR AUDIO DVD TOP MENU 5 AUDIO IN 6 FUNCTION 8 SOUND MODE 9 SYSTEM MENU 0 TV INPUT SUBTITLE ANGLE D.TUNING MEM SEL DVD MENU MUTING VOLUME 1 2,3 4 6 RETURN PRESET TUNING SHIFT - Sony DAV-DZ175 | Operating Instructions - Page 15
(page 30) Adjusts the volume. Sony TVs only. Depending on your TV, you may not be able to use some of the buttons. To insert the batteries Insert two R6 (size AA) batteries (supplied) by matching the 3 and # ends on the batteries to the markings inside the compartment. Note • Do not leave the remote - Sony DAV-DZ175 | Operating Instructions - Page 16
Guide to the Control Menu You can use the Control Menu to select a function and to view related information. DISPLAY Press DISPLAY while using the "DVD/CD" or "USB" function. Each time you press DISPLAY, the Control Menu changes: 1 t 2 t 3 t 1 t ... 1 Control Menu 1 2 Control Menu 2 (appears when - Sony DAV-DZ175 | Operating Instructions - Page 17
name of selected Control Menu item REPEAT ENTER Quit: DISPLAY Options Operation message List of Control Menu items The Control Menu 1 and the time code (DVD VIDEO/DVD-VR only). [MULTI/2CH] (page 35) You can select the playback area on a Super Audio CD when available. [SUPER AUDIO CD/CD - Sony DAV-DZ175 | Operating Instructions - Page 18
adjust various other settings. [QUICK] (page 26) You can make basic adjustments. audio CD or MP3 files on a DATA CD/DATA DVD onto a USB device. 1)These items are not displayed when playing a DATA CD/DATA DVD/USB device with video files. 2)USB device only. 3)DATA CD/DATA DVD only. Tip • The Control - Sony DAV-DZ175 | Operating Instructions - Page 19
Started Step 1: Installing the System How to position the system Install the system by referring to the illustration below. A B F C G A Front speaker (L (left)) B Front speaker (R (right)) C Center speaker D Surround speaker (L (left)) E Surround speaker (R (right)) F Subwoofer G Unit - Sony DAV-DZ175 | Operating Instructions - Page 20
strength. As a plaster board wall is especially fragile, attach the screws securely to a beam. Install the speakers on a vertical and flat wall where reinforcement is applied. • Sony is not responsible for accidents or damage caused by improper installation, insufficient wall strength or improper - Sony DAV-DZ175 | Operating Instructions - Page 21
Started Step 2: Connecting the System Connecting the speakers 1 Insert the connectors of the speaker cords to match the color of the SPEAKERS jacks of the unit until they click. SPEAKERSUSR L SUR R FRONT R FRONSTPLEAKSEURBWSOOFER CENTER Red (Front right speaker (R)) Gray (Surround right - Sony DAV-DZ175 | Operating Instructions - Page 22
to a TV and cable box Video 1 Video 2 Audio 1 Video 2 Audio 1 Connecting the video to your TV Depending on the jacks on your TV, select one of the connection methods. x Method 1: Video cord (supplied) connection This is the basic connection. x Method 2: HDMI cable* connection Picture quality - Sony DAV-DZ175 | Operating Instructions - Page 23
audio from your TV/cable box To listen to TV or cable box sound via the system, select one of the connection methods. x Method 1: Audio cord (not supplied) connection This is the basic connection and sends an analog audio receiver, or PlayStation, to the TV/CABLE jacks instead of your TV. 23US - Sony DAV-DZ175 | Operating Instructions - Page 24
You can enjoy connected components via the system's speakers. Connected component Portable audio source (not supplied) USB device (not a portable audio source. Connecting the antenna (aerial) ANTENNA COAXFIAML 75 or FM wire antenna (aerial) (supplied) Note • After connecting the FM wire antenna - Sony DAV-DZ175 | Operating Instructions - Page 25
Getting Started Connecting the AC power cord (mains lead) Wall outlet (mains): The shape of the wall outlet (mains) differs depending on the area. 25US - Sony DAV-DZ175 | Operating Instructions - Page 26
mode (page 55) • [4:3 LETTER BOX] or [4:3 PAN SCAN]: This aspect ratio is for a 4:3 standard TV (page 55) 7 Press X/x to select the Control for HDMI setting, then press . HDMI SETUP HDMI RESOLUTION: CONTROL FOR HDMI: VOLUME LIMIT: YCBCR/RGB(HDMI): AUDIO(HDMI): JPEG RESOLUTION: AUTO(1920x1080p) ON - Sony DAV-DZ175 | Operating Instructions - Page 27
The environment of the room in which the system is installed may affect measurements. When the measurements differ considerably from the status of the speaker installation, perform the speaker settings manually by following "Settings for the speakers" (page 60). 11 Unplug the calibration mic, press - Sony DAV-DZ175 | Operating Instructions - Page 28
HDMI OUT jack. 1 Press DVD/CD. 2 Press DISPLAY while the system is in stop mode. 3 Press X/x to select [SETUP], then press . CUSTOM 4 Press X/x to select [CUSTOM], then press . CUSTOM CUSTOM QUICK 5 Press X/x to select [HDMI SETUP], then press . HDMI SETUP HDMI RESOLUTION: CONTROL FOR HDMI - Sony DAV-DZ175 | Operating Instructions - Page 29
select the type of video signals output from the COMPONENT VIDEO OUT jacks. 1 Press DVD/CD. 6 Press X/x to select [PROGRESSIVE (COMPONENT OUT)], then or, - your TV is connected via jacks other than the COMPONENT VIDEO OUT jacks. [ON]: The system outputs progressive signals. Select this setting when - Sony DAV-DZ175 | Operating Instructions - Page 30
. 3 Place a disc on the tray, then press Z. DVD/CD "/1 USB FUNCTION C/X/x/c, DVD MENU O RETURN N VOLUME +/- DISPLAY x 1 Press DVD/CD or USB. • DVD/CD: For a disc. • USB: For a USB device the label side up. 4 Press N to start playback. 5 Press VOLUME +/- to adjust the volume. 30US USB device - Sony DAV-DZ175 | Operating Instructions - Page 31
not appear, press DVD MENU. 3 Press adjust the volume. To select the playback source of the USB device You can select the memory number for playback depending on the USB device. Press MEM SEL. Selected memory number USB Memory 2 selected. Home Theatre System x For video or audio files Press N to - Sony DAV-DZ175 | Operating Instructions - Page 32
folders/ files Press DVD MENU. To display the list of folders/files using the Control Menu 1 Press DVD only): You can play both JPEG image files and MP3 files in the same folder as a slide show. • [MUSIC]: Audio Operations Playback operation buttons on the remote Depending on the type of disc - Sony DAV-DZ175 | Operating Instructions - Page 33
the JPEG image file when you set [JPEG RESOLUTION] in [HDMI SETUP] to [(1920 × 1080i) HD ] or [(1920 × files. 98( 99) 13( 99) T 0: 03: 17 DVD VIDEO Selected row Note • If [MEDIA] is set to [ time code 1 Press DISPLAY. 2 Press X/x to select [TIME], then press . 3 Input the time code using - Sony DAV-DZ175 | Operating Instructions - Page 34
DVD VIDEO You can toggle audio format or language when the source contains multiple audio formats or multilingual audio. When 4 digits are displayed, they indicate a language code. See "Language Code sound, select these items using DVD MENU. 1 Press DVD TOP MENU or DVD MENU. 2 Press C/X/x/c to - Sony DAV-DZ175 | Operating Instructions - Page 35
front panel display. • [CD]: You can play the CD layer. When the system is playing a CD layer, "CD" lights up in the front panel display. Note • Super Audio CD audio signals are not output from the HDMI OUT jack. Selecting the Playback Mode Playing in programmed order (Program Play) You can play - Sony DAV-DZ175 | Operating Instructions - Page 36
1 Press DISPLAY. 2 Press X/x to select [PROGRAM], then press . 3 Press X/x to select [SET t], then press . Total time of the programmed tracks PROGRAM ALL CLEAR 1. TRACK - - 2. TRACK - - 3. TRACK - - 4. TRACK - - 5. TRACK - - 6. TRACK - - 7. TRACK - - 0: 00:00 T - - 01 02 03 04 05 06 Tracks - Sony DAV-DZ175 | Operating Instructions - Page 37
x DATA CD (audio files only)/DATA DVD (audio files only)/USB device (audio files only) • [OFF]: Off. • [ON (MUSIC)]: You can shuffle audio files in the the slide show 1 Press DISPLAY repeatedly until [EFFECT] appears on the control menu. 2 Press X/x to select [EFFECT], then press . 3 Press - Sony DAV-DZ175 | Operating Instructions - Page 38
effective when you set [JPEG RESOLUTION] in [HDMI SETUP] to [(1920 × 1080i) HD ] ] appears on the control menu. 2 Press DVD MENU repeatedly. 6 Press X/x to select the desired folder and press N. Note • If you play a large MP3 file and JPEG image file at the same time, the sound may skip. Sony - Sony DAV-DZ175 | Operating Instructions - Page 39
/title name from the ID3 tag information. The system can support ID3 ver 1.0/1.1/2.2/ 2.3. ID3 ver 2.2/2.3 tag information display has priority when both ID3 ver 1.0/1.1 and ver 2.2/2.3 tags are used for a single MP3 file. 5 Text information The DVD/Super Audio CD/CD text appears only when text is - Sony DAV-DZ175 | Operating Instructions - Page 40
DISPLAY repeatedly until [DATE] appears on the control menu. 5( 8) 10( 15) 18/9/2002 DVD/CD FM USB TV/CABLE AUDIO IN Source Disc that is played by the system FM radio USB device or iPod that is connected to the (USB) port. TV or cable box Portable audio source that is connected to the AUDIO IN jack - Sony DAV-DZ175 | Operating Instructions - Page 41
the source. • DVD/CD: Insert the disc into the unit (page 30). • TUNER FM: Select the radio program (page 42). • USB: Connect the USB device directly (page 30), or iPod via a USB cable (page 41). • TV/CABLE: Select the channel on the TV or cable box. • AUDIO IN: Connect the portable audio source via - Sony DAV-DZ175 | Operating Instructions - Page 42
the system's memory first (see "Presetting Radio Stations" (page 42)). 1 Press FM. 2 Press PRESET +/- repeatedly to select the preset station. 3 Adjust the the system receives the radio station. To stop the automatic tuning manually, press TUNING +/- or x. If an FM program is noisy If an FM program - Sony DAV-DZ175 | Operating Instructions - Page 43
Tuner 5 Press . 6 Press SYSTEM MENU. 43US - Sony DAV-DZ175 | Operating Instructions - Page 44
] to [STANDARD] (page 57). Sound from Surround setting "A.F.D. MULTI" (AUTO FORMAT DIRECT MULTI) Effect • 2 channel source: The system outputs 2 channel sound from the front and surround speakers by assigning the 2 channel sound to the surround left and right channels. • Multi-channel source: The - Sony DAV-DZ175 | Operating Instructions - Page 45
" performs Dolby Pro Logic II music mode decoding. • Multi-channel source: The system outputs sound from the speakers depending on the number of channels of the source. The system outputs the sound from the front speakers and subwoofer regardless of sound format or number of channels. Multi-channel - Sony DAV-DZ175 | Operating Instructions - Page 46
provides the sound for movies. "MOVIE" appears in the front panel display. • "MUSIC": The system provides the sound for music. "MUSIC" appears in the front panel display. Note • When you play a Super Audio CD, this function does not work. Enhancing compressed sound You can enhance compressed sound - Sony DAV-DZ175 | Operating Instructions - Page 47
TVs with the "BRAVIA" Sync function. By connecting Sony components that are compatible with the Control for HDMI function with an HDMI cable, operation is simplified as below: - System Power Off (page 47) - One-Touch Play (page 48) - Theater Mode (page 48) - System Audio Control (page 48) - Volume - Sony DAV-DZ175 | Operating Instructions - Page 48
quality suited for movies, and the System Audio Control function is activated automatically. Press THEATER. Enjoying TV sound from the speakers by this system (System Audio Control) To use this function, connect the system and your TV with an audio cord and an HDMI cable (page 22). Press [/1 to turn - Sony DAV-DZ175 | Operating Instructions - Page 49
Press MEM SEL. Selected memory number USB Memory 2 selected. Home Theatre System Convenient Functions Note • When the memory cannot be selected, [ • When transferring a single track on an audio CD or a single MP3 file on a DATA CD/ DATA DVD Source MP3 Audio CD Folder name "REC1-MP3"4) "REC1- - Sony DAV-DZ175 | Operating Instructions - Page 50
" folder each time single-track transferring is performed. Transferring tracks on an audio CD or MP3 files on a DATA CD/DATA DVD onto a USB device 1 Load an audio CD/DATA CD/DATA DVD. 2 Press DISPLAY while the system is in stop mode. 3 Press X/x to select [USB TRANSFER], then press . x For - Sony DAV-DZ175 | Operating Instructions - Page 51
USB device while erasing. • If the folder to be erased contains non-audio format files or sub folders, these are erased from the list on the minutes display (the remaining time) changes by 10 minutes. 4 Press SYSTEM MENU. Adjusting the Delay Between the Picture and Sound [A/V SYNC] When the sound - Sony DAV-DZ175 | Operating Instructions - Page 52
Connected Components The sound distortion of the connected component may be improved by reducing the input level. 1 Press TV/CABLE or AUDIO IN. 2 Press SYSTEM MENU. 3 Press X/x to select "ATTENUATE," then press or c. 4 Press X/x to select a setting, then press . • "ATT ON": You can attenuate the - Sony DAV-DZ175 | Operating Instructions - Page 53
panel display. 3 Press X/x to select a setting, then press . • "DEMO OFF": Off. • "DEMO ON": On. 4 Press SYSTEM MENU. Reperforming the Quick Setup 1 Press DVD/CD. 2 Press DISPLAY while the system is in stop mode. 3 Press X/x to select [SETUP], then press . 4 Press X/x to select [QUICK], then - Sony DAV-DZ175 | Operating Instructions - Page 54
X/x to select the setup item, then press . • [LANGUAGE SETUP] (page 54) • [VIDEO SETUP] (page 55) • [HDMI SETUP] (page 56) • [AUDIO SETUP] (page 57) • [SYSTEM SETUP] (page 58) • [SPEAKER SETUP] (page 60) Example: [VIDEO SETUP] Selected item VIDEO SETUP TV TYPE: PROGRESSIVE (COMPONENT OUT - Sony DAV-DZ175 | Operating Instructions - Page 55
not recorded on the DVD VIDEO, one of the recorded languages will be automatically selected (depending on the disc, the language may not be selected automatically). Tip • If you select [OTHERS t] in [MENU], [AUDIO], and [SUBTITLE], select and enter a language code from "Language Code List" (page 74 - Sony DAV-DZ175 | Operating Instructions - Page 56
from the jacks other than COMPONENT VIDEO OUT/HDMI OUT. [ system and TV that is compatible with the Control for HDMI function with an HDMI cable. [ON]: On. You can operate mutually between components that are connected with an HDMI cable. [OFF]: Off. x [VOLUME LIMIT] When the System Audio Control - Sony DAV-DZ175 | Operating Instructions - Page 57
/24bit PCM signals to 48 kHz/16-bit PCM. Note • When you set the function to other than "DVD/CD" or "USB," the system does not output the sound from the HDMI OUT jack even if you set [AUDIO (HDMI)] to [ON]. x [JPEG RESOLUTION] You can select the resolution of JPEG image files output from the - Sony DAV-DZ175 | Operating Instructions - Page 58
• The environment of the room in which the system is installed may affect measurements. When the measurements differ considerably from the status of the speaker installation, perform the speaker settings manually by following "Settings for the speakers" (page 60). 3 Press C/c to select [YES] or [NO - Sony DAV-DZ175 | Operating Instructions - Page 59
system appears. [GRAPHICS]: A preset picture stored in the system appears. [BLUE]: The background is blue. [BLACK]: The background is black. x [PARENTAL CONTROL] The [PARENTAL CONTROL] function allows you to restrict playback of DVDs enter a standard code from "Parental Control Area Code List" (page - Sony DAV-DZ175 | Operating Instructions - Page 60
Settings for the speakers [SPEAKER SETUP] You can adjust the speaker settings manually without performing the Quick Setup. Select the speakers you will use, set the speaker distance from your listening position, and then adjust the sound level for each speaker. You can adjust the sound level by - Sony DAV-DZ175 | Operating Instructions - Page 61
Settings [ON]: The test tone is emitted from each speaker in sequence while adjusting the level. Adjust the sound level as follows. 1 Set the [TEST TONE] to [ON]. 2 Press C/X/x/c repeatedly to select the desired speaker and the level, then press . 3 Repeat Step 2. 4 Press C/X/x/c to set [TEST TONE] - Sony DAV-DZ175 | Operating Instructions - Page 62
or problems concerning your system, please consult your nearest Sony dealer. On cleaning discs, disc/lens cleaners • Do not use cleaning discs or disc/lens cleaners (including wet or spray types). These may cause the apparatus to malfunction. On your TV's color • If the speakers should cause - Sony DAV-DZ175 | Operating Instructions - Page 63
center out. • Do not use solvents such as benzine, thinner, commercially available cleaners, or anti-static spray intended for vinyl LPs. This system can only play a standard circular disc. Using neither standard nor circular discs (e.g., card, heart, or star shape) may cause a malfunction. Do not - Sony DAV-DZ175 | Operating Instructions - Page 64
system, use this troubleshooting guide to help remedy the problem before requesting repairs. Should any problem persist, consult your nearest Sony dealer. Note that if service type of video signal output from the HDMI OUT jack, and switch your TV's input back to HDMI. If the picture still does not - Sony DAV-DZ175 | Operating Instructions - Page 65
the sound may come from the center speaker only. speaker only. There is no system sound from your TV. • Set [AUDIO (HDMI)] in [HDMI SETUP] to [ON] (page 57). • The HDMI OUT jack does not output Super Audio CD sound. • Perform the following procedure. 1 Turn the system off and on again. 2 Turn the - Sony DAV-DZ175 | Operating Instructions - Page 66
or FAT32 are unsupported.* * This system supports FAT12, FAT16, and FAT32, but some USB devices may not support all of these. For details, refer to the operating instructions of the USB device or contact the manufacturer. • If you use a partitioned USB device, only audio files on the first partition - Sony DAV-DZ175 | Operating Instructions - Page 67
are not displayed properly. • The character codes that can be displayed by this system are numbers and letters of the alphabet only instructions of the USB device to format the USB device. If the problem persists, contact your nearest Sony dealer. • The USB device is full. • The number of audio - Sony DAV-DZ175 | Operating Instructions - Page 68
Audio Control system and TV while using the function. System Audio Control function. • For details, see "Using the Control for HDMI Function for "BRAVIA" Sync" (page 47). Messages Symptom "PROTECTOR" and "PUSH POWER" appear alternately. "OVERLOAD," "REMOVE USB," then "PUSH POWER" appear. Problems - Sony DAV-DZ175 | Operating Instructions - Page 69
appears and a disc cannot be ejected. "DATA ERROR" appears. "READING" is displayed for a long time while playing. Problems and solutions • Contact your Sony dealer or local authorized Sony service facility. • The file you want to play is broken. • The file format does not match the extension of the - Sony DAV-DZ175 | Operating Instructions - Page 70
Sony service use only, normal system operation will not be possible. Turn off the system, and then turn on the system again to operate. VER.X.XX 70US Specifications AUDIO Sampling Frequency: less than 48 kHz) Super Audio CD/DVD System Laser Diode Properties Emission Duration: Continuous Laser - Sony DAV-DZ175 | Operating Instructions - Page 71
mm × 85 mm (4 1/8 in × 6 1/2 in × 3 3/ 8 in) (w/h/d) Mass (approx.) 0.5 kg (1 lb 2 oz) Additional Information Subwoofer DAV-DZ170/DAV-DZ171 (SS-WS102) Speaker system Subwoofer Bass reflex Speaker unit 180 mm (7 1/8 in) cone type Rated impedance 3 ohms Dimensions (approx.) 225 mm × 395 - Sony DAV-DZ175 | Operating Instructions - Page 72
DRM: Not compatible Design and specifications are subject to change without notice. • Standby power consumption 0.2 W. • Halogenated flame retardants are not used in the certain printed wiring boards. • Over 85% power efficiency of amplifier block is achieved with the full digital amplifier, S- - Sony DAV-DZ175 | Operating Instructions - Page 73
[MUSIC/ PHOTO] [PHOTO] Disc Disc/USB device Video files Video files JPEG image files JPEG image files MP3 files Audio files* JPEG image files JPEG image files MP3 files Audio files* MP3 files and JPEG image files with slide show JPEG image files MP3 files and JPEG image files with - Sony DAV-DZ175 | Operating Instructions - Page 74
1557 Ukrainian 1564 Urdu 1572 Uzbek 1581 Vietnamese 1587 Volapük 1613 Wolof 1632 Xhosa 1665 Yoruba 1684 Chinese 1697 Zulu 1703 Not specified Parental Control Area Code List Code Area 2044 Argentina 2047 Australia 2046 Austria 2057 Belgium 2070 Brazil 2079 Canada 2090 Chile 2092 China 2115 Denmark - Sony DAV-DZ175 | Operating Instructions - Page 75
58 AUDIO SETUP 57 AUTO CALIBRATION 57 AUTO STBY 53 B BACKGROUND 58 BLACK LEVEL 56 BLACK LEVEL (COMPONENT OUT) 56 C CONTROL FOR HDMI 56 Control for HDMI 47 Control Menu 16 CUSTOM 54 D D. C. A. C. (Digital Cinema Auto Calibration) 57 DEMO 53 DIMMER 53 DUAL MONO 52 DVD's menu 34 E EFFECT 37 F FM MODE - Sony DAV-DZ175 | Operating Instructions - Page 76
(1) Sony Corporation Printed in China
-
 1
1 -
 2
2 -
 3
3 -
 4
4 -
 5
5 -
 6
6 -
 7
7 -
8
-
9
-
10
-
11
-
12
-
13
-
14
-
15
-
16
-
17
-
18
-
19
-
20
-
21
-
22
-
23
-
24
-
25
-
26
-
27
-
28
-
29
-
30
-
31
-
32
-
33
-
34
-
35
-
36
-
37
-
38
-
39
-
40
-
41
-
42
-
43
-
44
-
45
-
46
-
47
-
48
-
49
-
50
-
51
-
52
-
53
-
54
-
55
-
56
-
57
-
58
-
59
-
60
-
61
-
62
-
63
-
64
-
65
-
66
-
67
-
68
-
69
-
70
-
71
-
72
-
73
-
74
-
75
-
76
 |
 |
©2010 Sony Corporation
4-165-483-
11
(1)
DVD Home Theatre
System
Operating Instructions
DAV-DZ170/DZ171/DZ175