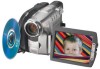
Sony DCR DVD301 Operating Instructions
Sony DCR DVD301 - 1MP DVD Handycam Camcorder Manual
 |
UPC - 027242654792
View all Sony DCR DVD301 manuals
Add to My Manuals
Save this manual to your list of manuals |
Sony DCR DVD301 manual content summary:
- Sony DCR DVD301 | Operating Instructions - Page 1
manual thoroughly, and retain it for future reference. Owner's Record The model and serial numbers are located on the bottom. Record the serial number in the space provided below. Refer to these numbers whenever you call upon your Sony dealer regarding this product. Model No. DCR-DVD301 Model - Sony DCR DVD301 | Operating Instructions - Page 2
of important operating and maintenance (servicing) instructions in the SONY Model No.: DCR-DVD301 Responsible Party:Sony Electronics Inc. Address: 16450 W. Bernardo Dr, San Diego, CA 92127 U.S.A. Telephone No.: 858-942-2230 This device complies with Part 15 of the FCC Rules. Operation - Sony DCR DVD301 | Operating Instructions - Page 3
supplied interface cable must be used with the equipment in order to comply with the limits for a digital device pursuant to Subpart B of Part 15 of FCC Rules. Certain countries or regions may regulate disposal of the battery used to power this product. Please consult with your local authority. 3 - Sony DCR DVD301 | Operating Instructions - Page 4
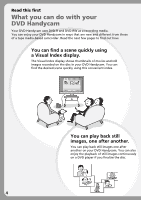
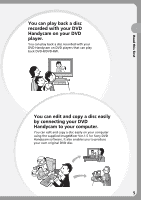
Read this first What you can do with your DVD Handycam Your DVD Handycam uses DVD-R and DVD-RW as a recording media. You can enjoy your DVD Handycam in ways that are new and different from those of a tape media-based camcorder. Read the next few pages to find out how. You can find a scene quickly - Sony DCR DVD301 | Operating Instructions - Page 5
recorded with your DVD Handycam on DVD players that can play back DVD-R/DVD-RW. You can edit and copy a disc easily by connecting your DVD Handycam to your computer. You can edit and copy a disc easily on your computer using the supplied ImageMixer Ver.1.5 for Sony DVD Handycam software. It also - Sony DCR DVD301 | Operating Instructions - Page 6
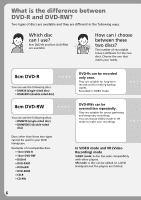
• DMW60DS (double-sided disc) Discs other than these two types cannot be used in your DVD Handycam. Examples of incompatible discs • 12cm DVD-R • 12cm DVD-RW • DVD+R • DVD-RAM • DVD+RW • DVD-ROM • CD-R • CD-RW DVD-Rs can be recorded only once. They are suitable for long-term records and for making - Sony DCR DVD301 | Operating Instructions - Page 7
For long-term storage To use the same disc over and over To play back on a DVD player To edit with a DVD Handycam DVD-R Use a DVD-RW in Video mode Use a DVD-RW in VR mode *1 DVD-R/RW discs recorded by Sony DVD Handycam camcorders are designed to be compatible with and may be played back on home - Sony DCR DVD301 | Operating Instructions - Page 8
How to prepare and use your DVD Handycam Preparing Prepare a new disc. • You can start recording promptly with a DVD-R. • You need to format a DVD-RW before recording. Formatting is also required when using a once recorded DVD-RW again. Select a recording format (either VIDEO mode or VR mode) when - Sony DCR DVD301 | Operating Instructions - Page 9
You can make a copy of a disc you have recorded by connecting your DVD Handycam to your computer with the supplied software. For the recommended computer system environment, see page 91. You can produce an original DVD by editing your movies/still images on your computer. Finalize the disc so - Sony DCR DVD301 | Operating Instructions - Page 10
can do with your DVD Handycam 4 What is the difference between DVD-R and DVD-RW 6 How to prepare and use your DVD Handycam 8 Getting Started Using this manual 12 Checking the supplied accessories ..... 14 Step 1 Preparing the power source ... 15 Installing/removing the battery pack 15 Charging - Sony DCR DVD301 | Operating Instructions - Page 11
option of each item .. 111 Troubleshooting Types of trouble and corrective action 118 Self-diagnosis display 125 Warning indicators 126 Warning messages 127 Additional information About the disc 129 About the "InfoLITHIUM" battery pack 130 Using your camcorder abroad .......... 131 Maintenance - Sony DCR DVD301 | Operating Instructions - Page 12
The images of the LCD display and the viewfinder used in this manual are captured using a digital still camera. These images may appear different from what you see with your camcorder. Note on TV color systems TV color systems differ depending on the country or region. To view your recordings on - Sony DCR DVD301 | Operating Instructions - Page 13
can be recorded in VR mode. Finalizing is required only when other DVD-RW compatible players cannot play the disc. You can record again with your camcorder on a finalized disc recorded in VR mode. Compatible players: DVD players that can play back DVD-RWs in VR mode. Note You may not be able to - Sony DCR DVD301 | Operating Instructions - Page 14
Make sure that the following accessories are supplied with your camcorder. 1 2 3 4 5 6 7 8 9 0 1 Wireless Remote Commander (1) (page 142) 2 AC-L15A/L15B AC adaptor (1), Power cord (1) (page 16) 3 NP-FM50 rechargeable battery pack (1) (page 15) 4 A/V connecting cable (1) 5 Shoulder - Sony DCR DVD301 | Operating Instructions - Page 15
the power source Installing/removing the battery pack To install the battery pack, slide it in and up in the direction of the arrow until it clicks. To remove the battery pack 1 Slide the battery pack in the direction of arrow while pressing the battery release button. 2 Slide the battery pack - Sony DCR DVD301 | Operating Instructions - Page 16
Step 1 Preparing the power source Charging the installed battery pack Your camcorder operates only with the "InfoLITHIUM" battery pack (M series). See page 130 for more information on the "InfoLITHIUM" battery pack. Open the DC IN jack cover. 4 Power cord AC adaptor 3 POWER/CHG lamp With the v - Sony DCR DVD301 | Operating Instructions - Page 17
starting/stopping, zooming, and turning the power on/off. The actual battery life may be shorter. Notes •If the power goes off even though the remaining battery time indicator indicates that the battery pack has enough power to operate, charge the battery pack fully again so that the indication - Sony DCR DVD301 | Operating Instructions - Page 18
During charging Fully charged Notes •BATTERY INFO does not appear when the power of the camcorder is ON. •The remaining battery time may not be indicated in the following cases: - The battery pack is not installed correctly. - The battery pack is damaged. - The battery pack is empty. •The number - Sony DCR DVD301 | Operating Instructions - Page 19
lamp turns off, the power cuts off. To set the mode dial Rotate and set the mode dial to the operation you want to perform, such as shooting or playback. : Playback/edit Select this when you play back or edit (in VR mode only) scenes recorded on your camcorder. : Movies Select this when - Sony DCR DVD301 | Operating Instructions - Page 20
and then fold it back to the camcorder body with the LCD screen facing out as shown below. b To adjust the brightness of the LCD display 1 Turn the power on by pressing the POWER button for a few seconds. 2 Press SETUP. The SETUP display appears. MANUAL SET PROGRAM AE P EFFECT D EFFECT WHT BAL - Sony DCR DVD301 | Operating Instructions - Page 21
. Select (LCD/VF SET) then [LCD B.L.] in the SETUP display when using the battery pack (page 113). •The [LCD BRIGHT], [LCD B.L.] and [LCD COLOR] settings is set to ON normally. When you use the camcorder outdoors, set it to OFF so that the battery pack lasts longer. •When you turn off the LCD - Sony DCR DVD301 | Operating Instructions - Page 22
lens adjustment dial until you can see the characters in the viewfinder clearly. Tips •If you install a large capacity battery pack such as the NP-QM91/QM91D in your camcorder, extend the viewfinder and adjust the angle. •You can change the brightness of the viewfinder backlight. Select [VF B.L.] in - Sony DCR DVD301 | Operating Instructions - Page 23
your camcorder will have been discharged during that time. In that case, charge the built-in rechargeable battery by connecting the AC adaptor, and set the date and time again (page 16, 134). Getting Started OPEN button SETUP button 1 Open the LCD screen while pressing OPEN. 2 Turn the power on - Sony DCR DVD301 | Operating Instructions - Page 24
with the same procedure as in step 5, and then press the button in the center. The clock starts to move. The internal clock of your camcorder operates on a 12-hour cycle. •12:00 AM stands for midnight. •12:00 PM stands for noon. Note When setting the date and time, you cannot - Sony DCR DVD301 | Operating Instructions - Page 25
Step 4 Setting the date and time Simple setting of the clock using a time difference You can easily set the clock to the local time by setting the area. In the SETUP display use the multi-selector to select (OTHERS) then [AREA SET] . World time difference Getting Started 1 2 3 4 6 8 10 12 13 14 16 - Sony DCR DVD301 | Operating Instructions - Page 26
can delete data and record again with a DVD-RW. The preparation procedure is different depending on the type of disc you use. Notes •When you insert or remove a disc, move the grip belt to the bottom of the camcorder so as not to obstruct the operation with your hand, etc.. •Do not apply - Sony DCR DVD301 | Operating Instructions - Page 27
. When the formatting is completed, you can start recording on the DVD-RW. Notes •It may take some time to recognize the disc depending battery pack or disconnect the AC adaptor while formatting. •You can remove the disc when a power source is connected to your camcorder even when your camcorder - Sony DCR DVD301 | Operating Instructions - Page 28
scratch, put the fingerprint on, or get the disc dirty. To hold your camcorder Hold your camcorder with your fingers inserted through the grip belt. To fasten the grip belt Fasten Note Do not pick up your camcorder by the viewfinder, the LCD screen, or the battery pack. Viewfinder 28 LCD screen - Sony DCR DVD301 | Operating Instructions - Page 29
operation is common with VIDEO mode and VR mode. 6 3 1 4 2 7 5 Recording lamp 1 Remove the lens cap by pressing both knobs on the sides of the cap. 2 Install the battery power on by pressing the POWER button for a few seconds. 6 Insert a disc (page 26). This sets your camcorder to standby. - Sony DCR DVD301 | Operating Instructions - Page 30
microphone during recording. •When the ACCESS lamp lights on, data is being recorded on the disc. Take note of the following when data is being recorded, or the data or the disc may be damaged. - Do not apply shock or shake the camcorder. - Do not turn the power off. - Do not remove the battery - Sony DCR DVD301 | Operating Instructions - Page 31
for 8 seconds. JAN 1 2004 11:23:45AM Date and time The date and time are displayed about 5 seconds after the power is turned on. Notes •The remaining battery time indicator shows the approximate continuous recording time remaining. The indicator may not be displayed accurately, depending on the - Sony DCR DVD301 | Operating Instructions - Page 32
in the HQ (high quality) mode, SP (standard play) mode, and the LP (long play) mode. Your camcorder is set to SP mode as the default setting. 1 Set the mode dial to (Movie). 2 Press SETUP. MANUAL SET PROGRAM AE P EFFECT D EFFECT WHT BAL AUTO SHTR [ SETUP ] : END 3 Use the multi-selector to - Sony DCR DVD301 | Operating Instructions - Page 33
to 20 × or 120 ×. The picture quality deteriorates as you move the power zoom lever towards the "T" side. To activate digital zoom, select the digital zoom power in (CAMERA SET) - [D ZOOM] in the SETUP display (page 112). The digital zoom is set to [OFF] as the default setting. The right side of - Sony DCR DVD301 | Operating Instructions - Page 34
Shooting movies Shooting with the subject checking the image - Mirror mode The picture on the LCD display is a mirror-image. However, the picture will be normal when recorded. 180° 90° Open and rotate the LCD screen 180 degrees as shown above. The indicator appears in the viewfinder and on the LCD - Sony DCR DVD301 | Operating Instructions - Page 35
beforehand (page 15 to 27). The following operation is common with VIDEO mode and VR on the sides of the cap. 2 Install the battery pack or connect the AC adaptor (page 15). 3 power on by pressing the POWER button for a few seconds. 6 Insert a disc (page 26). This sets your camcorder to standby. - Sony DCR DVD301 | Operating Instructions - Page 36
still images 7 Press and hold PHOTO down lightly, then check out the image. When the AE/AF lock indicator (z) stops flashing and remains on, your camcorder is ready for shooting. The brightness of the image and focus are adjusted, are targeted for the middle of the image, and are set. Number - Sony DCR DVD301 | Operating Instructions - Page 37
Digital zoom - SteadyShot - Super NightShot plus - Color Slow Shutter - Fader - Picture effect - Digital effect camcorder powered by battery for 5 minutes, your camcorder automatically turns off. This is to save battery power and to prevent battery wear. Turn the power on again by pressing the POWER - Sony DCR DVD301 | Operating Instructions - Page 38
Set the mode dial to (Still). 2 Press SETUP. 3 Use the multi-selector to select MANUAL SET PROGRAM AE FLASH MODE FLASH LVL WHT BAL (CAMERA SET) . [ SETUP ] : This is the standard image quality level for your camcorder. The images are compressed to about 1/10. 6 Press SETUP. The SETUP display - Sony DCR DVD301 | Operating Instructions - Page 39
You can select either of 2 image sizes, 1152 × 864 or 640 × 480. The default setting is 1152 × 864. 1 Set the mode dial to 2 Press SETUP. MANUAL SET PROGRAM AE FLASH MODE FLASH LVL WHT BAL (Still). [ SETUP ] : END 3 Use the multi-selector to select CAMERA SET SELFTIMER BURST QUALITY IMAGESIZE - Sony DCR DVD301 | Operating Instructions - Page 40
: •100-0001: This file name appears on the LCD display of your camcorder. •DSC00001.jpg: This file name appears on the display of your personal size FINE STANDARD 1152 × 864 640 × 480 1152 × 864 640 × 480 Recordable number DVD-RW DVD-R VIDEO VR VIDEO 2 250 5 400 2 250 5 400 2 150 5 100 4 - Sony DCR DVD301 | Operating Instructions - Page 41
in 640 × 480 size at about 0.6 sec intervals. EXP BRKTG (Exposure bracketing) Your camcorder automatically shoots 3 images at about 0.6 sec intervals at different exposures. 1 Set the mode dial to 2 Press SETUP. MANUAL SET PROGRAM AE FLASH MODE FLASH LVL WHT BAL (Still). [ SETUP ] : END 3 Use - Sony DCR DVD301 | Operating Instructions - Page 42
the maximum number possible. •The effect of exposure bracketing may be difficult to recognize on the LCD display. It is recommended that you connect your camcorder to a TV or a computer to see its effect. 42 - Sony DCR DVD301 | Operating Instructions - Page 43
with the light source behind the subject or a subject with a light background, use the backlight. BACK LIGHT button Adjusting the exposure manually Adjust the exposure manually in the following cases: - when you need a fine adjustment for subjects against the light. - when the subject is too bright - Sony DCR DVD301 | Operating Instructions - Page 44
brighter To return to the automatic exposure Press EXPOSURE again. Notes •When you adjust the exposure manually, the following functions do not work: - Color Slow Shutter - BACK LIGHT •Your camcorder automatically returns to the automatic exposure setting: - if you change the PROGRAM AE effect. - if - Sony DCR DVD301 | Operating Instructions - Page 45
the daytime). This may cause your camcorder to malfunction. •If focusing is difficult with the autofocus mode when using NightShot plus, focus manually. •While recording using the NightShot , you cannot use the following functions: - Fader - Exposure - Digital effect - PROGRAM AE - White balance 45 - Sony DCR DVD301 | Operating Instructions - Page 46
brightness. At this time, the motion of the picture may slow down. •While using Color Slow Shutter, you cannot use the following functions: - Fader - Exposure - Digital effect - PROGRAM AE 46 - Sony DCR DVD301 | Operating Instructions - Page 47
Shooting movies/still images Self-timer recording PHOTO button START/ STOP button SETUP button On shooting movies 1 Set the mode dial to (Movie). 2 Press SETUP. 3 Use the multi-selector to select (CAMERA SET). 4 Use the multi-selector to select [SELFTIMER]. CAMERA SET SELFTIMER D ZOOM 16 : - Sony DCR DVD301 | Operating Instructions - Page 48
with the ID-1/ ID-2 system, the screen size is selected automatically. Refer to the operating instructions of your TV for further information. [a] 16:9WIDE 1 Set the mode dial to 2 Press SETUP. MANUAL SET PROGRAM AE P EFFECT D EFFECT WHT BAL AUTO SHTR (Movie). [ SETUP ] : END 3 Use the - Sony DCR DVD301 | Operating Instructions - Page 49
in 16:9 Wide mode automatically appear on the TV screen at full size when: - you connect your camcorder to a TV that is compatible with the video ID (ID-1/ID-2) system. - you connect your camcorder to the S VIDEO jack on the TV. •The ID-1 system sends aspect ratio (screen horizontal/vertical ratio - Sony DCR DVD301 | Operating Instructions - Page 50
the LCD display. To return to the automatic white balance mode Set (MANUAL SET) - [WHT BAL] to [AUTO] in the SETUP display. camcorder at a white subject for about 10 seconds after turning the power on to get a better adjustment: - after you replace the battery pack. - when you take your camcorder - Sony DCR DVD301 | Operating Instructions - Page 51
when you are recording distant subjects such as mountains, and prevents your camcorder from focusing on glass or metal mesh in windows when you are recording ] : END 5 Use the multi-selector to select the desired effect. MANUAL SET PROGRAM AE P EFFECT D EFFECT WHT BAL AUTO SHTR RETURN SPOTLIGHT - Sony DCR DVD301 | Operating Instructions - Page 52
on a subject in the background. - To record a stationary subject using a tripod. FAR NEAR 1 Set the mode dial to (Still). 2 Press FOCUS. (Movie) or The 9 (manual focus) indicator appears. 3 Check the viewfinder or the LCD display and use the multi-selector to adjust the focus. To return to the - Sony DCR DVD301 | Operating Instructions - Page 53
while using fader. Also you cannot use fader while using following function. - Digital effect - Super NightShot plus - Color Slow Shutter •When the OVERLAP or WIPE indicator appears in the standby mode, your camcorder automatically stores the image recorded on a disc. While the image is being - Sony DCR DVD301 | Operating Instructions - Page 54
an old movie-type atmosphere to pictures. Your camcorder automatically records pictures in the letterbox mode for (reduce the degree)/B (increase the degree). MANUAL SET D EFFECT LUMI. Bars: Displayed in LUMI •The following functions do not work during digital effect: - Fader - Super NightShot plus - Sony DCR DVD301 | Operating Instructions - Page 55
step 2. Notes •You can delete the latest scene only when it has been recorded on a DVD-RW. Data once recorded on DVD-Rs cannot be deleted. •You can delete the scene which was recorded just before the operation. When you recorded in VR mode, you can delete any scenes. See "Deleting movies/still - Sony DCR DVD301 | Operating Instructions - Page 56
the LCD screen, you can monitor the playback picture in the viewfinder. You can control playback using the Remote Commander supplied with your camcorder. Remove the insulation sheet to activate the Remote Commander (page 143). VISUAL INDEX button 2 1 Set the mode dial to (Play/Edit). 2 Open the - Sony DCR DVD301 | Operating Instructions - Page 57
Viewing the recordings Playing a disc on your camcorder 3 Select the (Movie) tab or the (Still) tab with the multi-selector according to the kind of scene you want to play back. The thumbnail - Sony DCR DVD301 | Operating Instructions - Page 58
the previous image Press .. [Marks on the buttons] Marks on the buttons are different between the camcorder and the Remote Commander. Marks of the camcorder: Marks of the Remote Commander: N Playback N Playback X Pause X Pause x Stop x Stop > Next > Next . Previous . Previous - Sony DCR DVD301 | Operating Instructions - Page 59
on or off as you press the button. DISPLAY button Viewing the recordings DISPLAY/BATT INFO button To display date/time and various settings Your camcorder automatically records not only images on the disc but also the recording data (date/time and various settings when recorded) (Data code). To - Sony DCR DVD301 | Operating Instructions - Page 60
Playing a disc on your camcorder Various settings (movie) 40min 0002 AUTO 100 AWB F1 . 8 0dB 0:00:08 -R VIDEO [a] [b] [c] [d] [e] [f] [a] SteadyShot OFF [b] Exposure [c] White balance [d] AUDIO/VIDEO jack. • The data code is displayed on the TV screen if you connect your camcorder to a TV. 60 - Sony DCR DVD301 | Operating Instructions - Page 61
your camcorder Magnifying recorded images - PB ZOOM (Playback zoom) Zoom lever 1 In the playback, playback pause or review, move the power zoom your camcorder when you have processed the image using PB ZOOM. However, you can record images on a VCR using your camcorder as a player. •You can operate - Sony DCR DVD301 | Operating Instructions - Page 62
Playing a disc on your camcorder Playing still images automatically - Slide Show You can see the automatic playback of all the still images recorded on the disc. 1 Set the mode dial - Sony DCR DVD301 | Operating Instructions - Page 63
monitoring playback pictures on the TV screen, it is recommended that you power your camcorder from a wall outlet using the AC adaptor (page 18). Refer to the operating instructions of your TV. Open the jack cover. Connect your camcorder to the TV using the A/V connecting cable supplied with your - Sony DCR DVD301 | Operating Instructions - Page 64
DVD-RWs. Some players cannot play discs recorded in the VR mode. Make sure of playback compatibility with your players in advance of recording. For details, see the operating instructions supplied with your player. FINALIZE FINALIZE button Notes •Do not apply shock or vibration to your camcorder - Sony DCR DVD301 | Operating Instructions - Page 65
step 5 in VR mode. To play back still images on players such as DVD players, still images must be converted to a MPEG format. Converted still images remain as JPEG files. When still images are recorded in VR mode, perform the operation in "Converting all the still images on a disc to a movie file - - Sony DCR DVD301 | Operating Instructions - Page 66
images recorded on the disc, the more time it takes to create a Photomovie. •Still images which are not compatible with your camcorders, such as ones shot using a digital still camera and then copied to a computer can not be converted from still images to a movie using [PHOTOMOVIE]. •Playback may - Sony DCR DVD301 | Operating Instructions - Page 67
To change a disc title on the finalize display, select [DISC TITLE] with the multi-selector and start from step 4 on this page. 1 Press SETUP. MANUAL SET PROGRAM AE P EFFECT D EFFECT WHT BAL AUTO SHTR [ SETUP ] : END 2 Use the multi-selector to select DISC SET REC MODE FORMAT FINALIZE UNFINALIZE - Sony DCR DVD301 | Operating Instructions - Page 68
Finalizing a disc 6 Use the multi-selector to select [SET]. The disc title is set and the display returns to the SETUP display. DISC SET REC MODE FORMAT FINALIZE UNFINALIZE DISC TITLE RETURN BEACH [ SETUP ] : END 7 Press SETUP. The SETUP display disappears from the LCD display. To cancel - Sony DCR DVD301 | Operating Instructions - Page 69
to be played back in menu display on the DVD player. To play back still images The operation is different depending on your player. See operating instructions of your player. Notes •Make sure that the vertical-shaped DVD player with a DVD drive are placed in a horizontal position when playing back - Sony DCR DVD301 | Operating Instructions - Page 70
back a disc on a computer with a DVD drive installed The display and the operation may vary depending on the operating system of your computer. To play back movies 1 Turn on your computer. 2 Insert the finalized disc to the DVD drive of your computer. A DVD playback application starts and the movie - Sony DCR DVD301 | Operating Instructions - Page 71
case, copy the data to the hard disk drive of your computer. •The disc may not be played back on some computers. For details, see operating instructions of your computer. Tip You can play back the disc on a computer without a DVD drive, by connecting your camcorder to your computer using a USB cable - Sony DCR DVD301 | Operating Instructions - Page 72
on a finalized disc - Unfinalizing (VIDEO mode DVD-RWs only) You can record on finalized DVD-RWs by unfinalizing them. This operation is valid in VIDEO mode only. You do not have to unfinalize a VR mode disc. Insert a finalized DVD-RW into your camcorder beforehand. 1 Press SETUP. 2 Use the multi - Sony DCR DVD301 | Operating Instructions - Page 73
Finalizing a disc for other players Recording on a finalized disc - Unfinalizing (VIDEO mode DVD-RWs only) Notes •Make sure that the power of your camcorder is supplied from a wall outlet using the AC adaptor. •If you disconnect the AC adaptor while unfinalizing a disc, the disc may not be - Sony DCR DVD301 | Operating Instructions - Page 74
the multi-selector to select [REC FORMAT]. FORMAT REC FORMAT EXECUTE RETURN VIDEO VR ALL DATA TO BE DELETED CAN PLAYBACK ON VARIOUS DVD DEVICES. CANNOT EDIT IN CAMCORDER [ SETUP ] : END 5 Use the multi-selector to select [VIDEO] or [VR]. FORMAT REC FORMAT EXECUTE RETURN VIDEO ALL DATA TO BE - Sony DCR DVD301 | Operating Instructions - Page 75
the power of your camcorder is supplied from a wall outlet using the AC adaptor. •If you disconnect the AC adaptor during formatting, the disc may not be formatted correctly or damaged, and can not be recorded. •Do not apply shock or vibration to your camcorder during formatting. •You can format DVD - Sony DCR DVD301 | Operating Instructions - Page 76
is usable in VR mode only. • Do not remove the battery pack or the AC adaptor from you camcorder while editing. It may damage the disc. Registering movies or still images in the Playlist Insert a DVD-RW recorded in VR mode into your camcorder. 1 Set the mode dial to (Play/Edit). 2 Press EDIT. The - Sony DCR DVD301 | Operating Instructions - Page 77
Selecting the playing order on your camcorder - Playlist 4 Use the multi-selector to select [ movies or still images on the disc appears. EDIT EXEC. ADD RET. Using a disc in VR mode (DVD-RWs only) 001 JAN 1 04 1/1 6:00PM Backwards the page. Forwards the page. Shows current page/total pages - Sony DCR DVD301 | Operating Instructions - Page 78
Selecting the playing order on your camcorder - Playlist 9 Use the multi-selector to select [EXEC.]. The selected movies or still images are registered in the Playlist. When a still image is added to a - Sony DCR DVD301 | Operating Instructions - Page 79
when you make a Photomovie. Saving still images as a single movie allows you to register more scenes in the Playlist. Insert a DVD-RW with still images recorded into your camcorder. 1 Set the mode dial to (Play/Edit). 2 Press EDIT. The display to select editing object appears. EDIT EDIT MOVIE - Sony DCR DVD301 | Operating Instructions - Page 80
from the Playlist Erasing unnecessary scenes from the Playlist does not affect the actual recorded data on the disc. Insert a Playlist-registered DVD-RW into your camcorder. 1 Set the mode dial to (Play/Edit). 2 Press EDIT. The display to select editing object appears. EDIT EDIT MOVIE EDIT STILL - Sony DCR DVD301 | Operating Instructions - Page 81
Using a disc in VR mode (DVD-RWs only) Selecting the playing order on your camcorder - Playlist 7 Use the multi-selector to select the scene to be erased. The selected scene is marked with . Repeat this step to erase multiple scenes. - Sony DCR DVD301 | Operating Instructions - Page 82
- Playlist Changing the order within the Playlist Insert a Playlist-registered DVD-RW into your camcorder. 1 Set the mode dial to (Play/Edit). 2 Press EDIT. The display to select editing object appears. EDIT EDIT MOVIE EDIT STILL EDIT PLAYLIST [ EDIT ] : END 3 - Sony DCR DVD301 | Operating Instructions - Page 83
Using a disc in VR mode (DVD-RWs only) Selecting the playing order on your camcorder - Playlist 6 Use the multi-selector to select the scene to be moved. The selected scene is marked with . Repeat this step if you want to - Sony DCR DVD301 | Operating Instructions - Page 84
two scenes. Dividing movies into scenes within the Playlist does not affect the actual recorded data on the disc. Insert a Playlist-registered DVD-RW into your camcorder. Note You cannot divide a movie converted from still images. 1 Set the mode dial to (Play/Edit). 2 Press EDIT. The display to - Sony DCR DVD301 | Operating Instructions - Page 85
Using a disc in VR mode (DVD-RWs only) Selecting the playing order on your camcorder - Playlist 6 Use the multi-selector to select from the point where you press c/C and the actual dividing point, as your camcorder selects the dividing point based on half- second increments. 8 Use the multi- - Sony DCR DVD301 | Operating Instructions - Page 86
Selecting the playing order on your camcorder - Playlist Playing the Playlist Insert a Playlist-registered DVD-RW into your camcorder. 1 Set the mode dial to (Play/Edit). The Visual Index display appears. 001 JAN 1 03 1/2 6:00PM 2 Use the multi-selector to select (Playlist) tab. A thumbnail - Sony DCR DVD301 | Operating Instructions - Page 87
Editing the original data affects the actual recorded data. Dividing a movie Note that this operation actually divides the original recorded data on the disc. Insert a movie recorded DVD-RW into your camcorder. Notes •You cannot divide still images and still images converted to a movie. •When the - Sony DCR DVD301 | Operating Instructions - Page 88
point with more precision. Note A slight difference may occur from the point where you press c/C and the actual dividing point, as your camcorder selects the dividing point based on half-second increments. 8 Use the multi-selector to select [EXEC.]. The confirmation display appears. DIVIDE 0:02 - Sony DCR DVD301 | Operating Instructions - Page 89
only) Editing the original data Deleting movies/still images Note that this operation actually deletes recorded data from the disc. Insert a recorded DVD-RW into your camcorder. Notes •When you delete movies, the movies registered to the Playlist are also deleted. •Deleting scenes may not provide - Sony DCR DVD301 | Operating Instructions - Page 90
Editing the original data 6 Use the multi-selector to select [SELECT]. A thumbnail list of the movies or still images recorded on the disc appears. EDIT EXEC. DELETE RET. 001 JAN 1 04 1/2 6:00PM 7 Use the multi-selector to select a scene. The selected scene is marked with . Repeat this step - Sony DCR DVD301 | Operating Instructions - Page 91
may not recover properly even after your computer recovers from Suspend/Resume, or from Sleep status. •The software in the supplied CD-ROM does not work with a Mac OS or Mac OSX. Tips •Your camcorder is compatible with Hi-Speed USB (the USB 2.0 Specification).You can transfer data at a faster rate - Sony DCR DVD301 | Operating Instructions - Page 92
driver Start the following operation before connecting the USB cable to your computer. Install the USB driver to control your camcorder all the software. 2 Insert the supplied CD-ROM into the CD-ROM drive of your computer. The installation menu window appears. 3 Move the cursor to [USB Driver] and - Sony DCR DVD301 | Operating Instructions - Page 93
ImageMixer Ver.1.5 for Sony DVD Handycam (hereinafter referred to as ImageMixer) software that manages movies and still images transferred from your camcorder on your computer, and the WINASPI software that manages writing data on CD-Rs/CD-RWs. 1 When the USB driver installation is completed, click - Sony DCR DVD301 | Operating Instructions - Page 94
to (Play/Edit). 3 Turn the power on your camcorder by pressing the POWER button for a few seconds. 4 Connect the (USB) jack of the camcorder and the (USB) port of the computer using the USB cable supplied with your camcorder. USB port 6 Make sure that [Sony DVD Handycam] is selected as the best - Sony DCR DVD301 | Operating Instructions - Page 95
again following "If you cannot install the USB driver" (page 98). For Microsoft Windows 2000 users 1 Connect the AC adaptor to your camcorder. 2 Set the mode dial to (Play/Edit). 3 Turn the power on your camcorder by pressing the POWER button for a few seconds. 4 Connect the (USB) jack of - Sony DCR DVD301 | Operating Instructions - Page 96
again following "If you cannot install the USB driver" (page 98). For Microsoft Windows Me users 1 Connect the AC adaptor to your camcorder. 2 Set the mode dial to (Play/Edit). 3 Turn the power on your camcorder by pressing the POWER button for a few seconds. 4 Connect the (USB) jack of - Sony DCR DVD301 | Operating Instructions - Page 97
Device Manager] window appears. 4 Make sure that [SONY DDX-A1010] appears in [CDROM], [Sony DVD Handycam] in [Storage device], and [USB Mass Storage Device] in [Universal Serial Bus controllers] respectively. When all the devices appear, the USB driver is installed correctly. If any of these devices - Sony DCR DVD301 | Operating Instructions - Page 98
computer" (page 94). The USB driver installation and the connection between your camcorder and the computer is completed. Consulting the on-line help An ImageMixer on-line help is available where you can find detailed operating instructions for ImageMixer software. 1 Click located at the top right - Sony DCR DVD301 | Operating Instructions - Page 99
Ver.1.5 for Sony DVD Handycam] on your computer. The ImageMixer software starts and the title dialog box appears. 1 Turn on your computer and allow Windows to load. 2 Connect the AC adaptor to your camcorder. 3 Set the mode dial to (Play/Edit). 4 Turn the power on your camcorder by pressing the - Sony DCR DVD301 | Operating Instructions - Page 100
mode (page 32) and the length of the movie. •You cannot remove the disc from your camcorder during displaying the thumbnails on your computer display. •When anything goes wrong with the operation, close all the software and restart the computer. Tips •An album is a unit to register and to manage the - Sony DCR DVD301 | Operating Instructions - Page 101
the POWER button for a few seconds. 5 Insert a recorded and finalized disc into your camcorder. 6 Connect the (USB) jack of the camcorder and the (USB) port of the computer using the USB cable supplied with your camcorder. USB port USB cable (supplied) USB jack 7 Start the ImageMixer software on - Sony DCR DVD301 | Operating Instructions - Page 102
Editing and saving scenes Editing movies You can combine multiple scenes into a single scene. 1 Click on the title window. The window switches to the [Movie Editing Environment] and thumbnails appear. Saving the movie on your computer When the editing of the movie is completed, you can save the - Sony DCR DVD301 | Operating Instructions - Page 103
computer Creating an original disc You can edit the scenes registered to the album and make an original DVD. Making a menu A menu is required to play a disc recorded on your camcorder on a DVD player. 1 Click on the title window. The [Layout mode] window appears. Album menu: Click to change the - Sony DCR DVD301 | Operating Instructions - Page 104
window. The [Album mode] window appears. Tip When you create a DVD on the DVD drive installed with your computer, you can change the "Disc Type" from of the window. Selecting [4.7G] enables you to record data in 12 cm DVD-R/DVD-RW at its maximum capacity. 2 Drag and drop the contents to add and - Sony DCR DVD301 | Operating Instructions - Page 105
camcorder to the computer with the USB cable, then insert a blank disc into your camcorder. 4 Click . The [DVD ]. Recording on the disc starts. When the operation is completed, a dialog box asking if you [Cancel]. 7 Remove the disc following the instructions given in the on-screen messages. Notes - Sony DCR DVD301 | Operating Instructions - Page 106
VCR using the A/V connecting cable supplied with your camcorder. AUDIO/VIDEO A/V connecting cable (supplied) Tips •You can edit on VCRs that support the following systems: 8 mm, Hi8, VHS, S-VHS, VHSC, S-VHSC, Betamax, ED Betamax, mini DV, DV, Digital8, MICRO MV •If your VCR is a monaural - Sony DCR DVD301 | Operating Instructions - Page 107
a blank tape (or a tape you want to record over) into the VCR. Set the input selector to LINE. Refer to the operating instructions of the VCR. 3 Start recording on the VCR. 4 Play back the recorded disc on your camcorder. When you have finished dubbing Stop recording on the VCR, then press x on your - Sony DCR DVD301 | Operating Instructions - Page 108
. Set [DISPLAY] in (OTHERS) to [LCD] in the SETUP display (the default setting is [LCD]). 1 Set the mode dial to (Play/Edit) on your camcorder. 2 Press SETUP. The SETUP display appears. 3 Use the multi-selector to select (VIDEO SET). 4 Use the multi-selector to select [VIDEO INPUT]. VIDEO SET HiFi - Sony DCR DVD301 | Operating Instructions - Page 109
a disc you want to record additionally) into your camcorder. The [FORMAT] display appears when you insert a new DVD-RW. Format the disc in VIDEO mode or in VR mode (page 6) following the instructions on the display. 4 Press VISUAL INDEX on your camcorder. The Visual Index display disappears, and the - Sony DCR DVD301 | Operating Instructions - Page 110
- Customizing your camcorder - Changing the SETUP display You can change the default settings different depending on the mode dial position. APPLI. MANUAL SET VIDEO SET CAMERA SET LCD/VF SET DISC SET SETUP MENU OTHERS 1 Turn the power on by pressing the POWER button for a few seconds. 2 Press the - Sony DCR DVD301 | Operating Instructions - Page 111
camcorder Changing the SETUP display Selecting the option of each item Menu items differ depending on the position of the mode dial. The display shows only the items that are currently in effect or that you can operate add special effects using the various digital functions (page 54). To fire the - Sony DCR DVD301 | Operating Instructions - Page 112
zoom is performed. To activate the digital zoom. From 10✕ to 20✕ zoom is performed digitally (page 33). To activate the digital zoom. From 10x to 120✕ zoom is performed digitally. Not to record a 16:9 Wide off indicator excessive compensation for camera-shake. appears. Your camcorder prevents 112 - Sony DCR DVD301 | Operating Instructions - Page 113
On LCD B.L. and VF B.L. •When you select [BRIGHT], battery life is reduced a little during recording. •When you use power supplies other than the battery pack, [BRIGHT] is automatically selected. Tip Even if you images continuously (page 62). Mode dial Play/Edit Customizing your camcorder 113 - Sony DCR DVD301 | Operating Instructions - Page 114
and a player. To use the S VIDEO cable to connect your camcorder and a player. Play/Edit Play/Edit Icon/Item DISC SET REC MODE FORMAT*1 Option HQ z SP LP - FINALIZE - UNFINALIZE*1*2 - DISC TITLE - FILE NO. z SERIES RESET *1 DVD-RWs only *2 VIDEO mode only Meaning Mode dial To record in - Sony DCR DVD301 | Operating Instructions - Page 115
the power off automatically if no operation have taken place for five minutes when powered by the battery pack. To remain the power on even if no operation MODE •You cannot select [DEMO MODE] when a disc is inserted in your camcorder. •When NIGHTSHOT PLUS switch is set to ON, the ["NIGHTSHOT PLUS"] - Sony DCR DVD301 | Operating Instructions - Page 116
. To cancel the melody, beep sound and shutter sound. To activate the Remote Commander supplied with your camcorder. To deactivate the Remote Commander to avoid erroneous remote control operation caused by other equipments' remote control. To show the display on the LCD screen and in the viewfinder - Sony DCR DVD301 | Operating Instructions - Page 117
display even when your camcorder is connected to outputs on the TV or VCR. •If more than five minutes passes after removing the power source, the [PROGRAM battery is removed. Tip When recording a close subject, if [REC LAMP] is set to [ON], the red camera recording lamp on the front of the camcorder - Sony DCR DVD301 | Operating Instructions - Page 118
- Types of trouble and corrective action If you run into problems using your camcorder, use the following table to troubleshoot the problem. If the problem persists, disconnect the power source and contact your Sony dealer or local authorized Sony service facility. If "C:ss:ss" appears - Sony DCR DVD301 | Operating Instructions - Page 119
Troubleshooting Types of trouble and corrective action About the power source Symptom The battery pack is quickly discharged. The battery remaining time indicator does not indicate the correct time. You cannot charge the battery pack. The power goes off although the remaining battery time - Sony DCR DVD301 | Operating Instructions - Page 120
Types of trouble and corrective action About the disc Symptom Remaining disc space / connected. c Install/connect the power source correctly. • The battery pack is exhausted. c Install a charged battery pack. • Moisture condensation has occurred. c Turn off your camcorder and leave it for at least - Sony DCR DVD301 | Operating Instructions - Page 121
may prevent you from shooting movies. The power goes off. • Your camcorder powered by the battery pack turns off for more than five minutes with no operations performed. c Press the POWER button for a few seconds. c . spots appear on the display. This is not a malfunction. Troubleshooting 121 - Sony DCR DVD301 | Operating Instructions - Page 122
Types of trouble and corrective action Symptom Cause and/or Corrective Actions low sound is heard when playing back a disc. Cause and/or Corrective Actions • There is no disc inserted in the camcorder. c Insert a disc. (page 26) • A single-sided disc is inserted upside down. c Insert the disc - Sony DCR DVD301 | Operating Instructions - Page 123
playback crosses 2 titles made automatically by your camcorder when . is pressed, playback may not move to the previous scene. c Select the desired scene from the menu screen. Refer to the instruction manual for further information. Troubleshooting During editing Symptom The edit display is not - Sony DCR DVD301 | Operating Instructions - Page 124
at least an hour to acclimatize it. (page 132) • Some problems have occurred in your camcorder. c Remove the disc and insert it again, then operate your camcorder again. • The USB cable was connected before installation of the USB driver was completed. c Install the USB driver again. (page 98) 124 - Sony DCR DVD301 | Operating Instructions - Page 125
the AC adaptor or remove the battery pack. After reconnecting/reinstalling the power supply, operate your camcorder. • A malfunction that you cannot service has occurred. c Contact your Sony dealer or local authorized Sony service facility and inform them of the 5-digit code. (example: E:61:10) If - Sony DCR DVD301 | Operating Instructions - Page 126
unreadable on your camcorder. C:21: from your camcorder is inserted camcorder is inserted. Warning indicator referring to the disc Fast flashing: • An unrecognizable disc is inserted. E The battery pack is dead or nearly dead Slow flashing: •The battery pack is exhausted. Depending on the operating - Sony DCR DVD301 | Operating Instructions - Page 127
Warning messages Troubleshooting Message Cause and/or Corrective Actions FOR "InfoLITHIUM" BATTERY ONLY • Use an "InfoLITHIUM" battery pack. E • Install a charged battery pack. • The battery pack is completely dead, and cannot be recharged. c Replace it with a new battery pack. %*1 • - Sony DCR DVD301 | Operating Instructions - Page 128
(DVD-RW only). • An error occurred during reading or writing the disc. • You cannot operate your camcorder during charging the flash. *1 You hear the beep sound when the message appears. *2 If the data is not recorded correctly, your camcorder automatically recovers data when turn on the power - Sony DCR DVD301 | Operating Instructions - Page 129
You can use 8 cm DVD-R and 8 cm DVD-RW discs only. Use the discs with or logo. Note We recommend you to use the Sony discs which is confirmed compatibility with your camcorder. Refer to page 6 about the recommended discs. Notes on use •Hold the disc by its edge while supporting the center hole - Sony DCR DVD301 | Operating Instructions - Page 130
pack and an AC adaptor/charger (optional). The "InfoLITHIUM" battery pack calculates the power consumption according to the operating conditions of your camcorder, and displays the remaining battery time in minutes. With an AC adaptor/charger (optional), the remaining battery time and charging time - Sony DCR DVD301 | Operating Instructions - Page 131
in any area with 100 V to 240 V AC, 50/60 Hz power standards. Use a commercially available AC plug adaptor [a], if necessary, depending on the design of the wall outlet [b]. AC-L15A/L15B [a] [b] Your camcorder is an NTSC system-based camcorder. If you want to view the playback picture on a TV, it - Sony DCR DVD301 | Operating Instructions - Page 132
Camcorder operation •Operate your camcorder on 7.2 V (battery pack) or 8.4 V (AC adaptor) power. •For DC or AC operation, use the accessories recommended in these operating instructions. •If any solid object or liquid gets inside the casing, unplug your camcorder and have it checked by a Sony - Sony DCR DVD301 | Operating Instructions - Page 133
to direct sunlight The internal mechanisms of the viewfinder and the LCD display may be damaged. If your camcorder is not to be used for a long time Remove the disc. Periodically turn on the power, operate the movie and still images functions and play back a disc for about three minutes. On the LCD - Sony DCR DVD301 | Operating Instructions - Page 134
off for more than 24 hours. •Or, install a fully charged battery pack in your camcorder, and leave your camcorder with the POWER button turned off for more than 24 hours. Rechargeable battery pack •Use only the specified charger or video equipment with the charging function. •To prevent an accident - Sony DCR DVD301 | Operating Instructions - Page 135
Total number of pixels 123 200 (560 × 220) General Power requirements 7.2 V (battery pack) 8.4 V (AC adaptor) Average power consumption (when using the battery pack) During camera recording using LCD: 4.4 W Viewfinder: 4.1 W Operating temperature 0°C to 40°C (32°F to 104°F) Storage temperature -20 - Sony DCR DVD301 | Operating Instructions - Page 136
in the operating mode Operating temperature 0°C to 40°C (32°F to 104°F) Storage temperature -20°C to + 60°C (-4°F to + 140°F) Dimensions (approx.) 56 × 31 × 100 mm (2 1/4 × 1 1/4 × 4 in.) (w/h/d) excluding projecting parts Mass (approx.) 190 g (6.7 oz) excluding power cord Rechargeable battery pack - Sony DCR DVD301 | Operating Instructions - Page 137
- Parts and controls/Index - Identifying parts and controls Camcorder 1 6 7 8 2 9 3 4 5 0 1 LCD screen (page 20) 2 LCD BACKLIGHT button (page 20) 3 OPEN button (page 20) 4 REC START/STOP button 5 USB jack (page 94) 6 Viewfinder (page 22) 7 Eye cup 8 START/STOP button (page 30) 9 Battery - Sony DCR DVD301 | Operating Instructions - Page 138
Identifying parts and controls qa qj qs qd qk qf qg qh ql qa Mode dial (page 19) qs POWER/CHG lamp (page 16) qd REMOTE jack Use to connect to optional accessories. qf Viewfinder lens adjustment dial (page 22) qg POWER button (page 19) qh BATT (battery) release button (page 15) qj DC IN - Sony DCR DVD301 | Operating Instructions - Page 139
. •The intelligent accessory shoe supplies power to optional accessories such as a microphone. •The intelligent accessory shoe is linked to the POWER button, allowing you to turn the power supplied by the shoe on and off. Refer to the operating instructions of the accessory for further information - Sony DCR DVD301 | Operating Instructions - Page 140
Identifying parts and controls ea ed es ef eg eh ej ek ea Power zoom lever (page 33) es PHOTO button (page 35) ed SUPER NS PLUS/COLOR SLOW belt (page 28) Attaching the shoulder strap Attach the shoulder strap supplied with your camcorder to the hooks for the shoulder strap. 4 1 3 2 140 - Sony DCR DVD301 | Operating Instructions - Page 141
rg N PLAY (playback)/REVIEW button (pages 55, 56) rh FADER button (page 53) rj FOCUS button (page 52) rk EXPOSURE button (page 43) rl SETUP button (page 110) t; FINALIZE button (page 64) ta EDIT button (page 76) ts x STOP button (page 57) td X PAUSE button (page 58) Parts and controls/Index 141 - Sony DCR DVD301 | Operating Instructions - Page 142
parts and controls Remote Commander The buttons that have the same name on the Remote Commander as on your camcorder function identically to the buttons on your camcorder (page 59) 8 Transmitter 9 START/STOP button (page 30) 0 Power zoom buttons (page 33) qa X PAUSE button (page 58) qs VISUAL - Sony DCR DVD301 | Operating Instructions - Page 143
your camcorder from other Sony DVD players to avoid erroneous remote control operation. If you use another Sony DVD player in the DVD 2 Commander mode, it is recommended that you change the Commander mode of the DVD player or cover the sensor of the DVD player with black paper. Parts and - Sony DCR DVD301 | Operating Instructions - Page 144
Identifying parts and controls Operation indicators LCD display and viewfinder On shooting On playback wa ws 0001 wd wf AUTO 60 AWB F1.8 9dB N 0:12:34 -R VIDEO wg wh wj wk 144 1 Recording mode (pages 32, 114), Image size (page 39, 112) 2 Remaining battery time (page 18) 3 Zoom (page 33 - Sony DCR DVD301 | Operating Instructions - Page 145
quality 38, 112 Image size 39, 112 "InfoLITHIUM" battery ...... 130 Infrared ray emitter 139 Intelligent accessory shoe .... 139 JPEG 40 LANDSCAPE 51 LCD screen 20 LP 32 LUMI. (Luminance key) ........ 54 M, N Manual focus 52 MIC (PLUG IN POWER) jack 139 Mirror mode 34 Moisture condensation - Sony DCR DVD301 | Operating Instructions - Page 146
On trademarks • DVD-VIDEO, DVD-RW, and the DVD-R logo are trademarks. • InfoLITHIUM is a trademark of Sony Corporation. • PlayStation is a registered trademark of Sony Computer Entertainment Inc. • Microsoft and Windows are trademarks or registered trademarks of Microsoft Corporation in the United - Sony DCR DVD301 | Operating Instructions - Page 147
147 Parts and controls/Index - Sony DCR DVD301 | Operating Instructions - Page 148
Printed on 100% recycled paper using VOC (Volatile Organic Compound)-free vegetable oil based ink. Printed in Japan
-
 1
1 -
 2
2 -
 3
3 -
 4
4 -
 5
5 -
 6
6 -
 7
7 -
8
-
9
-
10
-
11
-
12
-
13
-
14
-
15
-
16
-
17
-
18
-
19
-
20
-
21
-
22
-
23
-
24
-
25
-
26
-
27
-
28
-
29
-
30
-
31
-
32
-
33
-
34
-
35
-
36
-
37
-
38
-
39
-
40
-
41
-
42
-
43
-
44
-
45
-
46
-
47
-
48
-
49
-
50
-
51
-
52
-
53
-
54
-
55
-
56
-
57
-
58
-
59
-
60
-
61
-
62
-
63
-
64
-
65
-
66
-
67
-
68
-
69
-
70
-
71
-
72
-
73
-
74
-
75
-
76
-
77
-
78
-
79
-
80
-
81
-
82
-
83
-
84
-
85
-
86
-
87
-
88
-
89
-
90
-
91
-
92
-
93
-
94
-
95
-
96
-
97
-
98
-
99
-
100
-
101
-
102
-
103
-
104
-
105
-
106
-
107
-
108
-
109
-
110
-
111
-
112
-
113
-
114
-
115
-
116
-
117
-
118
-
119
-
120
-
121
-
122
-
123
-
124
-
125
-
126
-
127
-
128
-
129
-
130
-
131
-
132
-
133
-
134
-
135
-
136
-
137
-
138
-
139
-
140
-
141
-
142
-
143
-
144
-
145
-
146
-
147
-
148
 |
 |
2-186-668-
11
(1)
©2004 Sony Corporation
Operating Instructions
Before operating the unit, please read this manual thoroughly,
and retain it for future reference.
Owner’s Record
The model and serial numbers are located on the bottom. Record the
serial number in the space provided below. Refer to these numbers
whenever you call upon your Sony dealer regarding this product.
DCR-DVD301
Digital
Video Camera
Recorder
Model No.
DCR-DVD301
Model No.
AC-
Serial No.
Serial No.
SERIES
TM
Operating Instructions
[US]