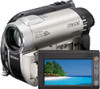
Sony DCR-DVD650 Operating Guide - Page 100
Other functions, Recommended USB cable, connection, Copying discs, Editing movies
 |
UPC - 027242763111
View all Sony DCR-DVD650 manuals
Add to My Manuals
Save this manual to your list of manuals |
Page 100 highlights
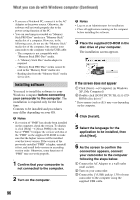
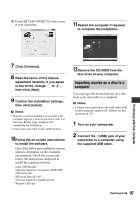
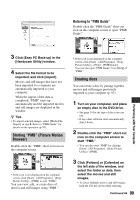
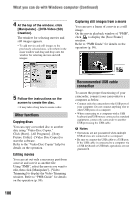
What you can do with Windows computer (Continued) 4 At the top of the window, click [Manipulate] - [DVD-Video (SD) Creation]. The window for selecting movies and still images appears. • To add movies and still images to the previously selected ones, select them in the main window and drag and drop onto the window for selecting movies and still images. Capturing still images from a movie You can save a frame of a movie as a still image. On the movie playback window of "PMB", click to display the [Save Frame] window. Refer to "PMB Guide" for details on the operation (p. 99). 5 Follow the instructions on the screen to create the disc. • It may take a long time to create a disc. Other functions Copying discs You can copy a recorded disc to another disc using "Video Disc Copier." Click [Start] - [All Programs] - [Sony Picture Utility] - [Video Disc Copier] to start the software. Refer to the "Video Disc Copier" help for details on the operation. Editing movies You can cut out only a necessary part from a movie and save it as another file. Using "PMB", select the movie you want to edit, then click [Manipulate] - [Video Trimming] to display the Video Trimming window. Refer to "PMB Guide" for details on the operation (p. 99). Recommended USB cable connection To assure the proper functioning of your camcorder, connect your camcorder to a computer as below. • Connect only the camcorder to the USB port of your computer. Do not connect anything else to other USB ports of a computer. • When connecting to a computer with a USB keyboard and USB mouse connected as standard equipment, connect the camcorder to another USB port using the USB cable. b Notes • Operations are not guaranteed when multiple USB devices are connected to a computer. • Be sure to connect the USB cable to a USB port. If the USB cable is connected to a computer via a USB keyboard or USB hub, operations are not guaranteed. 100
-
 1
1 -
2
-
3
-
4
-
5
-
6
-
7
-
8
-
9
-
10
-
11
-
12
-
13
-
14
-
15
-
16
-
17
-
18
-
19
-
20
-
21
-
22
-
23
-
24
-
25
-
26
-
27
-
28
-
29
-
30
-
31
-
32
-
33
-
34
-
35
-
36
-
37
-
38
-
39
-
40
-
41
-
42
-
43
-
44
-
45
-
46
-
47
-
48
-
49
-
50
-
51
-
52
-
53
-
54
-
55
-
56
-
57
-
58
-
59
-
60
-
61
-
62
-
63
-
64
-
65
-
66
-
67
-
68
-
69
-
70
-
71
-
72
-
73
-
74
-
75
-
76
-
77
-
78
-
79
-
80
-
81
-
82
-
83
-
84
-
85
-
86
-
87
-
88
-
89
-
90
-
91
-
92
-
93
-
94
-
 95
95 -
 96
96 -
 97
97 -
 98
98 -
 99
99 -
 100
100 -
 101
101 -
 102
102 -
 103
103 -
 104
104 -
 105
105 -
106
-
107
-
108
-
109
-
110
-
111
-
112
-
113
-
114
-
115
-
116
-
117
-
118
-
119
-
120
-
121
-
122
-
123
-
124
-
125
-
126
-
127
-
128
-
129
-
130
-
131
-
132
-
133
-
134
-
135
-
136
-
137
-
138
-
139
-
140
-
141
-
142
-
143
-
144
-
145
-
146
-
147
-
148
-
149
-
150
-
151
-
152
-
153
-
154
-
155
-
156
-
157
-
158
-
159
 |
 |
