Sony DCR-DVD710 Operating Guide - Page 63
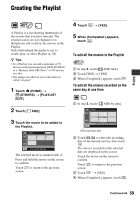
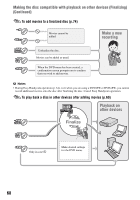
Connecting a device with the, USB cable, VIEW IMAGES.
 |
UPC - 027242727694
View all Sony DCR-DVD710 manuals
Add to My Manuals
Save this manual to your list of manuals |
Page 63 highlights
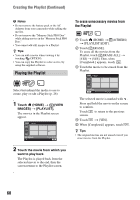
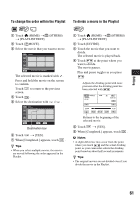
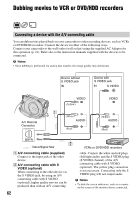
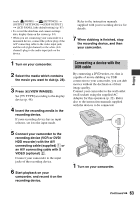
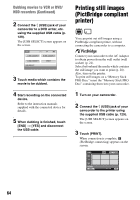
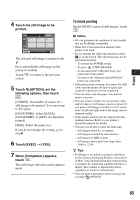
Editing touch (HOME) t (SETTINGS) t [OUTPUT SETTINGS] t [DISP OUTPUT] t [LCD PANEL] (the default setting) (p. 87). • To record the date/time and camera settings data, display them on the screen (p. 84). • When you are connecting your camcorder to a monaural device, connect the yellow plug of the A/V connecting cable to the video input jack, and the red (right channel) or the white (left channel) plug to the audio input jack on the device. 1 Turn on your camcorder. 2 Select the media which contains the movie you want to dub (p. 28). 3 Press (VIEW IMAGES). Set [TV TYPE] according to the display device (p. 48). 4 Insert the recording media in the recording device. If your recording device has an input selector, set it to the input mode. 5 Connect your camcorder to the recording device (VCR or DVD/ HDD recorder) with the A/V connecting cable (supplied) 1 or an A/V connecting cable with S VIDEO (optional) 2. Connect your camcorder to the input jacks of the recording device. 6 Start playback on your camcorder, and record it on the recording device. Refer to the instruction manuals supplied with your recording device for details. 7 When dubbing is finished, stop the recording device, and then your camcorder. Connecting a device with the USB cable By connecting a DVD writer, etc. that is capable of movie dubbing via USB connection to your camcorder, you can dub movies without the declination of their image quality. Connect your camcorder to the wall outlet (wall socket) using the supplied AC Adaptor for this operation (p. 22). Refer also to the instruction manuals supplied with the devices to be connected. 1 Turn on your camcorder. Continued , 63
-
 1
1 -
2
-
3
-
4
-
5
-
6
-
7
-
8
-
9
-
10
-
11
-
12
-
13
-
14
-
15
-
16
-
17
-
18
-
19
-
20
-
21
-
22
-
23
-
24
-
25
-
26
-
27
-
28
-
29
-
30
-
31
-
32
-
33
-
34
-
35
-
36
-
37
-
38
-
39
-
40
-
41
-
42
-
43
-
44
-
45
-
46
-
47
-
48
-
49
-
50
-
51
-
52
-
53
-
54
-
55
-
56
-
57
-
 58
58 -
 59
59 -
 60
60 -
 61
61 -
 62
62 -
 63
63 -
 64
64 -
 65
65 -
 66
66 -
 67
67 -
 68
68 -
69
-
70
-
71
-
72
-
73
-
74
-
75
-
76
-
77
-
78
-
79
-
80
-
81
-
82
-
83
-
84
-
85
-
86
-
87
-
88
-
89
-
90
-
91
-
92
-
93
-
94
-
95
-
96
-
97
-
98
-
99
-
100
-
101
-
102
-
103
-
104
-
105
-
106
-
107
-
108
-
109
-
110
-
111
-
112
-
113
-
114
-
115
-
116
-
117
-
118
-
119
-
120
-
121
-
122
-
123
-
124
-
125
-
126
-
127
-
128
-
129
-
130
-
131
-
132
-
133
-
134
-
135
-
136
-
137
-
138
-
139
-
140
-
141
-
142
-
143
-
144
-
145
-
146
-
147
-
148
-
149
-
150
-
151
-
152
-
153
-
154
-
155
-
156
-
157
-
158
-
159
 |
 |