Sony DCR-HC26 Operating Guide
Sony DCR-HC26 - Minidv Handycam Camcorder Manual
 |
UPC - 027242688711
View all Sony DCR-HC26 manuals
Add to My Manuals
Save this manual to your list of manuals |
Sony DCR-HC26 manual content summary:
- Sony DCR-HC26 | Operating Guide - Page 1
2-659-811-11(1) Digital Video Camera Recorder Operating Guide DCR-HC26 Getting Started 11 Recording/ Playback 22 Using the Menu 34 Dubbing/Editing 49 Using a Computer 55 Troubleshooting 65 Additional Information 79 © 2006 Sony Corporation - Sony DCR-HC26 | Operating Guide - Page 2
magnitude to constitute a risk of electric shock to persons. This symbol is intended to alert the user to the presence of important operating and maintenance (servicing) instructions in the literature accompanying the appliance. 2 - Sony DCR-HC26 | Operating Guide - Page 3
battery power, or other sources, refer to the operating instructions. Polarization This set may be equipped with a polarized ac dangerous voltage points or short out parts that could result in a fire or point where the cord exits from the appliance. Accessories Do not place the set on an unstable - Sony DCR-HC26 | Operating Guide - Page 4
the operating instructions. Adjust only those controls that are specified in the operating instructions. Improper adjustment parts. Unauthorized substitutions may result in fire, electric shock, or other hazards. Safety Check Upon completion of any service or repairs to the set, as the service - Sony DCR-HC26 | Operating Guide - Page 5
only. Regulatory Information Declaration of Conformity Trade Name: SONY Model No.: DCR-HC26 Responsible Party: Sony Electronics Inc. Address: 16450 W. Bernardo Dr, San Diego, CA 92127 U.S.A. Telephone Number: 858-942-2230 This device complies with Part 15 of the FCC Rules. Operation is subject to - Sony DCR-HC26 | Operating Guide - Page 6
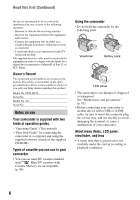
Sony dealer regarding this product. Model No. DCR-HC26 Serial No. Model No. AC- Serial No. Notes on use Your camcorder is supplied with two kinds of operation guides. - "Operating Guide" (This manual) - "First Step Guide" for connecting the camcorder to a computer and using the supplied software - Sony DCR-HC26 | Operating Guide - Page 7
problems. accessories are subject to change without notice. About the Carl Zeiss lens Your camcorder is equipped with a Carl Zeiss lens, which was developed jointly by Carl Zeiss, in Germany, and Sony Corporation, and produces superior images. It adopts the MTF* measurement system for video cameras - Sony DCR-HC26 | Operating Guide - Page 8
supplied items 11 Step 2: Charging the battery pack 12 Step 3: Turning the power on and holding your camcorder firmly ......... 15 Step 4: Adjusting the guide 17 Step 6: Setting the date and time 19 Step 7: Inserting a Cassette 20 Recording/Playback Easy Recording/Playback (Easy Handycam 22 - Sony DCR-HC26 | Operating Guide - Page 9
Computer Before referring to the "First Step Guide" on your computer 55 Installing the software and "First Step Guide" on a computer 57 Viewing "First Step Guide 61 Creating a DVD (Direct Access to "Click to DVD 62 Troubleshooting Troubleshooting 65 Warning indicators and messages 76 Continued - Sony DCR-HC26 | Operating Guide - Page 10
Additional Information Using your camcorder abroad 79 Usable cassette tapes 80 About the "InfoLITHIUM" battery pack 81 About i.LINK 82 Maintenance and precautions 83 Specifications 86 Index ...89 10 - Sony DCR-HC26 | Operating Guide - Page 11
See page 6, 80 for compatible cassettes for your camcorder. AC Adaptor (1) (p. 12) Rechargeable battery pack NP-FP30 (1) (p. 12, 81) CD-ROM "Picture Package Ver.1.5.1" (1) (p. 55) Operating Guide (This manual) (1) Power cord (1) (p. 12) A/V connecting cable (1) (p. 32, 49) Lens cap (1) (p. 15, 24 - Sony DCR-HC26 | Operating Guide - Page 12
setting). DC IN jack DC plug To the wall outlet AC Adaptor Power cord 1 Align the terminals of the battery pack and your camcorder 1, then attach the battery pack and click it into place 2. 2 3 Connect the AC Adaptor to the DC IN jack on your camcorder. DC IN jack With the v mark facing to the - Sony DCR-HC26 | Operating Guide - Page 13
CHG (charge) lamp turns off when the battery is fully charged. Disconnect the AC Adaptor from the DC IN jack. Disconnect the AC Adaptor from the DC IN jack holding both the camcorder and the DC plug. To use an outside power source You can operate your camcorder using the power from the wall outlet - Sony DCR-HC26 | Operating Guide - Page 14
as between a wall and furniture. • Do not short-circuit the DC plug of the AC Adaptor or battery terminal with any metallic objects. This may cause a malfunction. PRECAUTION • Even if your camcorder is turned off, AC power (house current) is still supplied to it while connected to the wall outlet - Sony DCR-HC26 | Operating Guide - Page 15
switch is set to OFF(CHG), slide it while pressing the green button. Lamps that light up CAMERA: To record on a tape. PLAY/EDIT: To play or edit pictures. 4 1 2 3 if you leave your camcorder without any operation attempted for approximately 5 minutes, to save battery power ([A.SHUT OFF], p. 48). 15 - Sony DCR-HC26 | Operating Guide - Page 16
(max.) 2 The viewfinder You can view pictures using the viewfinder to avoid wearing down the battery, or when the picture seen on the LCD screen is poor. Viewfinder 90 degrees (max.) 1 90 degrees to the camcorder • Do not press the buttons on the LCD frame accidentally when you open or adjust - Sony DCR-HC26 | Operating Guide - Page 17
touch panel. Place your hand on the rear side of the LCD panel to support it. Then, touch the buttons displayed on the screen. DISP/BATT INFO Touch on the (SETUP MENU) (p. 34, 47). Checking the screen indicators (Display guide) You can easily check the meaning of each indicator (p. 29) that appears - Sony DCR-HC26 | Operating Guide - Page 18
Step 5: Using the touch panel (Continued) 3 Touch the area including the indicator that you want to check. DISP GUIDE FOCUS: MANUAL PROGRAM AE: SPOTLIGHT P EFFECT: SEPIA END 1/2 PAGE PAGE RET. The meanings of the indicators in the area are listed on the screen. If you cannot - Sony DCR-HC26 | Operating Guide - Page 19
camcorder or change the POWER switch position. • If you do not use your camcorder for about 3 months, the built-in rechargeable battery gets [MENU]. MANUAL SET PROGRAM AE P EFFECT AUTO SHTR EXEC RET. 2 Select / (SETUP MENU) with , then touch [EXEC]. SETUP MENU CLOCK SET USB STREAM LANGUAGE - Sony DCR-HC26 | Operating Guide - Page 20
Inserting a Cassette You can use mini DV cassettes only (p. 80). • The recordable time varies depending on [REC MODE] (p. 46). 1 Slide and hold the OPEN/ EJECT lever in the direction of the arrow and open the lid. OPEN/EJECT lever 2 Insert a cassette with its window facing outwards, then press - Sony DCR-HC26 | Operating Guide - Page 21
21 Getting Started - Sony DCR-HC26 | Operating Guide - Page 22
Recording/Playback Easy Recording/Playback (Easy Handycam) With this Easy Handycam operation, most of Remove the lens cap (p. 15). the camera settings are automatically optimally adjusted, which frees you from detailed adjustments. The screen font size increases for easy viewing. A B E DC - Sony DCR-HC26 | Operating Guide - Page 23
adjustable menu settings. See page 34 for details on setting. • Almost all the settings return to the default setting automatically (p. 41). • Cancel Easy Handycam operation if you want to add any effects or settings to the images. Almost all the settings are returned to the previous situation - Sony DCR-HC26 | Operating Guide - Page 24
cap PHOTO POWER switch REC START/ STOP A REC START/STOP B 1 Slide the POWER switch in the direction of the arrow repeatedly to turn on the CAMERA lamp. If the POWER switch is set to OFF(CHG), slide it while pressing the green button. 2 Start recording. Movies Press REC START/STOP A (or - Sony DCR-HC26 | Operating Guide - Page 25
Recording/Playback Playback 1 Slide the POWER switch in the direction of the arrow repeatedly to turn on the PLAY/EDIT lamp. 2 Start playing back. Touch to rewind the tape to the desired point, then touch playback. A C B A Stop B Play/Pause toggles as you touch it • Playback automatically - Sony DCR-HC26 | Operating Guide - Page 26
zoom buttons qa on the LCD frame. • The minimum possible distance between camcorder and subject while maintaining sharp focus is about 1 cm (about 13/32 in the conversion lens (optional) if it is attached. • Adjust the focus manually ([FOCUS], p. 36) when it is hard to focus automatically. • Do - Sony DCR-HC26 | Operating Guide - Page 27
.......... qs Open the LCD panel qs 90 degrees to the camcorder (1), then rotate it 180 degrees to the lens side battery information is displayed. Remaining battery (approx.) BATTERY INFO BATTERY the setting of the date and time. Other part names and functions D Internal stereo microphone I - Sony DCR-HC26 | Operating Guide - Page 28
/playback Recording 12 3 4 5 Viewing 1 27 4 5 6 A Remaining battery (approx.) B Recording mode (SP or LP) (46) C Recording status button (34) Data code during recording The date/time during recording and the camera setting data will be recorded automatically. They do not appear on the screen - Sony DCR-HC26 | Operating Guide - Page 29
LCD screen. • Some of the indicators may not appear when you use [DISP GUIDE]. Upper left Upper right 60min STBY 0:00:00 60min / E D I T 26) Warning (76) Bottom Indicator 9 . Meaning Flexible spot meter (36)/ Manual exposure (38) Manual focus (36) Backlight (26) PROGRAM AE (42) n / EDIT + - Sony DCR-HC26 | Operating Guide - Page 30
Make sure that the CAMERA lamp lights up 60min PAGE1 PAGE2 0:00:00 SPOT FOCUS SPOT DISP FOCUS METER GUIDE MENU FADER END EXPO- SCH SURE Touch here again to cancel , and the camcorder enters the standby mode at the point where the last recording has finished. Searching manually (EDIT SEARCH) - Sony DCR-HC26 | Operating Guide - Page 31
the most recently recorded scenes (Rec review) You can view a few seconds of the scene recorded just before you stopped the tape. 1 Touch [MENU]. t [PAGE1] t 2 Select / (CAMERA SET) with , then touch [EXEC]. 3 Select [EDITSEARCH] with / , then touch [EXEC]. 4 Select [ON] with / , then - Sony DCR-HC26 | Operating Guide - Page 32
input jack of a TV or a VCR using the A/V connecting cable (1) or the A/V connecting cable with S VIDEO (2). Connect your camcorder to the wall outlet using the supplied AC Adaptor for this operation (p. 12). Refer also to the instruction manuals supplied with the devices to be connected. 1 A/V OUT - Sony DCR-HC26 | Operating Guide - Page 33
33 Recording/Playback - Sony DCR-HC26 | Operating Guide - Page 34
instructions below to use each of the menu items listed after this page. 1 Slide the POWER switch in the direction of the arrow repeatedly to turn on the respective lamp. CAMERA For details of the items, see page 42. 1 2 3 4 MANUAL SET P EFFECT TAPE SET REC MODE REMAIN TAPE SET REC MODE SP - Sony DCR-HC26 | Operating Guide - Page 35
x To use menu items during Easy Handycam operation 60min STBY 0:00:00 FN 1 Touch . 2 Select the desired menu. Touch [MENU] then select hide the menu screen. Each touch of [ RET.] takes you to the previous screen. •Cancel Easy Handycam operation to use menu items normally. Using the Menu 35 - Sony DCR-HC26 | Operating Guide - Page 36
Handycam operation are marked with*. See page 34 for details on selecting button items. When the CAMERA [FOCUS] is automatically set to [MANUAL]. • The setting returns to [ AUTO] when you focus. • The minimum possible distance between camcorder and subject while maintaining sharp focus is about - Sony DCR-HC26 | Operating Guide - Page 37
automatically set to [MANUAL]. • The setting returns to [ AUTO] when you turn the power off for more than 12 hours. DISP GUIDE (Display Guide)* See page 17. degrees and closed with the screen facing out. 1 Make sure that the CAMERA lamp lights up. 2 Close the LCD panel with the screen facing out - Sony DCR-HC26 | Operating Guide - Page 38
a picture manually. When recording indoors on a clear day, for instance, you can avoid backlight shadows on people next to the window by fixing to [ AUTO]. • If you have changed the battery pack while [ AUTO] is selected, taken your camcorder outdoors or brought it indoors after outside use while - Sony DCR-HC26 | Operating Guide - Page 39
Guide)* See page 17. [PAGE2] DATA CODE* During playback, displays information (data code) recorded automatically at the time of recording. B OFF Data code is not displayed. DATE/TIME Displays the date and time. CAM DATA (below) Displays camera appear. • During Easy Handycam operation, you can set - Sony DCR-HC26 | Operating Guide - Page 40
camcorder is connected to a personal computer, you can easily burn the picture recorded on the tape on a CD-R (Direct Access to Video CD Burn). See "First Step Guide the screen. This is not a malfunction. **Pictures output from the DV Interface (i.LINK) cannot be played back smoothly in slow mode. 2 - Sony DCR-HC26 | Operating Guide - Page 41
• During Easy Handycam operation, the following settings are automatically applied (p. 22). CAMERA PLAY/EDIT Easy Handycam MANUAL SET menu - 12BIT REMAIN z z AUTO SETUP MENU menu (p. 47) CLOCK SET z z z USB STREAM z z OFF LANGUAGE z z z DEMO MODE z - ON OTHERS menu (p. 48 - Sony DCR-HC26 | Operating Guide - Page 42
MANUAL SET menu - PROGRAM AE/P EFFECT, etc. The default settings are marked with to shoot distant subjects clearly. This setting also prevents your camcorder from focusing on glass or metal mesh in windows that comes in between the camcorder and the subject. PORTRAIT (Soft portrait) ( ) Select - Sony DCR-HC26 | Operating Guide - Page 43
with strong contrast. PASTEL* Pictures appear as a pale pastel drawing. CAMERA SET menu - D ZOOM/WIDE SEL/STEADYSHOT, etc. The default settings • You cannot output playback pictures edited with picture effects via the DV Interface (i.LINK). • You cannot add effects to externally input pictures - Sony DCR-HC26 | Operating Guide - Page 44
CAMERA SET menu (Continued) WIDE SEL (Wide select) You can record a picture in a ratio suitable for the screen on which it will be displayed. Refer also to the operating instructions 16:9 wide TV connected to your camcorder, select [16:9 WIDE]. The SEARCH function and Rec review (p. 30). N.S. - Sony DCR-HC26 | Operating Guide - Page 45
BRT NORMAL Standard brightness. BRIGHT Brightens the LCD screen. • When you connect your camcorder to outside power sources, [BRIGHT] is automatically selected for the setting. • When you select [BRIGHT], battery life is slightly reduced during recording. LCD COLOR You can adjust the color on the - Sony DCR-HC26 | Operating Guide - Page 46
VF SET menu (Continued) • When you select [BRIGHT], battery life is slightly reduced during recording. WIDE DISP (Wide mosaic-like noise may appear or sound may be interrupted when you play back the tape on other camcorders or VCRs. • When you mix recordings in the SP mode and in the LP mode on one - Sony DCR-HC26 | Operating Guide - Page 47
below. • When you set the POWER switch to PLAY/ EDIT or CAMERA with a cassette inserted. • When you touch (Play/Pause). ON Always 19. USB STREAM You can view the pictures displayed on the screen of your camcorder on your computer (USB Streaming) via the USB cable. See "First Step Guide" in - Sony DCR-HC26 | Operating Guide - Page 48
B. The indicators in parentheses appear when the items are selected. See page 34 for details on selecting menu items. WORLD TIME When using your camcorder abroad, you can set the time difference by touching / , the clock will be adjusted in accordance with the time difference. If you set the - Sony DCR-HC26 | Operating Guide - Page 49
to a VCR/DVD device, etc., using the A/V connecting cable (1), the A/V connecting cable with S VIDEO (2), or the i.LINK cable (3). Connect your camcorder to the wall outlet using the supplied AC Adaptor for this operation (p. 12). Refer also to the instruction manuals supplied with the devices to be - Sony DCR-HC26 | Operating Guide - Page 50
DV Interface (i.LINK): - Indicators - Pictures edited using [P EFFECT] (p. 42) • When connected using an i.LINK cable, the recorded picture becomes rough when a picture is paused on your camcorder while recording to a VCR. • When connected using an i.LINK cable, data code (date/time/camera settings - Sony DCR-HC26 | Operating Guide - Page 51
an i.LINK-compatible device using the i.LINK cable. Connect your camcorder to the wall outlet using the supplied AC Adaptor for this operation (p. 12). Refer also to the instruction manuals supplied with the devices to be connected. • You cannot record pictures on your camcorder from a TV or VCR/DVD - Sony DCR-HC26 | Operating Guide - Page 52
the tape has been recorded in the 16-bit mode (p. 46). - When the tape has been recorded in the LP mode. - When your camcorder is connected via an i.LINK cable. - When the tape has been recorded in 4CH MIC mode. - On blank sections of the tape. - When the tape has been recorded - Sony DCR-HC26 | Operating Guide - Page 53
adjustment returns to the default setting after 12 hours of turning the power off. • You can only record additional audio over a tape recorded on your camcorder. The sound may deteriorate when you dub audio on a tape recorded on other camcorders (including other camcorders (DCR-HC26)). 53 - Sony DCR-HC26 | Operating Guide - Page 54
Jacks to connect external devices Camcorder Open the jack cover. A (USB) jack (p. 55) B DV Interface (i.LINK) (p. 49, 51, 62) C A/V (audio/video) OUT jack (p. 32, 49) D DC IN jack (p. 12) 1 2 3 4 54 - Sony DCR-HC26 | Operating Guide - Page 55
Step Guide," see page 57. • There are 2 ways to connect your camcorder to a computer. - USB cable This method is good for copying video and sound recorded on a tape to the computer. A USB cable is not supplied with your camcorder. If necessary, buy a USB 2.0 cable (Type A to Type B-mini.). A Sony - Sony DCR-HC26 | Operating Guide - Page 56
About "First Step Guide" "First Step Guide" is an instruction manual you can refer to on your computer. This "First Step Guide" describes basic operations, from initial hookup of your camcorder and computer and making settings, to general operation the first time you use the software stored on the - Sony DCR-HC26 | Operating Guide - Page 57
a Macintosh computer using a USB cable, you cannot copy pictures recorded on a tape to the computer. To copy recordings from a tape, connect your camcorder to the computer with an i.LINK cable and use the standard software in the OS. Installing the software and "First Step Guide" on a computer You - Sony DCR-HC26 | Operating Guide - Page 58
system, a message may appear notifying you that "First Step Guide" cannot be installed automatically with the InstallShield Wizard. In such a case, manually copy "First Step Guide" to your computer according to the message instructions. 5 Select the language for the application to be installed - Sony DCR-HC26 | Operating Guide - Page 59
Agreement], then click [Next]. 10Click [Next] to install the "First Step Guide." Depending on the computer, this screen may not be displayed. In such a 3 Click [Finish]. 11Click [Next], then follow the on- screen instructions to install ImageMixer VCD2. 13Make sure [Yes, I want to restart my - Sony DCR-HC26 | Operating Guide - Page 60
your camcorder and computer, see "First Step Guide" software. 3 Place the supplied CD-ROM in the disc drive of your computer. 4 Double-click CD-ROM icon. 60 5 Copy "FirstStepGuide.pdf," stored in the desired language in the [FirstStepGuide] folder, to your computer. 6 Copy [IMXINST.SIT] in the [MAC - Sony DCR-HC26 | Operating Guide - Page 61
Guide] by selecting [Start], [Programs] ([All Programs] for Windows XP), [Picture Package], and [First Step Guide]. • To view "First Step Guide download it from the Adobe Systems web page: http://www.adobe.com/ For inquires about this software Pixela User Support Package by Sony Corporation would - Sony DCR-HC26 | Operating Guide - Page 62
Mode Launcher] is set up for each Windows XP user. To i.LINK connector i.LINK cable (optional) DV To DV Interface (i.LINK) 1 Turn on the computer. Close all applications running with an i.LINK. 2 Prepare the power source for the camcorder. Use the supplied AC Adaptor as the power source since it - Sony DCR-HC26 | Operating Guide - Page 63
into your camcorder. 5 Connect your camcorder to a computer via an i.LINK cable (p. 62). • When you connect your camcorder to a camcorder malfunction. • For details, see "First Step Guide" (p. 61). 6 Touch t [PAGE2] t [BURN DVD] t . "Click to DVD" starts up and the onscreen instructions - Sony DCR-HC26 | Operating Guide - Page 64
Creating a DVD (Direct Access to "Click to DVD") (Continued) stage, DVD creation will continue on your computer. • If any of the following occurs, copying of the picture is canceled. A DVD containing the data up to the point the operation was canceled is created. Refer to the help files of "Click to - Sony DCR-HC26 | Operating Guide - Page 65
, use the following table to troubleshoot the problem. If the problem persists, disconnect the power source and contact your Sony dealer. Overall operations/Easy Handycam The power does not turn on. • Attach a charged battery pack to the camcorder (p. 12). • Use the AC Adaptor to connect to a wall - Sony DCR-HC26 | Operating Guide - Page 66
(p. 13). The CHG (charge) lamp flashes while the battery pack is being charged. • Attach the battery pack to the camcorder correctly (p. 12). If the problem persists, disconnect the AC Adaptor from the wall outlet and contact your Sony dealer. The battery pack may be worn-out. The power turns off - Sony DCR-HC26 | Operating Guide - Page 67
from the compartment. • Make sure the power source (battery pack or AC Adaptor) is connected correctly (p. 12). • Remove the battery pack from the camcorder, then attach it again (p. 13). • Attach a charged battery pack to the camcorder (p. 12). • Moisture condensation has occurred inside the - Sony DCR-HC26 | Operating Guide - Page 68
Troubleshooting (Continued) The cassette is noisier during rewinding or fast-forwarding. • When using the AC Adaptor, rewind/fast forward speed increases (compared with battery operation) and therefore increases noise. This is not a malfunction. Recording Refer also to "Adjusting the image during - Sony DCR-HC26 | Operating Guide - Page 69
Troubleshooting [STEADYSHOT] does not function. • Set [STEADYSHOT] to [ON] (p. 44). The BACK LIGHT function does not function. • In the following settings, the BACK LIGHT function is canceled. - [MANUAL] of [EXPOSURE] - [SPOT METER] • The BACK LIGHT function does not work during Easy Handycam - Sony DCR-HC26 | Operating Guide - Page 70
Troubleshooting (Continued) No sound plug, make sure the red and white plugs of the A/V connecting cable are also connected (p. 32). The sound breaks off. • Clean the tape was recorded in a TV color system other than that of your camcorder (NTSC). This is not a malfunction (p. 79). is displayed on - Sony DCR-HC26 | Operating Guide - Page 71
and the camcorder from the (USB) jack on the computer. • Disconnect the cable from the computer and camcorder, restart the computer, then connect them again correctly. An error message appears when you place the supplied CD-ROM in your computer. • Set the computer display as follows: - Windows: 800 - Sony DCR-HC26 | Operating Guide - Page 72
. To copy recordings from a tape, connect your camcorder to the computer with an i.LINK cable and use the standard software in the OS. The image on tape does not appear on the screen of the Windows computer during USB Streaming. • The USB driver has been registered incorrectly as the computer was - Sony DCR-HC26 | Operating Guide - Page 73
Driver]. 5 Double-click [Setup.exe]. • Deleting anything other than [USB Audio Device], [USB Device] and [USB Composite Device] may cause a malfunction of your computer. x For Windows 2000 Log on as Administrator. 1 Check that your camcorder of your camcorder, disconnect the USB cable, then restart - Sony DCR-HC26 | Operating Guide - Page 74
.] appears on the screen of your camcorder. • You cannot start the Easy Handycam settings while the USB cable is connected. Disconnect the USB cable from your camcorder first. There is no sound when the camcorder is connected to the Windows computer via a USB cable. • Change the settings for your - Sony DCR-HC26 | Operating Guide - Page 75
Troubleshooting An error message appears while operating Picture Package. • Close Picture Package first, then slide the POWER switch on your camcorder ppackage.com/ "First Step Guide" is not displayed correctly. • Follow the procedure below and refer to "First Step Guide" (FirstStepGuide.pdf). 1 - Sony DCR-HC26 | Operating Guide - Page 76
the cassette. Press RESET (p. 27), and operate your camcorder again. E:61:ss / E:62:ss • Contact your Sony dealer or local authorized Sony service facility. Inform them of the 5-digit code, which starts from "E." 76 E (Battery level warning) • The battery pack is nearly used up. • Depending on the - Sony DCR-HC26 | Operating Guide - Page 77
(p. 84) Cannot start Easy Handycam. (p. 22, 65) Cannot cancel Easy Handycam. (p. 22, 65) Cannot start Easy Handycam with USB connected. • You cannot start the Easy Handycam settings while the USB cable is connected. Disconnect the USB cable from your camcorder first. Troubleshooting Continued , 77 - Sony DCR-HC26 | Operating Guide - Page 78
Warning indicators and messages (Continued) Invalid during Easy Handycam operation. (p. 23) USB invalid during Easy Handycam • You cannot connect the USB cable during Easy Handycam. Touch . HDV recorded tape. Cannot playback. • Your camcorder cannot play back this format. Play back the tape with the - Sony DCR-HC26 | Operating Guide - Page 79
abroad by the time difference you are in. Select [WORLD TIME] in the (OTHERS) menu, then set the time difference (p. 48). AC-L25A/L25B [a] [b] On TV color systems Your camcorder is NTSC system, so its picture can only be viewed on a NTSC system TV with an AUDIO/VIDEO input jack. System NTSC - Sony DCR-HC26 | Operating Guide - Page 80
tapes You can use mini DV format cassettes only. Use a cassette with the mark. Your camcorder is not compatible with camera connected to your camcorder. x When you record You cannot record software on your camcorder that contains copyright control signals for copyright protection of software - Sony DCR-HC26 | Operating Guide - Page 81
it efficiently. • When charging the battery pack while the AC Adaptor is connected to your camcorder, after charging is complete, disconnect the cable from the DC IN jack on your camcorder or remove the battery pack. To use the battery pack effectively • Battery pack performance decreases when the - Sony DCR-HC26 | Operating Guide - Page 82
battery's life is governed by storage, operating and environmental conditions. 82 About i.LINK The DV Interface on this unit is an i.LINKcompliant DV an i.LINK cable. When connecting this unit to an i.LINK-compatible device having two or more DV Interfaces, refer to the operating instructions of the - Sony DCR-HC26 | Operating Guide - Page 83
compatible application software, refer also to the operating instructions for the device to be connected. About the required i.LINK cable Use the Sony i.LINK 4-pin-to-4-pin cable (during DV dubbing). Maintenance and precautions On use and care • Do not use or store the camcorder and accessories in - Sony DCR-HC26 | Operating Guide - Page 84
) • If the battery electrolytic liquid has leaked, - consult your local authorized Sony service facility. - wash off any liquid that may have contacted your skin - if any liquid gets in your eyes, wash with plenty of water and consult a doctor. x When not using your camcorder for a long time - Sony DCR-HC26 | Operating Guide - Page 85
even when the POWER switch is set to OFF(CHG). The preinstalled rechargeable battery is always charged while your camcorder is connected to the wall outlet via the AC Adaptor or while the battery pack is attached. The rechargeable battery will be fully discharged in about 3 months if you do not use - Sony DCR-HC26 | Operating Guide - Page 86
AC Adaptor connected or the battery pack attached. Use your camcorder after charging the pre-installed rechargeable battery. However, even if the pre-installed rechargeable battery is not charged, the camcorder cassette Mini DV cassette with to a 35 mm still camera In CAMERA: 44 ~ 880 mm (1 - Sony DCR-HC26 | Operating Guide - Page 87
kΩ (kilohms) USB jack mini-B DV input/output i.LINK Interface (IEEE1394, 4-pin connector S100) LCD screen Picture 6.2 cm (2.5 type) Total dot number 123 200 (560 × 220) General Power requirements DC 7.2 V (battery pack) DC 8.4 V (AC Adaptor) Average power consumption During camera recording using - Sony DCR-HC26 | Operating Guide - Page 88
"InfoLITHIUM" is a trademark of Sony Corporation. • i.LINK and are trademarks of Sony Corporation. • Picture Package is a trademark of Sony Corporation. • is a trademark. • "Handycam" and are registered trademarks of Sony Corporation. • Microsoft, Windows, and Windows Media are trademarks or - Sony DCR-HC26 | Operating Guide - Page 89
DC plug 12 DEMO MODE 47, 65 DISP GUIDE (Display guide 17 DISP OUT (Display output 48 Display indicators 28 DISP/BATT INFO button 17, 27 Double speed Playback ........ 40 Dubbing 49, 52 DV Interface....... 49, 51, 54, 62 E EASY button 22 Easy Handycam 22, 35 EDITSEARCH 30, 44 END SCH (END - Sony DCR-HC26 | Operating Guide - Page 90
MANUAL SET menu ..........42 Menu 34 CAMERA SET menu....43 LCD/VF SET menu.......45 MANUAL support review 31 REC START/STOP button 22, 24 Rechargeable battery pack See Battery Recording 24 Recording capacity 28 Recording time 13 REMAIN 47 RESET button 27 Reversal Playback 40 S S VIDEO cable - Sony DCR-HC26 | Operating Guide - Page 91
71 Wide angle 26 WIDE DISP (Wide display 46 WIDE SEL (Wide select)..... 44 Windows 56, 57 WORLD TIME 48 Write-protect tab 80 Z Zoom 26 Zoom lever 26 Additional Information U USB jack 54 USB STREAM 47 USB Streaming 47 Using abroad 79 V V SPD PLAY (Various speed playback) .....40 VCR SET - Sony DCR-HC26 | Operating Guide - Page 92
Additional information on this product and answers to frequently asked questions can be found at our Customer Support Website. http://www.sony.net/ Printed on 100% recycled paper using US VOC (Volatile Organic Compound)-free vegetable oil based ink. Printed in Japan
-
 1
1 -
 2
2 -
 3
3 -
 4
4 -
 5
5 -
 6
6 -
 7
7 -
8
-
9
-
10
-
11
-
12
-
13
-
14
-
15
-
16
-
17
-
18
-
19
-
20
-
21
-
22
-
23
-
24
-
25
-
26
-
27
-
28
-
29
-
30
-
31
-
32
-
33
-
34
-
35
-
36
-
37
-
38
-
39
-
40
-
41
-
42
-
43
-
44
-
45
-
46
-
47
-
48
-
49
-
50
-
51
-
52
-
53
-
54
-
55
-
56
-
57
-
58
-
59
-
60
-
61
-
62
-
63
-
64
-
65
-
66
-
67
-
68
-
69
-
70
-
71
-
72
-
73
-
74
-
75
-
76
-
77
-
78
-
79
-
80
-
81
-
82
-
83
-
84
-
85
-
86
-
87
-
88
-
89
-
90
-
91
-
92
 |
 |

2-659-811-
11
(1)
© 2006 Sony Corporation
Digital Video Camera Recorder
Operating Guide
DCR-HC26
Getting Started
11
Recording/
Playback
22
Using the Menu
34
Dubbing/Editing
49
Using a Computer
55
Troubleshooting
65
Additional Information
79