Sony DCR SX41 Operating Guide - Page 29
Creating a disc, Copying a disc, Editing movies, Capturing photos from a movie
 |
UPC - 027242767898
View all Sony DCR SX41 manuals
Add to My Manuals
Save this manual to your list of manuals |
Page 29 highlights
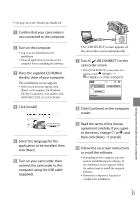
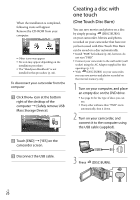
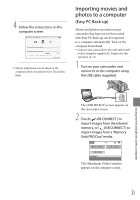
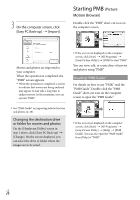
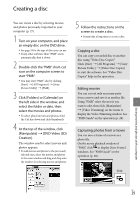
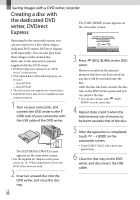
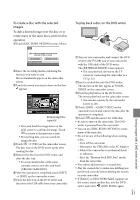
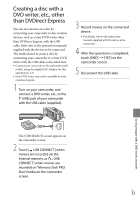
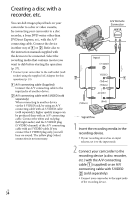
Creating a disc You can create a disc by selecting movies and photos previously imported to your computer (p. 27). 1 Turn on your computer, and place an empty disc on the DVD drive. See page 24 for the type of discs you can use. If any other software than "PMB" starts automatically, shut it down. 2 Double-click the "PMB" short-cut icon on the computer screen to start "PMB." You may start "PMB" also by clicking [Start] [All Programs] [Sony Picture Utility] [PMB]. 3 Click [Folders] or [Calendar] on the left side in the window, and select the folder or date, then select the movies and photos. To select plural movies and photos, hold the Ctrl key down and click thumbnails. 4 At the top of the window, click [Manipulate] [DVD-Video (SD) Creation]. The window used to select movies and photos appears. To add movies and photos to the previously selected ones, select the movies and photos in the main window and drag and drop onto the window for selecting movies and photos. 5 Follow the instructions on the screen to create a disc. It may take a long time to create a disc. Copying a disc You can copy a recorded disc to another disc using "Video Disc Copier." Click [Start] [All Programs] [Sony Picture Utility] [Video Disc Copier] to start the software. See "Video Disc Copier" help on the operation. Editing movies You can cut out only necessary parts from a movie and save it as another file. Using "PMB," select the movie you want to edit, then click [Manipulate] [Video Trimming] on the menu to display the Video Trimming window. See "PMB Guide" on the operation (p. 28). Capturing photos from a movie You can save a frame of a movie as a photo file. On the movie playback window of "PMB," click to display [Save Frame] windows. See "PMB Guide" on the operation (p. 28). Click Saving movies and photos with a computer US 29
-
 1
1 -
2
-
3
-
4
-
5
-
6
-
7
-
8
-
9
-
10
-
11
-
12
-
13
-
14
-
15
-
16
-
17
-
18
-
19
-
20
-
21
-
22
-
23
-
 24
24 -
 25
25 -
 26
26 -
 27
27 -
 28
28 -
 29
29 -
 30
30 -
 31
31 -
 32
32 -
 33
33 -
 34
34 -
35
-
36
-
37
-
38
-
39
-
40
-
41
-
42
-
43
-
44
-
45
-
46
-
47
-
48
-
49
-
50
-
51
-
52
-
53
-
54
-
55
-
56
-
57
-
58
-
59
-
60
-
61
-
62
-
63
-
64
-
65
-
66
-
67
-
68
-
69
-
70
-
71
-
72
-
73
-
74
-
75
-
76
-
77
-
78
-
79
-
80
-
81
-
82
-
83
-
84
-
85
-
86
-
87
-
88
-
89
-
90
-
91
-
92
-
93
-
94
-
95
-
96
-
97
-
98
-
99
-
100
-
101
-
102
-
103
-
104
-
105
-
106
-
107
-
108
 |
 |