Sony DCR-SX65 Handycam® Handbook - Page 72
GENERAL SET (Other setup items), Other setup items - battery life
 |
UPC - 027242819900
View all Sony DCR-SX65 manuals
Add to My Manuals
Save this manual to your list of manuals |
Page 72 highlights
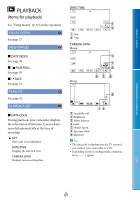
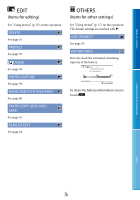
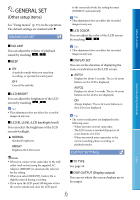
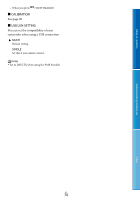
GENERAL SET (Other setup items) See "Using menus" (p. 57) on the operation. The default settings are marked with . SOUND/DISP SET to the camcorder body, the setting becomes [NORMAL] automatically. Tips This adjustment does not affect the recorded images in any way. LCD COLOR You can adjust the color of the LCD screen by touching / . Table of contents Useful recording techniques VOLUME You can adjust the volume of playback sound by touching / . BEEP ON A melody sounds when you start/stop recording, or operate the touch panel. OFF Cancels the melody. LCD BRIGHT You can adjust the brightness of the LCD screen by touching / . Tips This adjustment does not affect the recorded images in any way. LCD BL LEVEL (LCD backlight level) You can select the brightness of the LCD screen's backlight. NORMAL Standard brightness. BRIGHT Brightens the LCD screen. Tips This adjustment does not affect the recorded images in any way. DISPLAY SET You can set the duration of displaying the icons or indicators on the LCD screen. AUTO1 Displays for about 3 seconds. The rec & zoom buttons on the LCD is displayed. AUTO2 Displays for about 3 seconds. The rec & zoom buttons on the LCD is not displayed. ON Always displays. The rec & zoom buttons on the LCD is not displayed. Tips The icons or indicators are displayed in the following cases. When you turn on your camcorder. The LCD screen is touched (Except rec & zoom buttons on LCD). When you switch your camcorder to the movie recording, photo recording, or playback modes. OUTPUT SETTINGS Index Notes When you connect your camcorder to the wall outlet (wall socket) using the supplied AC Adaptor, [BRIGHT] is automatically selected for the setting. When you select [BRIGHT], battery life is slightly reduced during recording. If you open the LCD panel 180 degrees to face the screen outside and close the LCD panel TV TYPE See page 33. DISP OUTPUT (Display output) You can set where the screen displays are to be output. US 72
-
 1
1 -
2
-
3
-
4
-
5
-
6
-
7
-
8
-
9
-
10
-
11
-
12
-
13
-
14
-
15
-
16
-
17
-
18
-
19
-
20
-
21
-
22
-
23
-
24
-
25
-
26
-
27
-
28
-
29
-
30
-
31
-
32
-
33
-
34
-
35
-
36
-
37
-
38
-
39
-
40
-
41
-
42
-
43
-
44
-
45
-
46
-
47
-
48
-
49
-
50
-
51
-
52
-
53
-
54
-
55
-
56
-
57
-
58
-
59
-
60
-
61
-
62
-
63
-
64
-
65
-
66
-
 67
67 -
 68
68 -
 69
69 -
 70
70 -
 71
71 -
 72
72 -
 73
73 -
 74
74 -
 75
75 -
 76
76 -
 77
77 -
78
-
79
-
80
-
81
-
82
-
83
-
84
-
85
-
86
-
87
-
88
-
89
-
90
-
91
-
92
-
93
-
94
-
95
-
96
-
97
-
98
 |
 |