Sony DCR-SX65 Handycam® Handbook - Page 94
Parts and controls
 |
UPC - 027242819900
View all Sony DCR-SX65 manuals
Add to My Manuals
Save this manual to your list of manuals |
Page 94 highlights
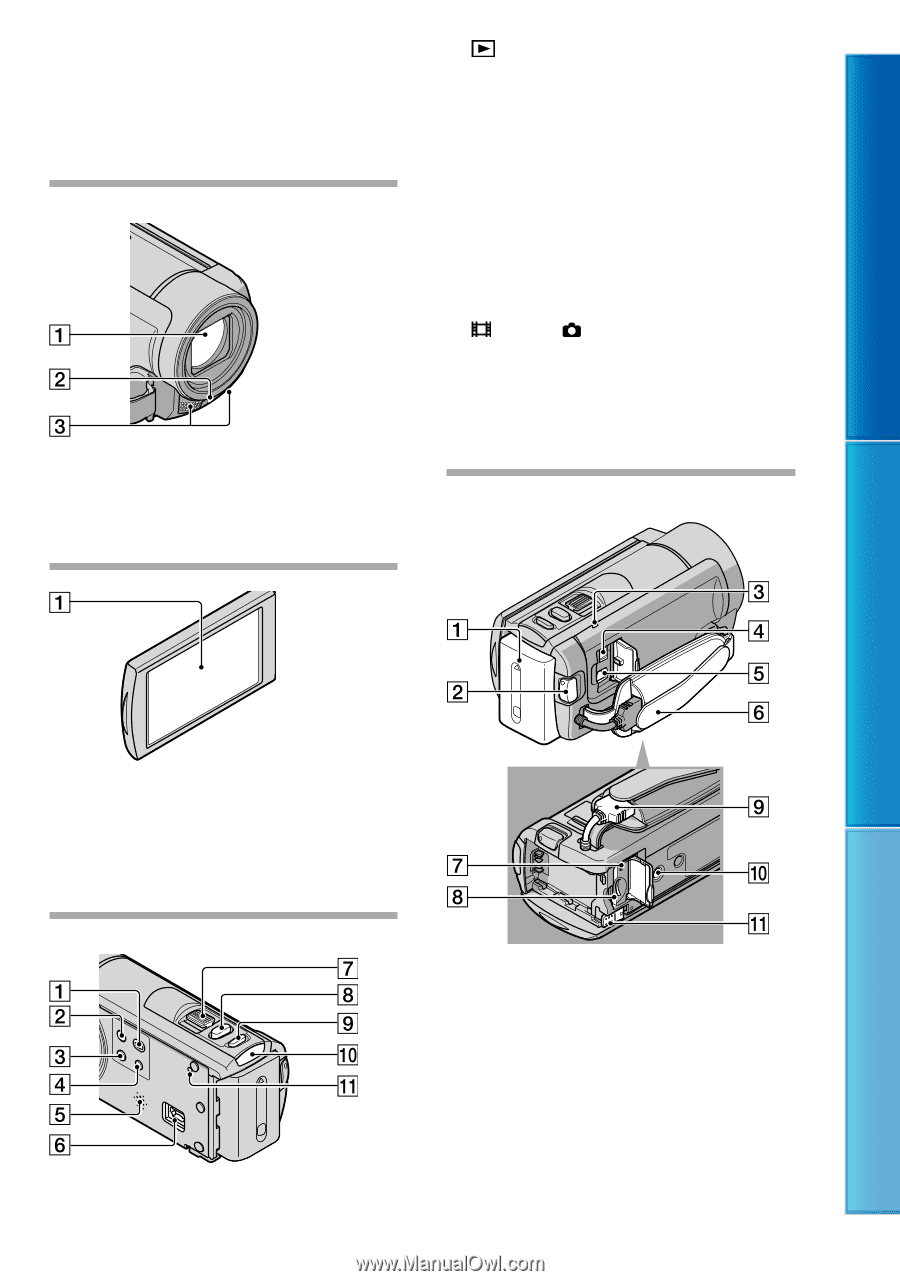
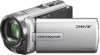
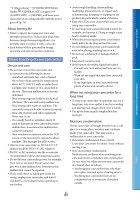
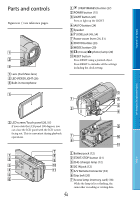
Table of contents Parts and controls Figures in ( ) are reference pages. Lens (Carl Zeiss lens) LED VIDEO LIGHT (26) Built-in microphone (VIEW IMAGES) button (27) POWER button (15) LIGHT button (26) Press to light up the LIGHT. iAUTO button (24) Speaker (USB) jack (45, 54) Power zoom lever (24, 31) PHOTO button (23) MODE button (20) (movie)/ (photo) lamp (20) RESET button Press RESET using a pointed object. Press RESET to initialize all the settings including the clock setting. Useful recording techniques Index LCD screen/Touch panel (26, 57) If you rotate the LCD panel 180 degrees, you can close the LCD panel with the LCD screen facing out. This is convenient during playback operations. Battery pack (12) START/STOP button (21) CHG (charge) lamp (12) DC IN jack (12) A/V Remote Connector (33) Grip belt (20) Access lamp (memory card) (18) While the lamp is lit or flashing, the camcorder is reading or writing data. US 94
-
 1
1 -
2
-
3
-
4
-
5
-
6
-
7
-
8
-
9
-
10
-
11
-
12
-
13
-
14
-
15
-
16
-
17
-
18
-
19
-
20
-
21
-
22
-
23
-
24
-
25
-
26
-
27
-
28
-
29
-
30
-
31
-
32
-
33
-
34
-
35
-
36
-
37
-
38
-
39
-
40
-
41
-
42
-
43
-
44
-
45
-
46
-
47
-
48
-
49
-
50
-
51
-
52
-
53
-
54
-
55
-
56
-
57
-
58
-
59
-
60
-
61
-
62
-
63
-
64
-
65
-
66
-
67
-
68
-
69
-
70
-
71
-
72
-
73
-
74
-
75
-
76
-
77
-
78
-
79
-
80
-
81
-
82
-
83
-
84
-
85
-
86
-
87
-
88
-
 89
89 -
 90
90 -
 91
91 -
 92
92 -
 93
93 -
 94
94 -
 95
95 -
 96
96 -
 97
97 -
 98
98
 |
 |