Sony DCR-TRV22 PIXELA ImageMixer v1.5 Instruction Manual - Page 225
Output Video CD Windows
 |
View all Sony DCR-TRV22 manuals
Add to My Manuals
Save this manual to your list of manuals |
Page 225 highlights
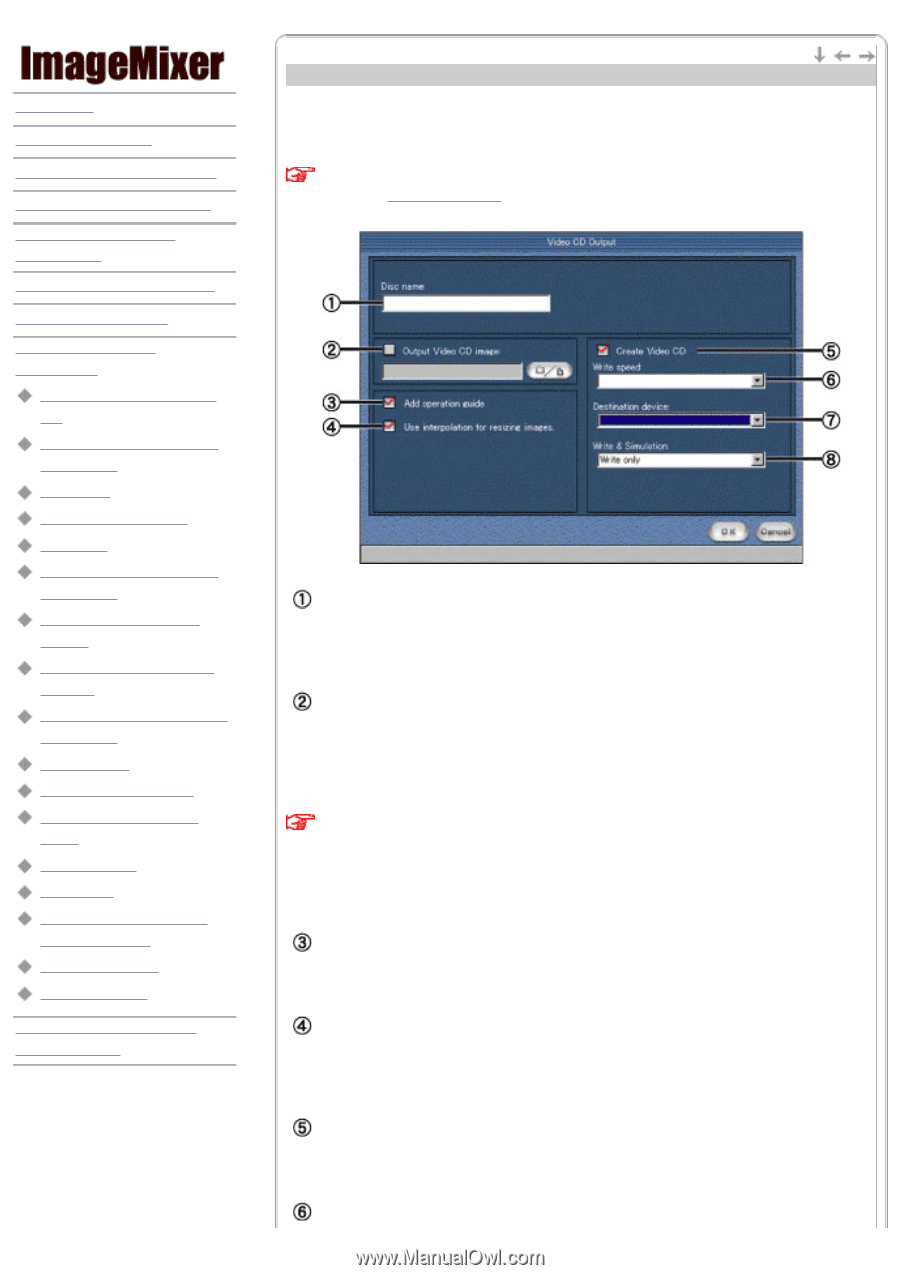
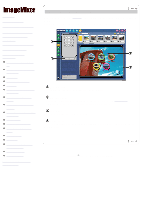
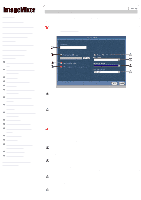
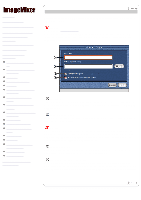
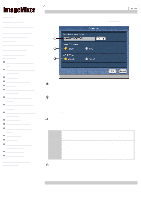
Introduction Chapter 1 Before Use Chapter 2 Capture Environment Chapter 3 Album Environment Chapter 4 Movie Editing Environment Chapter 5 Layout Environment Chapter 6 Image Editor Chapter 7 Video Disc Environment Process of creating a Video CD Layout environment/Screen composition Style panel Slideshow button panel Title panel Album environment/Screen composition General settings/Content settings Operation of thumbnail list window Writing environment/ Screen composition Preview panel Output Video CD (Win) Output Video CD image (Mac) Navigation Bar Preferences File format handled in the Video Disc mode Operation warning Term description Chapter 8 ImageMixer Easy Video CD (Win) Output Video CD (Windows) Explanations on the "Video CD Output" dialog box (Windows) that appears when you click the "Output" button. Important Please read this operation warning: Disc name: Type in the name of the Video CD you are going to create. The letters you can use are as follows: one byte capital letter of numbers 1 - 9, alphabet A - Z, underbar "_", a maximum of 30 characters. Output Video CD image: Put a check mark if you wish not to write directly to disc and instead only create a Video CD image. Click the "Browse" button and choose the destination folder for storage location. You can also put a check mark on "Create Video CD" to create Video CD while outputting the Video CD image. Important The created Video CD image will be saved to the destination folder named "Cdimage". Do not move or change the file name or location. If there is already an existing folder with that name, new coming Video CD images will be saved in the different folders which will be name as "Cdimage1", "Cdimage2", "Cdimage3", etc... Add operation guide: Put a check mark if you wish to have the operation guide of remote control for Video CD Video playback to be played just before the slideshow playback. Use interpolation for resizing images: If you are using a movie which image aspect is other than Video CD standard, the image aspect need to be resized. By using Interpolation function during resizing, it takes much time than without this function, but you can improve the image quality. Use it when it is necessary. Create Video CD: Put a check if you wish to write directly to disc to create a Video CD. Also put a check on "Output Video CD image" to output Video CD image while creating a Video CD. Write speed:
-
 1
1 -
2
-
3
-
4
-
5
-
6
-
7
-
8
-
9
-
10
-
11
-
12
-
13
-
14
-
15
-
16
-
17
-
18
-
19
-
20
-
21
-
22
-
23
-
24
-
25
-
26
-
27
-
28
-
29
-
30
-
31
-
32
-
33
-
34
-
35
-
36
-
37
-
38
-
39
-
40
-
41
-
42
-
43
-
44
-
45
-
46
-
47
-
48
-
49
-
50
-
51
-
52
-
53
-
54
-
55
-
56
-
57
-
58
-
59
-
60
-
61
-
62
-
63
-
64
-
65
-
66
-
67
-
68
-
69
-
70
-
71
-
72
-
73
-
74
-
75
-
76
-
77
-
78
-
79
-
80
-
81
-
82
-
83
-
84
-
85
-
86
-
87
-
88
-
89
-
90
-
91
-
92
-
93
-
94
-
95
-
96
-
97
-
98
-
99
-
100
-
101
-
102
-
103
-
104
-
105
-
106
-
107
-
108
-
109
-
110
-
111
-
112
-
113
-
114
-
115
-
116
-
117
-
118
-
119
-
120
-
121
-
122
-
123
-
124
-
125
-
126
-
127
-
128
-
129
-
130
-
131
-
132
-
133
-
134
-
135
-
136
-
137
-
138
-
139
-
140
-
141
-
142
-
143
-
144
-
145
-
146
-
147
-
148
-
149
-
150
-
151
-
152
-
153
-
154
-
155
-
156
-
157
-
158
-
159
-
160
-
161
-
162
-
163
-
164
-
165
-
166
-
167
-
168
-
169
-
170
-
171
-
172
-
173
-
174
-
175
-
176
-
177
-
178
-
179
-
180
-
181
-
182
-
183
-
184
-
185
-
186
-
187
-
188
-
189
-
190
-
191
-
192
-
193
-
194
-
195
-
196
-
197
-
198
-
199
-
200
-
201
-
202
-
203
-
204
-
205
-
206
-
207
-
208
-
209
-
210
-
211
-
212
-
213
-
214
-
215
-
216
-
217
-
218
-
219
-
 220
220 -
 221
221 -
 222
222 -
 223
223 -
 224
224 -
 225
225 -
 226
226 -
 227
227 -
 228
228 -
 229
229 -
 230
230 -
231
-
232
-
233
-
234
-
235
-
236
-
237
 |
 |