Sony DCR-TRV22 PIXELA ImageMixer v1.5 Instruction Manual - Page 46
Recording sound files, Recording sound files while previewing movie images
 |
View all Sony DCR-TRV22 manuals
Add to My Manuals
Save this manual to your list of manuals |
Page 46 highlights
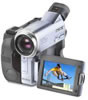
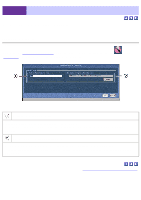
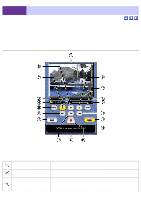
2-5-2 Sound Recording Mode Recording sound files Follow these steps to record music from a microphone or other sound output device, such as a TV, cassette tape player, etc. The size of recorded sound files is approximately 10MB per minute of CD audio. 1. Connect the microphone or other sound output device to the appropriate input jack on your computer. 2. Select an album. Select the album from the album list window into which you wish to save the recorded sound files. 3. Click the [Record] button. 4. Click the [Stop] button at the point at which you wish to stop recording. The audio format of digitally recorded files is PCM, the sampling rate is 44.1KHz, and the bit rate is 16bit stereo. In Windows, the file type of recorded files is WAVE. In Mac, AIFF files are created. Files are saved in the save location designated in the Capturing/Recording Preferences, but are, of course, added directly to the album selected in step 2. To confirm successful recording of sound files, double-click their thumbnail icon in the thumbnail list window. Recording sound files while previewing movie images Recording sound with a microphone or other sound output device can be performed while previewing a movie to which the sound will later be added. This is useful in synchronizing narration or background music to specific scenes of a movie. The files can then be added to movies you create yourself with the ImageMixer software. 1. Connect the microphone or other sound output device to the appropriate input jack on your computer. 2. Select the thumbnail of the file to which the sound will later be added. If necessary, change the currently selected album in the album list window. 3. Confirm that the [Preview On/Off] button is active (colored bright yellow).
-
 1
1 -
2
-
3
-
4
-
5
-
6
-
7
-
8
-
9
-
10
-
11
-
12
-
13
-
14
-
15
-
16
-
17
-
18
-
19
-
20
-
21
-
22
-
23
-
24
-
25
-
26
-
27
-
28
-
29
-
30
-
31
-
32
-
33
-
34
-
35
-
36
-
37
-
38
-
39
-
40
-
 41
41 -
 42
42 -
 43
43 -
 44
44 -
 45
45 -
 46
46 -
 47
47 -
 48
48 -
 49
49 -
 50
50 -
 51
51 -
52
-
53
-
54
-
55
-
56
-
57
-
58
-
59
-
60
-
61
-
62
-
63
-
64
-
65
-
66
-
67
-
68
-
69
-
70
-
71
-
72
-
73
-
74
-
75
-
76
-
77
-
78
-
79
-
80
-
81
-
82
-
83
-
84
-
85
-
86
-
87
-
88
-
89
-
90
-
91
-
92
-
93
-
94
-
95
-
96
-
97
-
98
-
99
-
100
-
101
-
102
-
103
-
104
-
105
-
106
-
107
-
108
-
109
-
110
-
111
-
112
-
113
-
114
-
115
-
116
-
117
-
118
-
119
-
120
-
121
-
122
-
123
-
124
-
125
-
126
-
127
-
128
-
129
-
130
-
131
-
132
-
133
-
134
-
135
-
136
-
137
-
138
-
139
-
140
-
141
-
142
-
143
-
144
-
145
-
146
-
147
-
148
-
149
-
150
-
151
-
152
-
153
-
154
-
155
-
156
-
157
-
158
-
159
-
160
-
161
-
162
-
163
-
164
-
165
-
166
-
167
-
168
-
169
-
170
-
171
-
172
-
173
-
174
-
175
-
176
-
177
-
178
-
179
-
180
-
181
-
182
-
183
-
184
-
185
-
186
-
187
-
188
-
189
-
190
-
191
-
192
-
193
-
194
-
195
-
196
-
197
-
198
-
199
-
200
-
201
-
202
-
203
-
204
-
205
-
206
-
207
-
208
-
209
-
210
-
211
-
212
-
213
-
214
-
215
-
216
-
217
-
218
-
219
-
220
-
221
-
222
-
223
-
224
-
225
-
226
-
227
-
228
-
229
-
230
-
231
-
232
-
233
-
234
-
235
-
236
-
237
 |
 |