Sony DCR-TRV25 PIXELA ImageMixer 1.0 Manual
Sony DCR-TRV25 - Digital Handycam Camcorder Manual
 |
View all Sony DCR-TRV25 manuals
Add to My Manuals
Save this manual to your list of manuals |
Sony DCR-TRV25 manual content summary:
- Sony DCR-TRV25 | PIXELA ImageMixer 1.0 Manual - Page 1
and images Software Usage Contract Introduction About This Manual General notes Sony (henceforth, 'ImageMixer'). This manual does not explain the basics of Windows or Macintosh operating systems. Basic operations, such as working with individual windows, are based on general usage of Windows - Sony DCR-TRV25 | PIXELA ImageMixer 1.0 Manual - Page 2
trademark of Apple Computer, Inc. q In addition, the company names and brand names referenced in this manual are themselves the trademarks, registered trademarks, and products of the respective companies. Warning 1. All rights related to the user manual and software produced by our company - Sony DCR-TRV25 | PIXELA ImageMixer 1.0 Manual - Page 3
About pictures and images q Keep in mind that pictures and images which may used with ImageMixer may be protected or otherwise forbidden, irrespective of their purpose or use. q As for - Sony DCR-TRV25 | PIXELA ImageMixer 1.0 Manual - Page 4
right to use the software program (henceforth, "this program") and its add-ons, such as the user guide. Consented matter You are it is used by two or more computers on a network, a royalty is required to be paid to PIXELA, Inc. for each additional computer. Third person use or the use of - Sony DCR-TRV25 | PIXELA ImageMixer 1.0 Manual - Page 5
When a customer reproduces this program or its add-ons without permission or breaks the above-mentioned consent conditions, this contract is automatically terminated, and other legal action may be taken by PIXELA, Inc. Upon termination of this contract, this program, its add-ons, and all duplicates - Sony DCR-TRV25 | PIXELA ImageMixer 1.0 Manual - Page 6
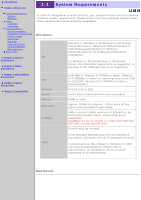
Windows ® 98 and Windows ® 98 Second Edition, DV (IEEE1394) capturing is not supported. In Windows ® 98, USB capturing is not supported) Chapter 4 Movie Editing Environment Chapter 5 Layout Environment Chapter 6 Image Editor CPU Software Sound Memory ); Direct Draw driver compatible ImageMixer will - Sony DCR-TRV25 | PIXELA ImageMixer 1.0 Manual - Page 7
OS Memory Hard Disk Graphics Other Mac OS 8.5.1 or later (Mac OS X is not compatible) 64MB or more Approx. 100MB for , or in less than 256 colors. Pre-installed QuickTime 4 or later. USB or IEEE1394 capturing is not available with Macintosh. Copyright © 2001 PIXELA Corp. All rights reserved. - Sony DCR-TRV25 | PIXELA ImageMixer 1.0 Manual - Page 8
1-2 Setup Installation Windows 1. Insert the ImageMixer CD in the CD drive. After inserting the CD, the screen below is displayed. If this screen is not displayed, right click the CD icon in My Computer to explore the contents of the CD drive and then double click the 'install.exe' file. 2. Click [ - Sony DCR-TRV25 | PIXELA ImageMixer 1.0 Manual - Page 9
] icon by double-clicking the CD icon on the desktop. 2. In the Menu screen, click a desired language icon to begin the installation process. Click the 'USB Driver' button when you want to install it. 3. Continue by following the instructions. Uninstalling - Sony DCR-TRV25 | PIXELA ImageMixer 1.0 Manual - Page 10
Windows 1. From the Start menu, point to settings 'Settings' and open the 'Control Panel.' 2. Double-click the [Add/Remove Programs] icon. The Add/Remove Programs property - Sony DCR-TRV25 | PIXELA ImageMixer 1.0 Manual - Page 11
refer to this manual by selecting Start>Programs>Pixela>ImageMixer>Help. Macintosh ImageMixer is started by double-clicking the ImageMixer icon (created during installation) in the ImageMixer folder on the HDD. ImageMixer startup screen (The Main Selector) The first window displayed when ImageMixer - Sony DCR-TRV25 | PIXELA ImageMixer 1.0 Manual - Page 12
Capture Environment button Album Environment button Movie Editing Environment button Layout Environment button Click to begin tasks related to capturing media files. Click to begin tasks related to albums. Click to begin tasks related to editing movie files. Click to begin tasks related to graphic - Sony DCR-TRV25 | PIXELA ImageMixer 1.0 Manual - Page 13
with and import files from a memory card, such as one which is inserted in a digital camera connected to your computer. You can also record sound Tasks related to graphic layouts (Layout Environment) Creating customized labels for video cassettes, floppy disks, and other items is a snap with - Sony DCR-TRV25 | PIXELA ImageMixer 1.0 Manual - Page 14
to begin tasks related to graphic layouts. Click to minimize the ImageMixer application window and display it in the task bar. (Windows only) Click to bring up this manual and get help using ImageMixer. (Windows only) Click to confirm or make changes to settings related to the currently selected - Sony DCR-TRV25 | PIXELA ImageMixer 1.0 Manual - Page 15
The bottom part of ImageMixer's application window is called the 'Status Bar.' When the mouse pointer is placed over an object, an explanation of its function is displayed in the Status Bar. - Sony DCR-TRV25 | PIXELA ImageMixer 1.0 Manual - Page 16
objects Objects in a certain layout may be selected in a variety of ways. q Selecting one object Click to select. q Selecting only individual objects In Windows, click the objects of your choice while holding down the 'Ctrl' key. In Macintosh, use the 'Command' key. q Selecting all objects in the - Sony DCR-TRV25 | PIXELA ImageMixer 1.0 Manual - Page 17
colors are displayed in work with. . Click the color you wish to Click to display and . A user-defined color can be created by clicking an area in the color spectrum or by inputting digits. The color currently specified in or is displayed here. Click this button to add the color currently - Sony DCR-TRV25 | PIXELA ImageMixer 1.0 Manual - Page 18
Click the color palette type you wish to work with. Click an area in the color spectrum to specify a color. Input digits to specify a color. Copyright © 2001 PIXELA Corp. All rights reserved. - Sony DCR-TRV25 | PIXELA ImageMixer 1.0 Manual - Page 19
video cameras or hard disk drives. Other names for this interface include i.LINK (in Windows), and FireWire (in Macintosh). MPEG MPEG stands for Moving Picture Experts Group. MPEG is an international data compression format for digital movies and Hi-Fi audio. MPEG-1 is the approved format for Video - Sony DCR-TRV25 | PIXELA ImageMixer 1.0 Manual - Page 20
files is linked to their thumbnails. Album files Source files refer to the media stored on your computer. As opposed to album files or thumbnails, they can be considered the 'original' data files. size the object. Control points are displayed slightly differently in Windows and Macintosh. Blocks - Sony DCR-TRV25 | PIXELA ImageMixer 1.0 Manual - Page 21
Blocks are the square areas which surround the control points. Copyright © 2001 PIXELA Corp. All rights reserved. - Sony DCR-TRV25 | PIXELA ImageMixer 1.0 Manual - Page 22
Opening Capture Environment Capture window Capture Tasks Import file mode display Importing files Digital Camera Import Mode Digital camera import display Importing files from a digital camera Audio CD Recording Mode Control panel Caution Recording music files Troubleshooting Sound Recording Mode - Sony DCR-TRV25 | PIXELA ImageMixer 1.0 Manual - Page 23
button Click to start digital camera import mode. CD Recording Mode button Click to start CD recording mode. Sound Recording Mode button Click to start sound recording mode. USB Device Capture Mode button Click to start USB device capture mode. (Windows only) DV Camcorder Click to start DV - Sony DCR-TRV25 | PIXELA ImageMixer 1.0 Manual - Page 24
2-2-1 Capture Tasks ImageMixer allows you to "drag and drop" media (still pictures, movies, and sound files) straight from disks on your computer into albums of your choice. Import file mode display - Sony DCR-TRV25 | PIXELA ImageMixer 1.0 Manual - Page 25
a preview of the source file and provides detailed file information. In the case of movie files, the entire movie can be previewed in this window. The preview window is not displayed when a sound file thumbnail is selected. A single fame and its position in the movie can be previewed by dragging the - Sony DCR-TRV25 | PIXELA ImageMixer 1.0 Manual - Page 26
Volume control In Windows, adjust the volume by dragging the slider. In Macintosh, click to display a vertical volume slider. Adjust the volume by dragging the slider up or down. - Sony DCR-TRV25 | PIXELA ImageMixer 1.0 Manual - Page 27
saved into the directory designated in the Capturing/Recording Preferences. Files can also be imported by dragging and dropping thumbnails from the thumbnail list window into the desired album. See below. In Macintosh, it may be impossible to create thumbnails for files which cannot be opened - Sony DCR-TRV25 | PIXELA ImageMixer 1.0 Manual - Page 28
by QuickTime Player. Also, since Macintosh recognizes files by their contents rather than file extensions, some files may be added as certain file type which is not in accordance with their file extension. Copyright © 2001 PIXELA Corp. All rights reserved. - Sony DCR-TRV25 | PIXELA ImageMixer 1.0 Manual - Page 29
2-3-1 Digital Camera Import Mode This mode allows you to import files from digital cameras and memory card reader devices. This is possible when a removable disk is mounted. Digital camera import display - Sony DCR-TRV25 | PIXELA ImageMixer 1.0 Manual - Page 30
Select memory card menu Digital cameras and memory cards connected directly to the PC are displayed in a list. Refresh button Click to refresh the reading of data from the source currently selected in . Memory card list window Available memory cards and similarly formatted sources are displayed - Sony DCR-TRV25 | PIXELA ImageMixer 1.0 Manual - Page 31
Information Display button Displays file information pertaining to the selected Exif file. Exif Device Information Display button Displays Exif camera information pertaining to the selected file. Exif Photo Information Displays photo information pertaining to the selected Display button Exif - Sony DCR-TRV25 | PIXELA ImageMixer 1.0 Manual - Page 32
Camera Import Mode Importing files from a digital camera Files from a digital camera memory card or removable disk may be imported as follows: 1. Select a digital camera from the menu. Memory cards and sources with digital camera memory card formatting are displayed in the memory card list window - Sony DCR-TRV25 | PIXELA ImageMixer 1.0 Manual - Page 33
Vertically oriented pictures are usually saved horizontally, though Exif files will contain information to the effect that the picture was taken vertically. ImageMixer creates vertical thumbnails for those files in accordance with the Exif information, even though they may have originally been saved - Sony DCR-TRV25 | PIXELA ImageMixer 1.0 Manual - Page 34
2-4-1 Audio CD Recording Mode ImageMixer allows you to record CDs straight from your CD-ROM drive. Recorded files can be played or added to a movie media stream. Control panel Audio CDs can be played or recorded using the control panel shown below. - Sony DCR-TRV25 | PIXELA ImageMixer 1.0 Manual - Page 35
audio CD is present. A list of available CD drives is displayed. Select the CD drive you wish to record from. (Windows only) Select CD drive menu If 'Enable digital recording' is checked in the Capturing/Recording Preferences, the CD drive is displayed according to its drive name. If the setting - Sony DCR-TRV25 | PIXELA ImageMixer 1.0 Manual - Page 36
, make sure that there is no check next to "Enable digital CD audio for this CDROM device." Digital recording q If digital recording from the CD drive is not possible, try analog recording. Macintosh supports only digital recording Recording in Macintosh When another player is running, recording may - Sony DCR-TRV25 | PIXELA ImageMixer 1.0 Manual - Page 37
Copyright © 2001 PIXELA Corp. All rights reserved. - Sony DCR-TRV25 | PIXELA ImageMixer 1.0 Manual - Page 38
the track list window. 5. If you wish to record only one portion of a track, cue up the track according to the instructions below. To record digitally recorded files is PCM, the sampling rate is 44.1KHz, and the bit rate is 16bit stereo. In Windows, the file type of recorded files is WAVE. In Mac - Sony DCR-TRV25 | PIXELA ImageMixer 1.0 Manual - Page 39
Macintosh Files are recorded is by dragging & dropping the track number from the track list window to the thumbnail list window. Tracks are recorded individually. Copyright © 2001 PIXELA Corp. All rights reserved. - Sony DCR-TRV25 | PIXELA ImageMixer 1.0 Manual - Page 40
Troubleshooting Unable to record sound files (analog recording in Windows). (See section 2-4-2) There may be a problem with a driver. There may also be a problem on your computer's configurations, in which case we recommend that you consult the manufacturer's technical support center. Recorded - Sony DCR-TRV25 | PIXELA ImageMixer 1.0 Manual - Page 41
Sound is not recorded from the starting point (sound begins late). Although recording commences when the [Record] button is clicked, sound is not always recorded from this point. This is because there may be a time lag before play begins. It is therefore recommended that you set the point at which - Sony DCR-TRV25 | PIXELA ImageMixer 1.0 Manual - Page 42
with the ImageMixer software. Control panel From the control panel, you can record sounds using a microphone or other sound output device connected to an audio input on your computer. You can also use the control panel (shown below) to playback recorded sounds. Preview window Displays a preview of - Sony DCR-TRV25 | PIXELA ImageMixer 1.0 Manual - Page 43
Playback position slider Preview ON/OFF button Time display Volume control Stop button Play button Pause button Record button The position at which you wish to begin playback can be selected by dragging the slider. Switches the preview display on or off. Displays the accumulated time of the - Sony DCR-TRV25 | PIXELA ImageMixer 1.0 Manual - Page 44
to the appropriate input jack on your computer. 2. Select an album. Select the album from the album list window into which you wish to save the digitally recorded files is PCM, the sampling rate is 44.1KHz, and the bit rate is 16bit stereo. In Windows, the file type of recorded files is WAVE. In Mac - Sony DCR-TRV25 | PIXELA ImageMixer 1.0 Manual - Page 45
with the ImageMixer software. 1. Connect the microphone or other sound output device to the appropriate input jack on your computer. 2. Select digitally recorded files is PCM, the sampling rate is 44.1KHz, and the bit rate is 16bit stereo. In Windows, the file type of recorded files is WAVE. In Mac - Sony DCR-TRV25 | PIXELA ImageMixer 1.0 Manual - Page 46
Copyright © 2001 PIXELA Corp. All rights reserved. - Sony DCR-TRV25 | PIXELA ImageMixer 1.0 Manual - Page 47
recording sound level. The method for adjusting the volume may be different depending on your computer's configurations, in which case we recommend that you consult the manufacturer's technical support center. Recorded analog sound files contain noise and jump. Confirm that the CD recording volume - Sony DCR-TRV25 | PIXELA ImageMixer 1.0 Manual - Page 48
or movie scenes directly from devices connected to your computer's USB port, such as a digital camera. Control panel Monitor window Volume control Still Picture Capture button Motion Picture Capture button Displays images from the USB-connected device. Adjust volume by dragging the slider. Click - Sony DCR-TRV25 | PIXELA ImageMixer 1.0 Manual - Page 49
USB interface of the device (such as a digital video camera) to the USB port on the computer. Set the device to display images through the USB connection. Consult the instruction manual there is a problem with the connection between the PC and the device: A black monitor window will displayed. When - Sony DCR-TRV25 | PIXELA ImageMixer 1.0 Manual - Page 50
Only) Capturing movie scenes Follow these steps to capture (record) a movie file from a USB-connected device. 1. Select an album. Designate an album from the album list window into which to save the captured movie file. 2. Click the [Movie Scene Capture] Capturing a movie scene is now possible - Sony DCR-TRV25 | PIXELA ImageMixer 1.0 Manual - Page 51
Capturing still pictures Follow these steps to capture a still picture from a USB-connected device. 1. Select an album. Designate an album from the album list window into which to save the captured picture file. 2. Click the [Still Picture Capture ] Capturing a still picture is now possible. - Sony DCR-TRV25 | PIXELA ImageMixer 1.0 Manual - Page 52
2-7-1 DV Camcorder Capture Mode (Windows Only) ImageMixer enables you to capture both still pictures and movie scenes a digital video cameras connected to the IEEE1394 port of your computer. Control panel From the control panel, you can play or record media from a digital video camera connected - Sony DCR-TRV25 | PIXELA ImageMixer 1.0 Manual - Page 53
the movie in a large monitor window. Cassette indicator Refresh connection button Time display This icon becomes active (glows) when a DV cassette is present in the digital video camera. Click to refresh the connection between the PC and the digital video camera. Displays the current play time - Sony DCR-TRV25 | PIXELA ImageMixer 1.0 Manual - Page 54
Information display panel Indicates current operation and connection status of the device. Copyright © 2001 PIXELA Corp. All rights reserved. - Sony DCR-TRV25 | PIXELA ImageMixer 1.0 Manual - Page 55
2-7-2 DV Camcorder Capture Mode (Windows Only) Changing the display size When capturing files from a digital video camera (DV camcorder), there are two monitor sizes from which to choose: small monitor and large monitor. Click the [small monitor] change the monitor size. button or the [ - Sony DCR-TRV25 | PIXELA ImageMixer 1.0 Manual - Page 56
A black monitor window will be displayed. If the digital video camera is not properly connected to the PC, or is not set to play mode, or if a DV cassette isn't present in the machine, the message on the information display panel will say "Camcorder Not Found." If there seems to a problem with the - Sony DCR-TRV25 | PIXELA ImageMixer 1.0 Manual - Page 57
2-7-3 DV Camcorder Capture Mode (Windows Only) Capturing movie scenes Follow the steps below to capture movie scenes. 1. Select an album. Designate an album from the album list window into which to save the captured movie file. 2. Click the [Movie Scene Capture] Capturing a movie scene is now - Sony DCR-TRV25 | PIXELA ImageMixer 1.0 Manual - Page 58
2. Click the [Still Picture Capture ] Capturing a still picture is now possible. button. 3. Click the [Play] button to start the movie in the monitor window. You can also fast forward, rewind, pause, etc., to find the point at which you plan to begin recording. 4. Click the [Capture] button - Sony DCR-TRV25 | PIXELA ImageMixer 1.0 Manual - Page 59
Copyright © 2001 PIXELA Corp. All rights reserved. - Sony DCR-TRV25 | PIXELA ImageMixer 1.0 Manual - Page 60
2-8 Capturing/Recording Preferences Open the capturing/recording environment. Displaying preferences window 1. Open ImageMixer. 2. Click the [Capture Environment] Selector or Selector Bar. button on the Main 3. Click the [Preferences] button. Preferences window - Sony DCR-TRV25 | PIXELA ImageMixer 1.0 Manual - Page 61
This function is only Windows except . Movie capture settings Here you can set preferences related to the USB device capture mode or the DV camcorder capture mode, both of which are used to capture movie scenes and save them on your computer. q Capture as MPEG1 The default format for movie files - Sony DCR-TRV25 | PIXELA ImageMixer 1.0 Manual - Page 62
Aspect Ratio If your digital video camera uses the NTSC format (standard in the United States, Canada, Japan, and elsewhere) the resolution of still picture files will be 720 x 480 pixels, which is most likely slightly longer horizontally than the display of your computer. When you display these - Sony DCR-TRV25 | PIXELA ImageMixer 1.0 Manual - Page 63
the recording of audio CDs. q Digital recording Digital recording is enabled by checking this box USB Capture Device Setting This setting allows you to select the driver needed for properly transferring the audio portion of movie media captured from devices connected to the USB port of your computer - Sony DCR-TRV25 | PIXELA ImageMixer 1.0 Manual - Page 64
Window Playing movies and sound files (Win) Playing movies and sound files (Mac) Viewing still pictures Exporting Album Files Exporting movies Exporting pictures Output to memory Editor Selector Bar Thumbnail Display buttons Album list window Menu buttons The buttons located on this bar control - Sony DCR-TRV25 | PIXELA ImageMixer 1.0 Manual - Page 65
thumbnails are also located here. Image Edit button Allows the source file of a selected still picture thumbnail to be edited. Thumbnail list window Thumbnails related to movies, still pictures, and sound files are shown here. You can use the display control buttons to effectively "filter - Sony DCR-TRV25 | PIXELA ImageMixer 1.0 Manual - Page 66
small graphic representations of files which have been added to a particular album. Thumbnails for a selected album are displayed in the 'thumbnail list window.' Movie file thumbnails The graphic representation, or thumbnail image, consists of the first frame of the movie. The title of the movie is - Sony DCR-TRV25 | PIXELA ImageMixer 1.0 Manual - Page 67
The thumbnail image consists of a miniature image of the picture itself. The title of the still picture is shown here. This is the icon used for still pictures. Copyright © 2001 PIXELA Corp. All rights reserved. - Sony DCR-TRV25 | PIXELA ImageMixer 1.0 Manual - Page 68
dialog box. Enter the file name, define the destination directory, then click [Save]. The newly created album will appear in the album list window. Add album Adds, or retrieves, a saved album which was previously removed. Clicking this command displays the 'Open' dialog box. Selecting and opening an - Sony DCR-TRV25 | PIXELA ImageMixer 1.0 Manual - Page 69
As' dialog box. Enter the file name, define the destination directory, then click [Save]. The newly created backup album is displayed in the album list window. A folder with the same name as the backup album is created in the destination directory. The backup album file and backup files of the files - Sony DCR-TRV25 | PIXELA ImageMixer 1.0 Manual - Page 70
with selected thumbnails Creates a new album with the selected source files (according to the currently selected thumbnails) as its initial contents. In Windows, clicking this menu item displays the 'Save As' dialog box. Enter the album file name, define the destination directory, and then click - Sony DCR-TRV25 | PIXELA ImageMixer 1.0 Manual - Page 71
are merely graphic representations of the actual files that exist on your computer, there may be cases where the source file is changed ( you wish to check, and then click the 'Test thumbnail integrity' command. In Windows, when a file added in an album cannot be found because it has been deleted - Sony DCR-TRV25 | PIXELA ImageMixer 1.0 Manual - Page 72
Pastes a cut or copied thumbnail into the album of your choice. A cut or copied thumbnail cannot be pasted into an album in which a copy of that thumbnail already exists. Delete thumbnail Deletes the selected thumbnail from the album. Clicking this command displays a confirmation dialog box. - Sony DCR-TRV25 | PIXELA ImageMixer 1.0 Manual - Page 73
3-4 File Menu Clicking this button displays the file menu. Move Moves the source file of the selected thumbnail. Clicking this command displays the 'Browse for Folder' dialog box. Select the destination location and click [OK] to move the source file. Copy Copies the source file of the selected - Sony DCR-TRV25 | PIXELA ImageMixer 1.0 Manual - Page 74
only) Displays the contents of the directory containing the source file of the selected thumbnail. This function utilizes the standard Windows Explorer interface. Rename file Allows you to change the name of the source file associated with the selected thumbnail. Clicking this command displays - Sony DCR-TRV25 | PIXELA ImageMixer 1.0 Manual - Page 75
is complete, a thumbnail associated with the new file will appear in the current album. Output to memory card Outputs a copy of the source file associated with the selected thumbnail to a memory card. Print Prints out the source file of the selected thumbnail. Clicking this command displays the - Sony DCR-TRV25 | PIXELA ImageMixer 1.0 Manual - Page 76
and returns to main screen of the Album Environment. Apply as wallpaper (Windows only) Sets the source file of the selected still picture thumbnail as . Make sure that Active Desktop is off. Use as screen saver (Windows only) Sets the source file of the selected movie thumbnail as the screen - Sony DCR-TRV25 | PIXELA ImageMixer 1.0 Manual - Page 77
Menus Context menus provide a variety of commands related to working with thumbnails and their respective source files. They can be displayed in Windows by rightclicking the thumbnail you wish to work with. In Macintosh, hold down the control key while clicking the appropriate thumbnail. Copy - Sony DCR-TRV25 | PIXELA ImageMixer 1.0 Manual - Page 78
selected thumbnail. Clicking this command displays the Print Layout Settings dialog box, providing you with a variety of options related to paper size, etc. Output to memory card Outputs a copy of the source file associated with the selected thumbnail to - Sony DCR-TRV25 | PIXELA ImageMixer 1.0 Manual - Page 79
This command makes the currently selected thumbnail image appear as part of the icon of the currently selected album. Edit picture Allows the source file of the selected still picture thumbnail to be edited. The edited still picture is created as a new file and its thumbnail is automatically added - Sony DCR-TRV25 | PIXELA ImageMixer 1.0 Manual - Page 80
3-6 Thumbnail Views Thumbnails of files existing in the currently selected album are displayed in the thumbnail list window. There are a variety of views available, each with their own special properties. Thumbnail view Displays thumbnails existing in the selected album. This is the default - Sony DCR-TRV25 | PIXELA ImageMixer 1.0 Manual - Page 81
view (Windows) Selecting individual thumbnails provides you with a wide variety of information, including that which relates to Exif formatted files. In particular, these files contain all sorts of information relative to specific dates/times, camera information, and camera settings. This - Sony DCR-TRV25 | PIXELA ImageMixer 1.0 Manual - Page 82
image, date/time the picture was taken, Exif version, image size, and whether or not the picture is meant to appear vertically or horizontally (orientation). Camera Information Display button (Exif files only) Photo Information Display button (Exif files only) Displays information relative to the - Sony DCR-TRV25 | PIXELA ImageMixer 1.0 Manual - Page 83
that which relates to Exif formatted files. In particular, these files contain all sorts of information relative to specific dates/times, camera information, and camera settings. This view also allows you to add your own information, such as titles and comments that will help you remember certain - Sony DCR-TRV25 | PIXELA ImageMixer 1.0 Manual - Page 84
with which the Exif picture was originally taken, including the name of the camera manufacturer, camera model, and the camera's maximum aperture value. Exif Photo Information Display button Displays information relative to the settings under which the Exif photograph itself was taken, including - Sony DCR-TRV25 | PIXELA ImageMixer 1.0 Manual - Page 85
movie files to be viewed and sound files to be played. To bring up this window, follow the steps below. 1. Select the thumbnail which corresponds to the file you want double-clicking their corresponding thumbnail. Playing movies and sound files (Windows) View/Play window for movies and sound files. - Sony DCR-TRV25 | PIXELA ImageMixer 1.0 Manual - Page 86
series. Displays the accumulated play time of the movie or sound file currently being played. Drag the slider to control volume. Closes the view/play window and returns to the main screen of the Album Environment. Playing movies and sound files (Macintosh) - Sony DCR-TRV25 | PIXELA ImageMixer 1.0 Manual - Page 87
View/Play window for movies and sound files. Display Movies are shown here. Volume control Drag the slider to control volume. Play button Click to begin playback from - Sony DCR-TRV25 | PIXELA ImageMixer 1.0 Manual - Page 88
and returns to the main screen of the Album Environment. Viewing still pictures View window for still pictures. Display Zoom In button Zoom Out button Display Previous button Displays the selected file(s). Clicking this button enlarges the display size. Clicking - Sony DCR-TRV25 | PIXELA ImageMixer 1.0 Manual - Page 89
Display Next button Close button When two or more files have been selected for viewing, clicking this button moves you to the next file in the series. Closes the view display and returns to the main screen of the Album Environment. Copyright © 2001 PIXELA Corp. All rights reserved. - Sony DCR-TRV25 | PIXELA ImageMixer 1.0 Manual - Page 90
Select the thumbnail of the movie file to be exported from the thumbnail list window. Click 'Export within album as new movie' in the pull-down File : Select either [low], [Normal], [high], or [highest] image quality. MPEG movie for Sony: Select either [160 x 112], [160 x 112 (CV)], [320 x 240], or - Sony DCR-TRV25 | PIXELA ImageMixer 1.0 Manual - Page 91
Click to begin preview from the current position on the play position slider. Pauses movie playback. Defines size and quality options relative to the Sony MPEG movie format. Note that when a low image quality is selected, the compression speed (rate at which the file is exported) is relatively fast - Sony DCR-TRV25 | PIXELA ImageMixer 1.0 Manual - Page 92
2. When exporting a still picture from a movie file, select the desired frame by dragging the play position slider. 3. Define the file format options (BMP for Windows, PICT for Macintosh, Exif or JPEG) and click the [Export] button. 4. Once the file is exported, the dialog box will close and the new - Sony DCR-TRV25 | PIXELA ImageMixer 1.0 Manual - Page 93
the selected movie or still picture file into the Exif file format used by digital cameras. Original size or 640 x 480 pixels may be selected. Exports the selected movie frame or still picture in BMP (Windows) or PICT (Macintosh) format. Exports the selected movie frame or still picture in JPEG - Sony DCR-TRV25 | PIXELA ImageMixer 1.0 Manual - Page 94
card' in the pull-down File Menu or the Context Menu. 3. The Memory Card Output dialog box is displayed. Select a memory card present either in a camera or in a memory card reader connected to your computer. Click the [Output] button. 4. A progress bar is shown and the file is saved to the selected - Sony DCR-TRV25 | PIXELA ImageMixer 1.0 Manual - Page 95
. Card Search button Searches for any memory cards present, either in a camera or in a memory card reader connected to your computer. Still Picture Display button Displays only thumbnails of still picture files in the thumbnail list window. Movie Display button Displays only thumbnails - Sony DCR-TRV25 | PIXELA ImageMixer 1.0 Manual - Page 96
. Refresh button Refreshes (rereads) the data existing on the currently selected memory card. Output button Outputs a copy of the file selected in the thumbnail list window to the selected memory card. Close button Closes the memory card output dialog box and returns to the main screen of the - Sony DCR-TRV25 | PIXELA ImageMixer 1.0 Manual - Page 97
3-9 Printing Within the Album Environment Whether you would like to print out snap shots of your favorite pictures or create a physical record of your album files, ImageMixer provides you with a variety of printing options, conveniently located within the album environment. Furthermore, the - Sony DCR-TRV25 | PIXELA ImageMixer 1.0 Manual - Page 98
Index Printing Defines the number of thumbnails printed per page. Defines the number of thumbnails per page by columns and rows. Example: 4 pictures per page. Example: 2 columns, 3 rows per page. Prints thumbnails and their source file names. Defines the number of thumbnails printed per page. - Sony DCR-TRV25 | PIXELA ImageMixer 1.0 Manual - Page 99
List Printing Prints thumbnails and information pertaining to their corresponding source files. The number of boxes that may be checked depends upon the number of images per page as well as the paper size. When the file to be printed is an Exif file, checking the 'Indicate Date' box allows the - Sony DCR-TRV25 | PIXELA ImageMixer 1.0 Manual - Page 100
Print Image Only Prints the selected picture according to its actual size. The date can also be printed in the lower right-hand corner of the picture by checking the 'Indicate Date' box. When the file to be printed is an Exif file, checking the 'Indicate Date' box allows the photo date/time to - Sony DCR-TRV25 | PIXELA ImageMixer 1.0 Manual - Page 101
button Displays only files that can be output to a memory card. Still Picture Display button Displays only still picture files in the thumbnail list window. Movie File Display button Displays only movie files in the thumbnail list window. Sound File Display button Displays only sound files in the - Sony DCR-TRV25 | PIXELA ImageMixer 1.0 Manual - Page 102
are searched according to the specified criteria. Files that match the specified criteria are highlighted (appear bright yellow) in the thumbnail display window. Search results can be canceled by clicking the [Reset] button. The Create album with selected thumbnails item in the pull-down album - Sony DCR-TRV25 | PIXELA ImageMixer 1.0 Manual - Page 103
modified. The currently displayed thumbnails can also be arranged arbitrarily by dragging them to the desired location within the thumbnail list window. Sort in Ascending Order button Sort in Descending Order button Alphanumerically sorts thumbnails in the currently displayed album in ascending - Sony DCR-TRV25 | PIXELA ImageMixer 1.0 Manual - Page 104
format, the following settings will not apply. The edited file will be saved in its original format. Save as BMP (Windows) This is the still picture file format generally used in Windows. Save as PICT (Macintosh) This is the still picture file format generally used in Macintosh. Save as JPEG This is - Sony DCR-TRV25 | PIXELA ImageMixer 1.0 Manual - Page 105
If this box is not checked, all files displayed in the thumbnail list window will be displayed in the slide show. Repeat If this box is checked, the slide show display will be repeated, or looped, until the slide show window is closed. Interval Defines the time each image is shown during the slide - Sony DCR-TRV25 | PIXELA ImageMixer 1.0 Manual - Page 106
Defines the characters (letters, numbers, etc.) added to the names of all files created in ImageMixer, such as those created through exporting movies/still pictures or those you have altered, or edited yourself. The prefix characters will be followed by consecutive numbers and the file will be saved - Sony DCR-TRV25 | PIXELA ImageMixer 1.0 Manual - Page 107
Provides tools related to opening and saving projects, creating MPEG1 media streams, and thumbnail display options. Displays thumbnails of movies and sound files Thumbnail list window existing in the selected album. Also displays transition effects and titles. - Sony DCR-TRV25 | PIXELA ImageMixer 1.0 Manual - Page 108
Storyboard Timeline Shows the arrangement of files used in the media stream. Details the linear progression of media within the stream. Double-clicking sound media here also provides you with trimming options. Copyright © 2001 PIXELA Corp. All rights reserved. - Sony DCR-TRV25 | PIXELA ImageMixer 1.0 Manual - Page 109
4-2 Monitor Panel Edit mode Click the [Edit Mode] button. Monitor Play position slider Stop button Displays the media stream currently arranged on the Storyboard. The position at which to begin playback can be defined by dragging the slider. Stops playback and returns the movie to the beginning. - Sony DCR-TRV25 | PIXELA ImageMixer 1.0 Manual - Page 110
Play button Pause button Time display Volume control Plays from the current position of the play position slider. Pauses playback. Displays the currently accumulated playing time of the movie or sound file being previewed. Drag the slider to control volume. Preview mode Click the [Preview Mode] - Sony DCR-TRV25 | PIXELA ImageMixer 1.0 Manual - Page 111
Preview range select slider Stop button Play button Defines the range of the media stream to be previewed. Stops playback and returns the movie to the beginning. Plays from the current position of the play position slider. Pause button Time display Volume control Play position slider Pauses - Sony DCR-TRV25 | PIXELA ImageMixer 1.0 Manual - Page 112
files) are called project files. Open a project file Clicking this button displays the 'Open' dialog box, allowing you to browse the folders on your computer. Save project Clicking this button displays the 'Save As' dialog box. Enter the file name and click [Save] once you have defined a location on - Sony DCR-TRV25 | PIXELA ImageMixer 1.0 Manual - Page 113
button saves the edited media stream as an MPEG1 movie file. Enter the file name and click [Save] once you have defined a location on your computer where you would like the movie to be stored. Select album - Sony DCR-TRV25 | PIXELA ImageMixer 1.0 Manual - Page 114
Select which thumbnails you wish to appear in the thumbnail list window. When you click the arrow, a dropdown list of available album files will be displayed. Copyright © 2001 PIXELA Corp. All rights reserved. - Sony DCR-TRV25 | PIXELA ImageMixer 1.0 Manual - Page 115
Storyboard by dragging & dropping their thumbnails from the thumbnail list window. Trash can button Title icon Clip thumbnail Transition box Transition be added by dragging transition effect thumbnails from the thumbnail list window. This icon indicates the location of a transition effect which has - Sony DCR-TRV25 | PIXELA ImageMixer 1.0 Manual - Page 116
Copyright © 2001 PIXELA Corp. All rights reserved. - Sony DCR-TRV25 | PIXELA ImageMixer 1.0 Manual - Page 117
the exact starting and stopping points of visual media clips arranged on the Storyboard. Dragging & dropping sound file thumbnails from the thumbnail list window adds them to the movie soundtrack. Once added, sound clips can be dragged to the desired position within the media stream. Placing your - Sony DCR-TRV25 | PIXELA ImageMixer 1.0 Manual - Page 118
Copyright © 2001 PIXELA Corp. All rights reserved. - Sony DCR-TRV25 | PIXELA ImageMixer 1.0 Manual - Page 119
error message may be displayed. In this case, increase the amount of free memory by increasing the virtual memory size. Virtual memory size can be adjusted from the memory control panels under the Apple menu. 2. The Movie Editor window will appear. 3. Use the play position slider to define the point - Sony DCR-TRV25 | PIXELA ImageMixer 1.0 Manual - Page 120
edit mode. Monitor Displays the movie to be edited. Displays the first frame of the selected trimming Trimming bar range range. Doubleclicking this window returns the play position slider to the trimming range in-point. Single Increment Rewind button Rewinds the movie one increment. - Sony DCR-TRV25 | PIXELA ImageMixer 1.0 Manual - Page 121
control volume. Single Advances the Increment movie one Advance button increment. Out-point frame window Displays the last frame of the selected trimming range. Doubleclicking this window returns the play position slider to the trimming range out-point. Defines the Incrementation duration - Sony DCR-TRV25 | PIXELA ImageMixer 1.0 Manual - Page 122
4-7-1 Sound Editing Various operations, such as trimming, fade-in/fade-out settings, and volume level, can be performed relative to both primary and superimposed soundtracks. Primary soundtrack editing Double-click the thumbnail of a movie file on the Storyboard to display the Movie Editor. From - Sony DCR-TRV25 | PIXELA ImageMixer 1.0 Manual - Page 123
Copyright © 2001 PIXELA Corp. All rights reserved. - Sony DCR-TRV25 | PIXELA ImageMixer 1.0 Manual - Page 124
have made the desired changes by playing the movie in the Preview Mode, as changes will not be reflected in the editing mode. Sound Editor window - Sony DCR-TRV25 | PIXELA ImageMixer 1.0 Manual - Page 125
Sound editor window Switches, if necessary, to the sound edit mode. Monitor Displays the movie to be edited. Time display Displays the currently accumulated playing time of the movie or sound file being previewed. Drag the slider to Volume control control playback volume. - Sony DCR-TRV25 | PIXELA ImageMixer 1.0 Manual - Page 126
-in ending position. Fade-out starting time display. Indicates time (from end of clip) of fade-out starting position. OK button Applies changes and closes window. Close button Cancels changes and closes window. Copyright © 2001 PIXELA Corp. All rights reserved. - Sony DCR-TRV25 | PIXELA ImageMixer 1.0 Manual - Page 127
have made the desired changes by playing the movie in the Preview Mode, as changes will not be reflected in the editing mode. Sound Editor window - Sony DCR-TRV25 | PIXELA ImageMixer 1.0 Manual - Page 128
Monitor Displays the portion of the media stream to which the sound to be edited has already been superimposed. Fade-out slider Drag the slider to set the starting time of the soundtrack fadeout. - Sony DCR-TRV25 | PIXELA ImageMixer 1.0 Manual - Page 129
fade-in ending position. Fade-out starting time display. Indicates time (from end of clip) of fadeout starting position. OK button Applies changes and closes window. Close button Cancels changes and closes window. Drag the slider to edit volume. - Sony DCR-TRV25 | PIXELA ImageMixer 1.0 Manual - Page 130
Copyright © 2001 PIXELA Corp. All rights reserved. - Sony DCR-TRV25 | PIXELA ImageMixer 1.0 Manual - Page 131
created in the Layout Environment into a movie. 1. Click the [Title] button. 2. Thumbnails of available titles will be displayed in the thumbnail list window. Drag the title thumbnail you wish to use directly into the desired movie clip already placed on the Storyboard. 3. A [T] will appear in - Sony DCR-TRV25 | PIXELA ImageMixer 1.0 Manual - Page 132
Title Editor button Switches, if necessary, to the title edit mode. Monitor window Displays the movie being edited. Title range bar Indicates the range of the associated movie clip in which the title is to appear. Single Increment - Sony DCR-TRV25 | PIXELA ImageMixer 1.0 Manual - Page 133
On/off button Displays the total time the title appears. Defines whether or not the title appears at all. OK button Applies changes and closes window. Close button Cancels changes and closes window. Copyright © 2001 PIXELA Corp. All rights reserved. - Sony DCR-TRV25 | PIXELA ImageMixer 1.0 Manual - Page 134
between any two movie clip thumbnails) on the Storyboard. 3. Double-click the transition effect thumbnail on the storyboard to open the Transition Settings window. 4. Use the slider to drag either the starting point or the end point of the transition effect. The point not being dragged will - Sony DCR-TRV25 | PIXELA ImageMixer 1.0 Manual - Page 135
at a time, the length of time the transition effect appears. Allows changes to certain aspects of the currently selected transition effect. Applies changes and closes window. Cancels changes and closes window. Copyright © 2001 PIXELA Corp. All rights reserved. - Sony DCR-TRV25 | PIXELA ImageMixer 1.0 Manual - Page 136
the Save Project button. 2. The 'Save As' dialog box will appear. Enter the file name and click [Save] once you have defined a location on your computer where you would like the project to be stored. To open a saved project, click the Open Project File button. Clicking this button displays the - Sony DCR-TRV25 | PIXELA ImageMixer 1.0 Manual - Page 137
ImageMixer is a powerful application when it comes to generating movies in that it allows you to create movies in MPEG1 format, a hallmark of which is that the only visual media which actually needs to be rewritten to disk are those portions in which transition effects or titles appear. Since the - Sony DCR-TRV25 | PIXELA ImageMixer 1.0 Manual - Page 138
create yourself. The higher the quality setting, the more disk space required. Work Disk Setting (Macintosh only) Defines the disk to be used as virtual memory for temporary files. - Sony DCR-TRV25 | PIXELA ImageMixer 1.0 Manual - Page 139
Copyright © 2001 PIXELA Corp. All rights reserved. - Sony DCR-TRV25 | PIXELA ImageMixer 1.0 Manual - Page 140
3.9 X 5.8 inch (100 X 148 mm) postcards, as well as labels for video tapes, disks, etc. You can also create titles to be inserted into your own to select layout mode. Click to display current layout in the preview window. This button is not displayed when working with titles. Print button Click - Sony DCR-TRV25 | PIXELA ImageMixer 1.0 Manual - Page 141
design as a custom template. Click to select an album from the dropdown list. Thumbnails from the currently selected album are Thumbnail list window displayed in a list. Only still picture thumbnails are displayed. Task panel Buttons for layout/object-related operations are arranged on this panel - Sony DCR-TRV25 | PIXELA ImageMixer 1.0 Manual - Page 142
5-1-2 Layout Environment Task panel Create New button Click to create a new layout. Orientation button Background Color button Overlap Order button Alignment button Group button Click to change the orientation (horizontal/vertical positioning) of the current layout. Click to change the - Sony DCR-TRV25 | PIXELA ImageMixer 1.0 Manual - Page 143
copy the selected object(s). Paste button Click to paste copied object(s). Transform Text button Click allow changes to the 3-dimensional properties of the selected text. (Windows only) Delete button Click to delete the selected object(s). Copyright © 2001 PIXELA Corp. All rights reserved. - Sony DCR-TRV25 | PIXELA ImageMixer 1.0 Manual - Page 144
layout type from the layout menu. In the menu window, click the desired layout type and click the [OK of the printer. When the printer driver is not specified, a new layout cannot be In Windows, right-click the printer driver and select [Set As Default]. In Macintosh, select the printer driver from - Sony DCR-TRV25 | PIXELA ImageMixer 1.0 Manual - Page 145
display the layout types for VHS tape, 8mm tape, floppy disk, MD, DV cassette and CD labels. Click to display title and postcard layouts. In Windows, click to display the list of printer paper types. In Macintosh, the custom button is displayed. Click to select the desired layout type. Click the - Sony DCR-TRV25 | PIXELA ImageMixer 1.0 Manual - Page 146
a Mini Disc label. Create a digital video camera cassette label. Create a CD jewel case insert. Others HAGAKI Title Create a 3.9 X 5.8 inch (100 X 148 mm) postcard layout. Create a title to be inserted into a movie media stream. Custom In Windows - Sony DCR-TRV25 | PIXELA ImageMixer 1.0 Manual - Page 147
5-3-1 Layout Operations Creating a new layout Create a new layout by clicking the [Create new] button in the task panel. If a layout is currently displayed, a dialog box will appear asking if you want to save the current layout. Click the [OK] button to save the current layout. Environment a - Sony DCR-TRV25 | PIXELA ImageMixer 1.0 Manual - Page 148
by increments. Click the [Reduce] button to shrink the layout display by increments. You can also select a layout display size by clicking the magnification display window. Copyright © 2001 PIXELA Corp. All rights reserved. - Sony DCR-TRV25 | PIXELA ImageMixer 1.0 Manual - Page 149
(custom templates) will be added to the end of the list. Custom template save location In Windows, custom templates are saved in the Program Files>Pixela>ImageMixer>User Data>Layout Menu Display>Custom Templates. In Macintosh, custom templates are saved in the following location: 'ImageMixer - Sony DCR-TRV25 | PIXELA ImageMixer 1.0 Manual - Page 150
Print layout Click the [Print] button to print the current layout. In Windows, the print settings dialog box will be displayed. In Macintosh, select the paper size to be used in the paper settings dialog box chosen under - Sony DCR-TRV25 | PIXELA ImageMixer 1.0 Manual - Page 151
moved (inside the Blocks). If you click and drag a Control point, you will change the size of the object. Moving more than one object In Windows, select the objects to be moved and drag the one defined by the blue Control points. In Macintosh, drag any of the selected objects. Moving - Sony DCR-TRV25 | PIXELA ImageMixer 1.0 Manual - Page 152
while dragging the control point. Changing object size with the keyboard You can change an object's size by using the arrow keys on your computer keyboard. In Windows, hold down the [Ctrl] key while using the arrow keys. In Macintosh, hold down the [Control] key while using the arrow keys. The size - Sony DCR-TRV25 | PIXELA ImageMixer 1.0 Manual - Page 153
Copyright © 2001 PIXELA Corp. All rights reserved. - Sony DCR-TRV25 | PIXELA ImageMixer 1.0 Manual - Page 154
5-4-2 Object Operations Changing the overlap order of objects When new objects are added to the layout, they will appear on top of previously placed objects. Select the object for which you would like to change the overlap order, and click the [Change Overlap Order] button. A dropdown menu will be - Sony DCR-TRV25 | PIXELA ImageMixer 1.0 Manual - Page 155
the [Alignment] button to align the selected objects in relation to one another. A dropdown menu is displayed. Select the objects' new alignment. In Windows, the object defined by the blue control points will be the reference object of all selected objects. In Macintosh, the object placed farthest - Sony DCR-TRV25 | PIXELA ImageMixer 1.0 Manual - Page 156
Align top Align bottom Align the top of all selected objects according to the control points on the top of the reference object. Align the bottom of all selected objects according to the control points on the bottom of the reference object. Copyright © 2001 PIXELA Corp. All rights reserved. - Sony DCR-TRV25 | PIXELA ImageMixer 1.0 Manual - Page 157
or Change size. Select objects to be locked into place and click the [Lock] button. The control points of the locked object(s) will turn Yellow (Windows) or Gray (Macintosh). The [Lock] button will change to the [Unlock] button. When no object is selected, the [Lock]/[Unlock] button is shaded - Sony DCR-TRV25 | PIXELA ImageMixer 1.0 Manual - Page 158
of the object in the same or a different layout. You can copy and paste multiple objects, though doing so may take more time for your computer to execute. Copyright © 2001 PIXELA Corp. All rights reserved. - Sony DCR-TRV25 | PIXELA ImageMixer 1.0 Manual - Page 159
objects Select an object and click the [Delete] selected and deleted at once. button. Multiple objects may be Transforming 3-D appearance of text objects (Windows only) Text objects can be altered to appear 3-dimensional both on the screen and when printed out. Select a text object and click the - Sony DCR-TRV25 | PIXELA ImageMixer 1.0 Manual - Page 160
q If you make changes to the content of the actual text, be aware that you may not see those changes on the screen unless you have chosen the proper setting under 'Appearance in text box' in the Text Creator/Editor. q Note that 3-dimensional transformations can only be done when the text box has - Sony DCR-TRV25 | PIXELA ImageMixer 1.0 Manual - Page 161
. After making the appropriate settings relative to font, color, etc., click the [OK] text object in the layout window. button to arrange the text as a Editing existing text objects You can change settings relative to font, color, etc., and make changes to the actual - Sony DCR-TRV25 | PIXELA ImageMixer 1.0 Manual - Page 162
Input text to be arranged as a text object in the layout. According to the settings in and , the sample window gives you an idea of how your text will appear in the layout. Style settings Text alignment Appearance in text box Shadow settings These define - Sony DCR-TRV25 | PIXELA ImageMixer 1.0 Manual - Page 163
Copyright © 2001 PIXELA Corp. All rights reserved. - Sony DCR-TRV25 | PIXELA ImageMixer 1.0 Manual - Page 164
5-5-2 Arranging and Editing Text Text object settings Style settings Font Style Size Text color Color Select button Defines the font, such as Times New Roman, Arial, etc. Defines the text style, such as italic, bold, etc. Defines the font size. Displays the currently selected text color. In order - Sony DCR-TRV25 | PIXELA ImageMixer 1.0 Manual - Page 165
Align left Align center Align right Top vertical alignment Center vertical alignment Bottom vertical alignment Arranges text horizontally along the left side of the text box. Arranges text horizontally in the center of the text box. Arranges text horizontally along the right side of the text box. - Sony DCR-TRV25 | PIXELA ImageMixer 1.0 Manual - Page 166
5-5-3 Arranging and Editing Text Text object settings Text box settings No wrapping The text in the text box is not wrapped. The text cannot be displayed any larger than the font size set. Wrapped text If the text box is too small, some text will not be displayed at all. The entire text will be - Sony DCR-TRV25 | PIXELA ImageMixer 1.0 Manual - Page 167
Create shadow Up Down Left Right Shadow color Select color Increments Click to add a shadow to the text. Click to move the shadow up. Click to move the shadow down. Click to move the shadow left. Click to move the shadow right. Displays the currently selected color of the shadow. Click to - Sony DCR-TRV25 | PIXELA ImageMixer 1.0 Manual - Page 168
5-6-1 Arranging and Editing Shapes Arranging shape objects Click the [Create New Shape] button to display the Shape Creator/Editor. Select a shape to work with and make the appropriate changes relative to color, shadow properties, etc. Click the [OK] the shape in the layout. button to arrange - Sony DCR-TRV25 | PIXELA ImageMixer 1.0 Manual - Page 169
Shape Preview Window Available Shapes Paint/Line Settings Shadow Settings Displays the current shape according to and . Defines the shape to be arranged in the layout. Defines paint and line effects. Defines shadow effects. Copyright © 2001 PIXELA Corp. All rights reserved. - Sony DCR-TRV25 | PIXELA ImageMixer 1.0 Manual - Page 170
5-6-2 Arranging and Editing Shapes Shape object settings Paint/Line Settings Paint button Paint/Line color Color Select button Pattern Click to define the color of the shape. Indicates the currently selected color of the shape or its outline. Click to display the Color palette. Select the desired - Sony DCR-TRV25 | PIXELA ImageMixer 1.0 Manual - Page 171
Line Line thickness It is not possible to define a line pattern for shapes other than circles, squares, and rounded squares. Also, selecting no pattern (in the upper left hand corner of the pattern palette) will effectively get rid of any color settings. The line pattern can't be defined when a - Sony DCR-TRV25 | PIXELA ImageMixer 1.0 Manual - Page 172
Create Shadow button Up Down Left Right Shadow color Select color Increments Click to add a shadow to the figure. Click to move the shadow up. Click to move the shadow down. Click to move the shadow left. Click to move the shadow right. Displays the color of the shadow. Click to select the - Sony DCR-TRV25 | PIXELA ImageMixer 1.0 Manual - Page 173
in your layout. The selected album's thumbnails will be displayed in the thumbnail list window. Only still picture thumbnails are displayed. 2. Drag or double-click a thumbnail from the Thumbnail list window. The still picture associated with the thumbnail will appear in the layout as an image - Sony DCR-TRV25 | PIXELA ImageMixer 1.0 Manual - Page 174
Editing an image object Double-click the image object you wish to work with or select it and click the [Image Edit] button to open the Image Editor. Copyright © 2001 PIXELA Corp. All rights reserved. - Sony DCR-TRV25 | PIXELA ImageMixer 1.0 Manual - Page 175
Preferences Open the layout environment. Display preferences 1. Open ImageMixer. 2. Click the [Layout Environment] to open the layout window. button on the Main Selector 3. Click the [Preferences] button on the Selector Bar. The layout preferences window will be displayed. Layout Preferences - Sony DCR-TRV25 | PIXELA ImageMixer 1.0 Manual - Page 176
an object moves each time the arrow keys are pressed. Defines the distance an object moves each time the 'Shift' + arrow keys are pressed. In Windows, defines the incremental change to an object's size each time the 'Ctrl' + arrow keys are pressed. In Macintosh, the 'Control' key is used in - Sony DCR-TRV25 | PIXELA ImageMixer 1.0 Manual - Page 177
Outline display Check this box to display only the outline of image objects in the display window. Copyright © 2001 PIXELA Corp. All rights reserved. - Sony DCR-TRV25 | PIXELA ImageMixer 1.0 Manual - Page 178
Crop/Rotate/Flip Mode Cropping Rotating/Flipping Image Resizing Mode Mask Mode (Win) Gradation masks Stencil masks Drawn masks Chroma Key Mode (Mac) Create Shadow Mode (Win) Blend Mode (Win) Opening Image Editor From Album Environment 1. Open ImageMixer. 2. Click the button on the Main Selector - Sony DCR-TRV25 | PIXELA ImageMixer 1.0 Manual - Page 179
to change to Image resizing mode. Mask button or Chroma Key button In Windows, click to change to Mask mode. In Macintosh, this button will take you this button will return ImageMixer to the Image Editor. Editing window Displays the image being edited. Magnification Zoom In button Zoom - Sony DCR-TRV25 | PIXELA ImageMixer 1.0 Manual - Page 180
Mode buttons Editing tools are grouped into various 'modes' in ImageMixer. Click the mode that includes those tools you want to use to edit the picture currently displayed in the editing window. and are not displayed when in mode . Copyright © 2001 PIXELA Corp. All rights reserved. - Sony DCR-TRV25 | PIXELA ImageMixer 1.0 Manual - Page 181
Editor Undo Click to undo the previous operation. Tool bar (Macintosh Only) Macintosh displays a tool bar in the upper portion of the Image Editor window. This tool bar is only displayed when working within one of the editing modes. Select tool Lasso tool Magic Wand Select All button Reverse - Sony DCR-TRV25 | PIXELA ImageMixer 1.0 Manual - Page 182
Tool options Copy button Cut button Paste button Click to display the Tool options. Click to copy the selected area. Click to cut the selected area. Click to paste a cut or copied selection. Tool options dialog box Click the [Tool Options] button on the Tool bar to bring up the dialog box. - Sony DCR-TRV25 | PIXELA ImageMixer 1.0 Manual - Page 183
Selection range Feather Border Drag the slider to define the range of colors that may be selected with the [Magic Wand] . Blurs the edges of selected areas. Copyright © 2001 PIXELA Corp. All rights reserved. - Sony DCR-TRV25 | PIXELA ImageMixer 1.0 Manual - Page 184
6-2-1 Filter Mode Red-eye Click to compensate for photos in which the Compensation button subject's eyes appear red. Auto Enhance button Allows ImageMixer to automatically enhance image quality. Brightness/Contrast button Click to control brightness and contrast. Hue/Saturation button Click - Sony DCR-TRV25 | PIXELA ImageMixer 1.0 Manual - Page 185
After setting the options, draw directly on the image displayed in the editing window. Range slider Drag the slider to specify the color range for red-eye compensation. Replacement color indicator Displays the color you have chosen to replace - Sony DCR-TRV25 | PIXELA ImageMixer 1.0 Manual - Page 186
6-2-2 Filter Mode Auto enhance ImageMixer can automatically enhance the image quality of your pictures. Preview window Displays a preview of the enhanced image. [OK] button Click to execute auto enhancement of the image. Brightness/Contrast - Sony DCR-TRV25 | PIXELA ImageMixer 1.0 Manual - Page 187
brightness/contrast. Hue, Saturation After selecting the color you want to adjust, drag the slider while checking the results in the preview window. Preview window Previews the results of changes made to hue, saturation and lightness settings. All Click to adjust the hue, saturation and lightness of - Sony DCR-TRV25 | PIXELA ImageMixer 1.0 Manual - Page 188
Green Select to adjust the hue, saturation and lightness of this color. Cyan Select to adjust the hue, saturation and lightness of this color. Blue Select to adjust the hue, saturation and lightness of this color. Magenta Select to adjust the hue, saturation and lightness of this color. Hue Drag the - Sony DCR-TRV25 | PIXELA ImageMixer 1.0 Manual - Page 189
to adjust sharpness. [OK] button Click to apply the sharpness setting. Blur In Windows, ImageMixer will automatically blur an image. In Macintosh, a slider will be displayed. Drag the slider to control the blur. Preview window Displays the result of applying the blur filter. [OK] button Click it to - Sony DCR-TRV25 | PIXELA ImageMixer 1.0 Manual - Page 190
Copyright © 2001, PIXELA Corp. All rights reserved. - Sony DCR-TRV25 | PIXELA ImageMixer 1.0 Manual - Page 191
6-3-1 Draw Mode After setting the tool options, use the mouse to draw directly on the image in the edit window. Brush button Pen button Eraser button Paint button Airbrush button Click to draw with the brush. Click to draw with the pen. Click to erase - Sony DCR-TRV25 | PIXELA ImageMixer 1.0 Manual - Page 192
size. Brush Type Selector button Click to display available brush types and sizes. (See below.) There are slight differences in the brush types available in Windows and Macintosh. Pen - Sony DCR-TRV25 | PIXELA ImageMixer 1.0 Manual - Page 193
size. Pen Style Selector button Click to display available pen styles and sizes. (See below.) There are slight differences in the pen styles available in Windows and Macintosh. Copyright © 2001 PIXELA Corp. All rights reserved. - Sony DCR-TRV25 | PIXELA ImageMixer 1.0 Manual - Page 194
6-3-2 Draw Mode Eraser Transparency Indicates the currently defined transparency. Transparency slider Drag to define transparency. In Macintosh, you can also define the eraser size and color relative to the background picture. Paint - Sony DCR-TRV25 | PIXELA ImageMixer 1.0 Manual - Page 195
size. Airbrush Type Selector button Click to display available airbrush types and sizes. (See below.) There are slight differences in the airbrush types available in Windows and Macintosh. - Sony DCR-TRV25 | PIXELA ImageMixer 1.0 Manual - Page 196
Copyright © 2001 PIXELA Corp. All rights reserved. - Sony DCR-TRV25 | PIXELA ImageMixer 1.0 Manual - Page 197
Mode Crop button Rotate/Flip button Click to crop the picture. Specify the crop area by dragging the Control points displayed in the image edit window. Click to rotate or flip the image. Cropping Crop button Click to crop image to the area defined by the rectangular box that appears on - Sony DCR-TRV25 | PIXELA ImageMixer 1.0 Manual - Page 198
Rotating/Flipping Rotate Counterclockwise button Rotates the image counterclockwise 90 degrees. Rotate Clockwise button Rotates the image clockwise 90 degrees. Vertical flip Flips the image vertically, along the horizontal axis with each click. Horizontal flip Flips the image horizontally, along the - Sony DCR-TRV25 | PIXELA ImageMixer 1.0 Manual - Page 199
image size Width Height Lock aspect ratio [OK] button Displays the height and width (in pixels) of the picture currently displayed in the image edit window. Enter a value (in pixels) for the new width of the image. Enter a value (in pixels) for the new height of the image. Select this option - Sony DCR-TRV25 | PIXELA ImageMixer 1.0 Manual - Page 200
6-6 Mask Mode (Windows Only) Masks allow you to apply certain limitations to the appearance of pictures by using stencils, changing the opacity (transparency) of the image, etc. This - Sony DCR-TRV25 | PIXELA ImageMixer 1.0 Manual - Page 201
apply the selected stencil mask. Drawn masks After selecting a tool, use the mouse to draw your custom mask directly on the image in the editor window. Changes will be applied upon returning to the layout environment. Brush button Click to draw a custom mask with the brush. Pen button Click to draw - Sony DCR-TRV25 | PIXELA ImageMixer 1.0 Manual - Page 202
Airbrush button Click to draw a custom mask with the airbrush. Refer to Draw mode to see a description of each drawing tool. Copyright © 2001 PIXELA Corp. All rights reserved. - Sony DCR-TRV25 | PIXELA ImageMixer 1.0 Manual - Page 203
6-7 Chroma Key Mode (Macintosh Only) Applying a fixed blue tone to areas of an image will render it transparent upon returning to the Layout Environment. This mode is not available when opening the Image Editor from the Album Environment. Complete transparency cannot be achieved when drawing with - Sony DCR-TRV25 | PIXELA ImageMixer 1.0 Manual - Page 204
6-8 Create Shadow Mode (Windows Only) This mode is not available when opening the Image Editor from the Album Environment. Set and before clicking . Click to create a shadow. Clicking this - Sony DCR-TRV25 | PIXELA ImageMixer 1.0 Manual - Page 205
Increment Gradation slider Transparency slider Shadow color indicator Color selector The numerical value entered here specifies the distance (in pixels) the shadow moves each time or is clicked. Drag to adjust the gradation of the shadow. Drag to specify the transparency of the shadow. Indicates - Sony DCR-TRV25 | PIXELA ImageMixer 1.0 Manual - Page 206
6-9 Blend Mode (Windows) This mode is not available when opening the Image Editor from the Album Environment. Normal Multiply Screen Overlay Soft Light Click to display or revert - Sony DCR-TRV25 | PIXELA ImageMixer 1.0 Manual - Page 207
Hard Light Darken Lighten Difference The pixels of the foreground image will be lightened if they are 50% brighter than the pixels of the background image. Black and white pixels remain unchanged. Displays only the parts of the foreground image that are darker than the background image. Displays
-
 1
1 -
 2
2 -
 3
3 -
 4
4 -
 5
5 -
 6
6 -
 7
7 -
8
-
9
-
10
-
11
-
12
-
13
-
14
-
15
-
16
-
17
-
18
-
19
-
20
-
21
-
22
-
23
-
24
-
25
-
26
-
27
-
28
-
29
-
30
-
31
-
32
-
33
-
34
-
35
-
36
-
37
-
38
-
39
-
40
-
41
-
42
-
43
-
44
-
45
-
46
-
47
-
48
-
49
-
50
-
51
-
52
-
53
-
54
-
55
-
56
-
57
-
58
-
59
-
60
-
61
-
62
-
63
-
64
-
65
-
66
-
67
-
68
-
69
-
70
-
71
-
72
-
73
-
74
-
75
-
76
-
77
-
78
-
79
-
80
-
81
-
82
-
83
-
84
-
85
-
86
-
87
-
88
-
89
-
90
-
91
-
92
-
93
-
94
-
95
-
96
-
97
-
98
-
99
-
100
-
101
-
102
-
103
-
104
-
105
-
106
-
107
-
108
-
109
-
110
-
111
-
112
-
113
-
114
-
115
-
116
-
117
-
118
-
119
-
120
-
121
-
122
-
123
-
124
-
125
-
126
-
127
-
128
-
129
-
130
-
131
-
132
-
133
-
134
-
135
-
136
-
137
-
138
-
139
-
140
-
141
-
142
-
143
-
144
-
145
-
146
-
147
-
148
-
149
-
150
-
151
-
152
-
153
-
154
-
155
-
156
-
157
-
158
-
159
-
160
-
161
-
162
-
163
-
164
-
165
-
166
-
167
-
168
-
169
-
170
-
171
-
172
-
173
-
174
-
175
-
176
-
177
-
178
-
179
-
180
-
181
-
182
-
183
-
184
-
185
-
186
-
187
-
188
-
189
-
190
-
191
-
192
-
193
-
194
-
195
-
196
-
197
-
198
-
199
-
200
-
201
-
202
-
203
-
204
-
205
-
206
-
207
 |
 |
Introduction
About This Manual
General notes
Using this manual
Read Carefully
About trademarks
Warning
About pictures and images
Software Usage Contract
Chapter 1 Before Use
Chapter 2 Capture
Environment
Chapter 3 Album
Environment
Chapter 4 Movie Editing
Environment
Chapter 5 Layout
Environment
Chapter 6 Image Editor
Introduction
About This Manual
General notes
●
This manual is an HTML document which explains the functions of PIXELA
ImageMixer Ver.1.0 for Sony
(henceforth, 'ImageMixer').
This manual does not explain the basics of Windows or Macintosh operating
systems. Basic operations, such as working with individual windows, are
based on general usage of Windows and Macintosh.
●
Screenshots may differ slightly depending on each company's bundling of this
product.
●
Most screenshots currently used in this manual relate to the Windows
version. The screenshots for Windows and Macintosh differ slightly.
Moreover, images may vary according to monitor specifications.
●
Due to the fact that the most recent information related to this software has
not been added to the manual, please consult the Read Me file, included on
the CD-ROM.
Using this manual
This manual explains all ImageMixer's many functions
.
Any item can be referenced
by clicking the menu (table of contents) displayed on left-hand side of the screen.
●
Blue text
indicates a link. Clicking it will display the relevant item.Once that
item has been displayed, the link will appear in
purple text
.
●
The end of the page can be referenced by clicking
.
●
The beginning of the page can be referenced by clicking
.
●
The preceding page (or preceding item) can be referenced by clicking
.
●
The following page (or following item) can be referenced by clicking
.
●
Issues of particular importance are indicated in
red text
. Please read them
carefully.
Homepage
The latest information on ImageMixer can be found on our home page:
Copyright © 2001 PIXELA Corp. All rights reserved.