Sony DCR-TRV460 Camera Operations Guide - Page 11
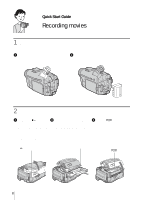
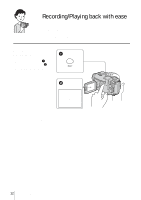
Start recording while checking the subject on the LCD screen. - no sound
 |
UPC - 027242643116
View all Sony DCR-TRV460 manuals
Add to My Manuals
Save this manual to your list of manuals |
Page 11 highlights
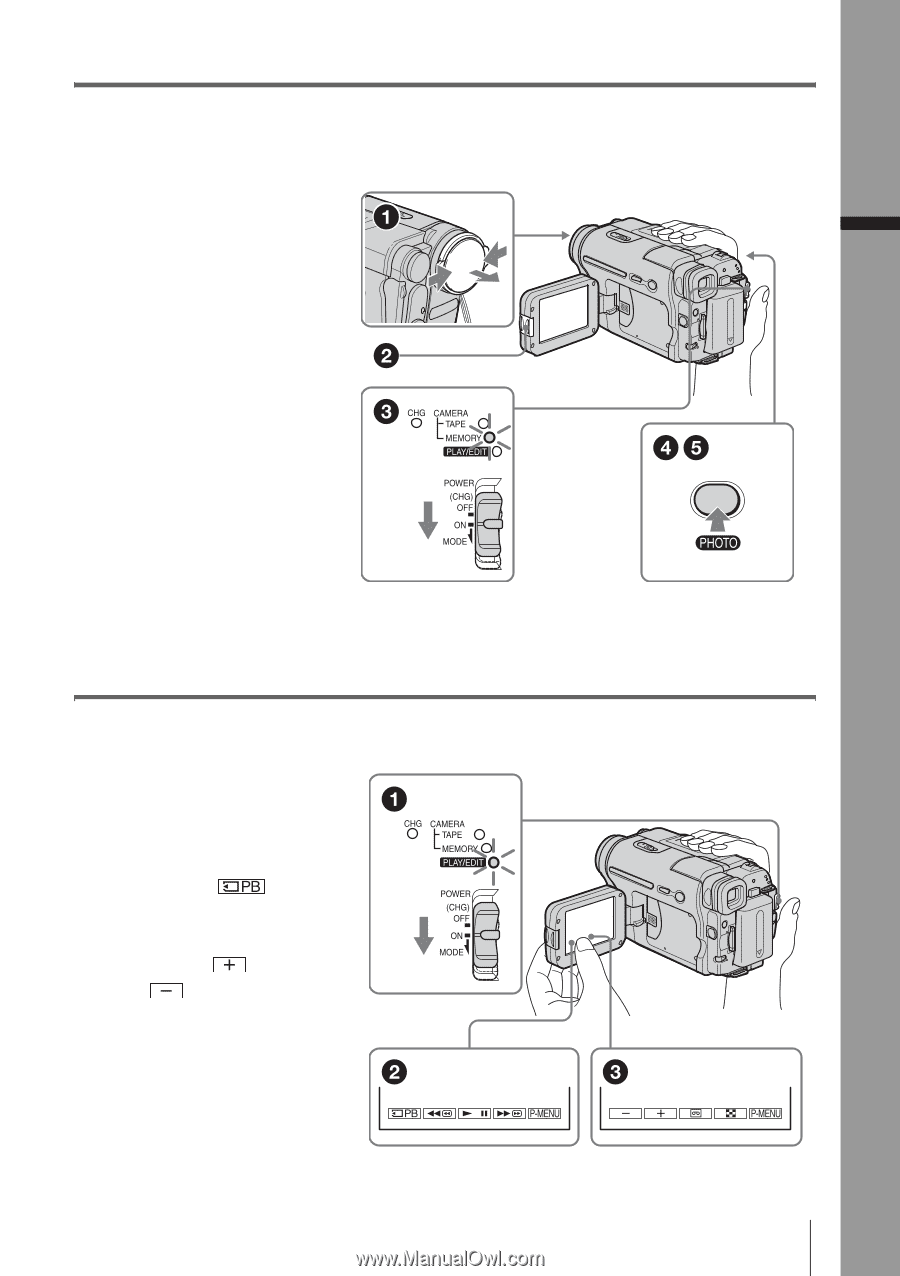
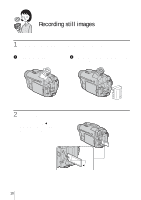
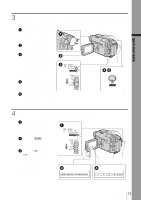
Quick Start Guide 3 Start recording while checking the subject on the LCD screen. The date and time is not set up in the default setting. To set the date and time, see page 19. a Remove the lens cap. Lens cap is not attached when you purchase your camcorder (p. 126). b Press OPEN and open the LCD panel. c While pressing the green button, slide the POWER switch repeatedly until the CAMERA-MEMORY lamp lights up. The power turns on. d Press PHOTO lightly. A short beep sound is heard when the focus is adjusted. e Press PHOTO fully. A shutter sound is heard and the still image is recorded. 4 View the recorded picture on the LCD screen. a Slide the POWER switch repeatedly until the PLAY/EDIT lamp lights up. b Touch . The most recently recorded image is displayed. c Touch (next) or (previous) to view images in sequence. To turn off the power, slide the POWER switch up to (CHG) OFF. Quick Start Guide 11
-
 1
1 -
2
-
3
-
4
-
5
-
 6
6 -
 7
7 -
 8
8 -
 9
9 -
 10
10 -
 11
11 -
 12
12 -
 13
13 -
 14
14 -
 15
15 -
 16
16 -
17
-
18
-
19
-
20
-
21
-
22
-
23
-
24
-
25
-
26
-
27
-
28
-
29
-
30
-
31
-
32
-
33
-
34
-
35
-
36
-
37
-
38
-
39
-
40
-
41
-
42
-
43
-
44
-
45
-
46
-
47
-
48
-
49
-
50
-
51
-
52
-
53
-
54
-
55
-
56
-
57
-
58
-
59
-
60
-
61
-
62
-
63
-
64
-
65
-
66
-
67
-
68
-
69
-
70
-
71
-
72
-
73
-
74
-
75
-
76
-
77
-
78
-
79
-
80
-
81
-
82
-
83
-
84
-
85
-
86
-
87
-
88
-
89
-
90
-
91
-
92
-
93
-
94
-
95
-
96
-
97
-
98
-
99
-
100
-
101
-
102
-
103
-
104
-
105
-
106
-
107
-
108
-
109
-
110
-
111
-
112
-
113
-
114
-
115
-
116
-
117
-
118
-
119
-
120
-
121
-
122
-
123
-
124
-
125
-
126
-
127
-
128
-
129
-
130
-
131
-
132
-
133
-
134
-
135
-
136
 |
 |