Sony DCR-TRV460 Camera Operations Guide - Page 20
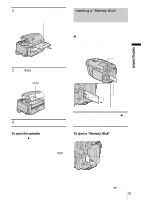
Step 6: Inserting the recording media, Inserting a cassette tape
 |
UPC - 027242643116
View all Sony DCR-TRV460 manuals
Add to My Manuals
Save this manual to your list of manuals |
Page 20 highlights
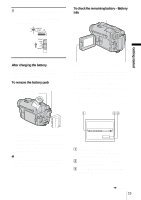
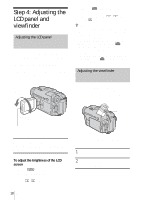
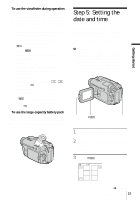
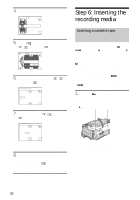
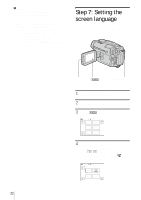
4 Touch [MENU]. 60min -:--:-- CAMERA SET PROGRAM AE SPOT METER EXPOSURE OK 5 Select (TIME/LANGU.) with / , then touch . 60min -:--:-- DISPLAY MENU ROTATE A. SHUT OFF CLOCK SET WORLD TIME LANGUAGE PROGRAM AE OK 6 Select [CLOCK SET] with / , then touch . CLOCK SET -:--:-- DATE 2004Y JAN M 1D 12: 00 AM OK 7 Set [Y] (year) with / , then touch . CLOCK SET -:--:-- DATE 2004Y JAN M 1D 12: 00 AM OK You can set any year up to the year 2079. 8 Set [M] (month), [D] (day), hour and minute in the same way as was done in step 7, then touch . For midnight, set it to 12:00AM. For midday, set it to 12:00PM. Step 6: Inserting the recording media Inserting a cassette tape You can record on standard 8 mm , Hi8 and Digital8 cassettes in Digital8 system only. For details on these cassettes (such as write-protection), see page 115. b Notes • Do not force the cassette into the compartment. This may cause a malfunction of your camcorder. • The recording time when you use your camcorder is half of the indicated time on Hi8 tape. If you select the LP mode in the menu settings, the recording time is 3/4 of the indicated time on Hi8 tape. 1 Slide the OPEN/EJECT lever in the direction of the arrow and open the lid. OPEN/EJECT lever Lid The cassette compartment automatically comes out and opens up. 20 Getting started
-
 1
1 -
2
-
3
-
4
-
5
-
6
-
7
-
8
-
9
-
10
-
11
-
12
-
13
-
14
-
 15
15 -
 16
16 -
 17
17 -
 18
18 -
 19
19 -
 20
20 -
 21
21 -
 22
22 -
 23
23 -
 24
24 -
 25
25 -
26
-
27
-
28
-
29
-
30
-
31
-
32
-
33
-
34
-
35
-
36
-
37
-
38
-
39
-
40
-
41
-
42
-
43
-
44
-
45
-
46
-
47
-
48
-
49
-
50
-
51
-
52
-
53
-
54
-
55
-
56
-
57
-
58
-
59
-
60
-
61
-
62
-
63
-
64
-
65
-
66
-
67
-
68
-
69
-
70
-
71
-
72
-
73
-
74
-
75
-
76
-
77
-
78
-
79
-
80
-
81
-
82
-
83
-
84
-
85
-
86
-
87
-
88
-
89
-
90
-
91
-
92
-
93
-
94
-
95
-
96
-
97
-
98
-
99
-
100
-
101
-
102
-
103
-
104
-
105
-
106
-
107
-
108
-
109
-
110
-
111
-
112
-
113
-
114
-
115
-
116
-
117
-
118
-
119
-
120
-
121
-
122
-
123
-
124
-
125
-
126
-
127
-
128
-
129
-
130
-
131
-
132
-
133
-
134
-
135
-
136
 |
 |
