Sony DEV5 Digital Recording Binoculars Handbook - Page 32
Controlling the image settings manually with the MANUAL dial, Press MANUAL to make
 |
View all Sony DEV5 manuals
Add to My Manuals
Save this manual to your list of manuals |
Page 32 highlights
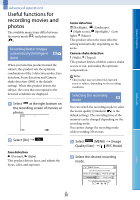
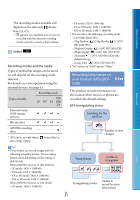
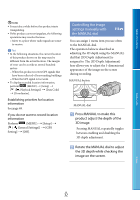
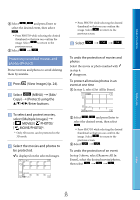
Table of Contents Notes It may take a while before this product starts triangulating. If this product cannot triangulate, the following operations may resolve the issue. Move to a place where radio signals are easier to receive. Tips In the following situations, the current location of this product shown on the map may be different from the actual location. The margin of error can be as wide as several hundred meters. When this product receives GPS signals that have been reflected off surrounding buildings. When the GPS signal is too weak. To display recorded location information, perform (MENU) [Setup] [ ( Playback Settings)] [Data Code] [Coordinates]. Establishing priorities for location information See page 69. If you do not want to record location information Perform (MENU) [Setup] [ ( General Settings)] [GPS Setting] [Off]. Controlling the image settings manually with the MANUAL dial You can assign 1 menu item you use often to the MANUAL dial. The operation below is described as adjusting the 3D depth using the MANUAL dial that [3D Depth Adjustment] is assigned to. The [3D Depth Adjustment] here allows you to adjust the 3-dimensional appearance of the image on the screen during recording. MANUAL button MANUAL dial Press MANUAL to make this product adjust the depth of the 3D image. Pressing MANUAL repeatedly toggles between enabling and disabling the 3D depth adjustment. Rotate the MANUAL dial to adjust the 3D depth while checking the image on the screen. Menu Lists Index GB 32
-
 1
1 -
2
-
3
-
4
-
5
-
6
-
7
-
8
-
9
-
10
-
11
-
12
-
13
-
14
-
15
-
16
-
17
-
18
-
19
-
20
-
21
-
22
-
23
-
24
-
25
-
26
-
 27
27 -
 28
28 -
 29
29 -
 30
30 -
 31
31 -
 32
32 -
 33
33 -
 34
34 -
 35
35 -
 36
36 -
 37
37 -
38
-
39
-
40
-
41
-
42
-
43
-
44
-
45
-
46
-
47
-
48
-
49
-
50
-
51
-
52
-
53
-
54
-
55
-
56
-
57
-
58
-
59
-
60
-
61
-
62
-
63
-
64
-
65
-
66
-
67
-
68
-
69
-
70
-
71
-
72
-
73
-
74
-
75
-
76
-
77
-
78
-
79
-
80
-
81
-
82
-
83
-
84
-
85
-
86
-
87
-
88
-
89
-
90
-
91
-
92
-
93
-
94
-
95
-
96
-
97
-
98
 |
 |
