Sony DEV5 Digital Recording Binoculars Handbook - Page 39
Importing movies and photos to a computer
 |
View all Sony DEV5 manuals
Add to My Manuals
Save this manual to your list of manuals |
Page 39 highlights
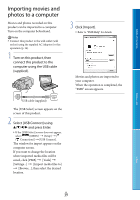
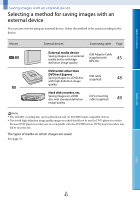
Table of Contents Importing movies and photos to a computer Movies and photos recorded on this product can be imported to a computer. Turn on the computer beforehand. Notes Connect this product to the wall outlet (wall socket) using the supplied AC Adaptor for this operation (p. 14). 1 Turn on this product, then connect this product to the computer using the USB cable (supplied). 3 Click [Import]. Refer to "PMB Help" for details. Movies and photos are imported to your computer. When the operation is completed, the "PMB" screen appears. USB cable (supplied) The [USB Select] screen appears on the screen of this product. 2 Select [USB Connect] using and press Enter. If the [USB Select] screen does not appear, select (MENU) [Setup] [ ( Connection)] [USB Connect]. The window for import appears on the computer screen. If you want to change the location where imported media files will be saved, click [PMB] [Tools] [Settings...] [Import media files to] [Browse...], then select the desired location. Menu Lists Index GB 39
-
 1
1 -
2
-
3
-
4
-
5
-
6
-
7
-
8
-
9
-
10
-
11
-
12
-
13
-
14
-
15
-
16
-
17
-
18
-
19
-
20
-
21
-
22
-
23
-
24
-
25
-
26
-
27
-
28
-
29
-
30
-
31
-
32
-
33
-
 34
34 -
 35
35 -
 36
36 -
 37
37 -
 38
38 -
 39
39 -
 40
40 -
 41
41 -
 42
42 -
 43
43 -
 44
44 -
45
-
46
-
47
-
48
-
49
-
50
-
51
-
52
-
53
-
54
-
55
-
56
-
57
-
58
-
59
-
60
-
61
-
62
-
63
-
64
-
65
-
66
-
67
-
68
-
69
-
70
-
71
-
72
-
73
-
74
-
75
-
76
-
77
-
78
-
79
-
80
-
81
-
82
-
83
-
84
-
85
-
86
-
87
-
88
-
89
-
90
-
91
-
92
-
93
-
94
-
95
-
96
-
97
-
98
 |
 |
