Sony DPP-EX50 Operating Instructions - Page 66
Printing a displayed image
 |
UPC - 027242639546
View all Sony DPP-EX50 manuals
Add to My Manuals
Save this manual to your list of manuals |
Page 66 highlights
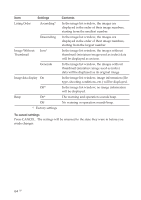
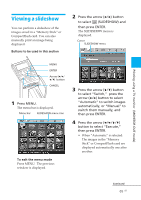
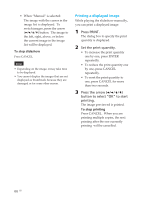
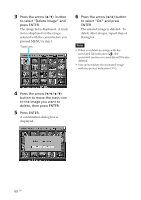
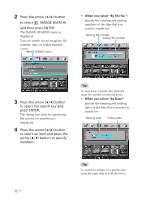
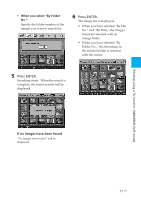
• When "Manual" is selected: The image with the cursor in the image list is displayed. To switch images, press the arrow (B/b/V/v) button. The image to the left, right, above, or below the current image in the image list will be displayed. To stop slideshow Press CANCEL. Notes • Depending on the image, it may take time to be displayed. • You cannot display the images that are not displayed as thumbnails because they are damaged or for some other reason. Printing a displayed image While playing the slideshow manually, you can print a displayed image. 1 Press PRINT. The dialog box to specify the print quantity is displayed. 2 Set the print quantity. • To increase the print quantity one by one, press ENTER repeatedly. • To reduce the print quantity one by one, press CANCEL repeatedly. • To reset the print quantity to one, press CANCEL for more than two seconds. 3 Press the arrow (B/b/V/v) button to select "OK" to start printing. The image previewed is printed. To stop printing Press CANCEL. When you are printing multiple copies, the next printing after the one currently printing will be cancelled. 66 GB
-
 1
1 -
2
-
3
-
4
-
5
-
6
-
7
-
8
-
9
-
10
-
11
-
12
-
13
-
14
-
15
-
16
-
17
-
18
-
19
-
20
-
21
-
22
-
23
-
24
-
25
-
26
-
27
-
28
-
29
-
30
-
31
-
32
-
33
-
34
-
35
-
36
-
37
-
38
-
39
-
40
-
41
-
42
-
43
-
44
-
45
-
46
-
47
-
48
-
49
-
50
-
51
-
52
-
53
-
54
-
55
-
56
-
57
-
58
-
59
-
60
-
 61
61 -
 62
62 -
 63
63 -
 64
64 -
 65
65 -
 66
66 -
 67
67 -
 68
68 -
 69
69 -
 70
70 -
 71
71 -
72
-
73
-
74
-
75
-
76
-
77
-
78
-
79
-
80
-
81
-
82
-
83
-
84
-
85
-
86
-
87
-
88
-
89
-
90
-
91
-
92
-
93
-
94
-
95
-
96
-
97
-
98
-
99
-
100
-
101
-
102
-
103
-
104
-
105
-
106
-
107
-
108
-
109
-
110
-
111
-
112
-
113
-
114
-
115
-
116
-
117
-
118
-
119
-
120
-
121
-
122
-
123
-
124
-
125
-
126
-
127
-
128
-
129
-
130
-
131
-
132
-
133
-
134
-
135
-
136
-
137
-
138
-
139
-
140
-
141
-
142
-
143
-
144
 |
 |