Sony DPP-EX50 Operating Instructions - Page 79
Changing the print settings
 |
UPC - 027242639546
View all Sony DPP-EX50 manuals
Add to My Manuals
Save this manual to your list of manuals |
Page 79 highlights
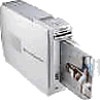
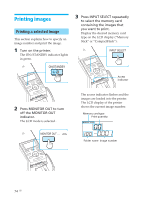
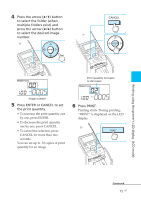
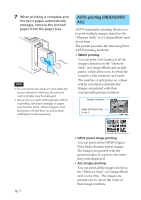
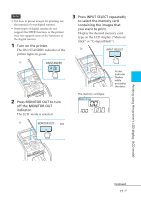
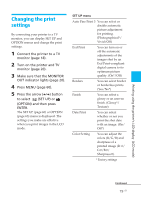
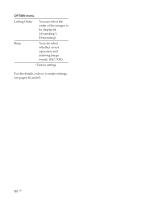
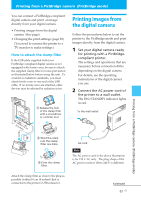
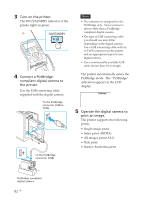
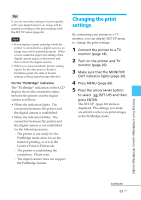
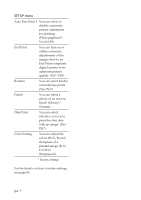
Printing using the printer's LCD display (LCD mode) Changing the print settings By connecting your printer to a TV monitor, you can display SET UP and OPTION menus and change the print settings. 1 Connect the printer to a TV monitor (page 18). 2 Turn on the printer and TV monitor (page 20). 3 Make sure that the MONITOR OUT indicator lights (page 20). 4 Press MENU (page 60). 5 Press the arrow (B/b) button to select (SET UP) or (OPTION) and then press ENTER. The SET UP (page 60) or OPTION (page 63) menu is displayed. The settings you make are effective when you print images in the LCD mode. SET UP menu Auto Fine Print 3 You can select or disable automatic picture adjustment for printing. (Photographical*/ Vivid/Off) Exif Print You can turn on or off the automatic adjustments of the images shot by an Exif Print-compliant digital camera to its optimum picture quality. (On*/Off) Borders You can select border or borderless prints. (Yes/No*) Finish You can select a glossy or an uneven finish. (Glossy*/ Texture) Date Print You can select whether or not you print the shot date with an image. (On/ Off*) Color Setting You can adjust the colors (R/G/B) and sharpness of a printed image (R: 0/ G:0/B:0/ Sharpness:0). * Factory settings Continued 79 GB
-
 1
1 -
2
-
3
-
4
-
5
-
6
-
7
-
8
-
9
-
10
-
11
-
12
-
13
-
14
-
15
-
16
-
17
-
18
-
19
-
20
-
21
-
22
-
23
-
24
-
25
-
26
-
27
-
28
-
29
-
30
-
31
-
32
-
33
-
34
-
35
-
36
-
37
-
38
-
39
-
40
-
41
-
42
-
43
-
44
-
45
-
46
-
47
-
48
-
49
-
50
-
51
-
52
-
53
-
54
-
55
-
56
-
57
-
58
-
59
-
60
-
61
-
62
-
63
-
64
-
65
-
66
-
67
-
68
-
69
-
70
-
71
-
72
-
73
-
 74
74 -
 75
75 -
 76
76 -
 77
77 -
 78
78 -
 79
79 -
 80
80 -
 81
81 -
 82
82 -
 83
83 -
 84
84 -
85
-
86
-
87
-
88
-
89
-
90
-
91
-
92
-
93
-
94
-
95
-
96
-
97
-
98
-
99
-
100
-
101
-
102
-
103
-
104
-
105
-
106
-
107
-
108
-
109
-
110
-
111
-
112
-
113
-
114
-
115
-
116
-
117
-
118
-
119
-
120
-
121
-
122
-
123
-
124
-
125
-
126
-
127
-
128
-
129
-
130
-
131
-
132
-
133
-
134
-
135
-
136
-
137
-
138
-
139
-
140
-
141
-
142
-
143
-
144
 |
 |