Sony DPP-EX50 Operating Instructions - Page 83
Press MENU On the PictBridge indication
 |
UPC - 027242639546
View all Sony DPP-EX50 manuals
Add to My Manuals
Save this manual to your list of manuals |
Page 83 highlights
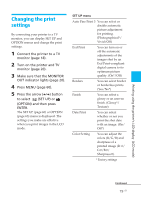
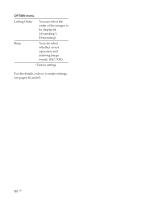
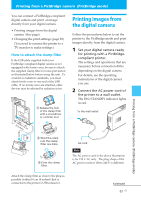
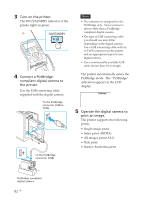
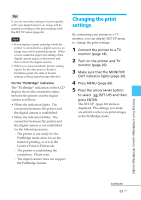
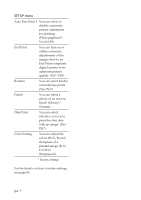
Tip If you do not make settings for print quality with your digital camera, an image will be printed according to the print settings with the SET UP menu (page 60). Note • If you replace a print cartridge while the printer is connected to a digital camera, an image may not be printed properly. If this occurs, make the paper size setting of the digital camera again or disconnect and then connect the digital camera. • When you select standard/printer setting option for the date print or border/ borderless print, the date or border settings of the printer become effective. On the "PictBridge" indication The "PictBridge" indication on the LCD display shows the connection status between the printer and the digital camera as follows: • When the indication lights: The connection between the printer and the digital camera is established. • When the indication blinks: The connection between the printer and the digital camera is not established for the following reasons: - The printer is not ready for the PictBridge mode since it is in the midst of printing, or it is in the Creative Print or Edit mode. - The printer is establishing the connection. Please wait. - The digital camera does not support the PictBridge feature. Changing the print settings By connecting your printer to a TV monitor, you can display SET UP menu to change the print settings. 1 Connect the printer to a TV monitor (page 18). 2 Turn on the printer and TV monitor (page 20). 3 Make sure that the MONITOR OUT indicator lights (page 20). 4 Press MENU (page 60). 5 Press the arrow (B/b) button to select (SET UP) and then press ENTER. The SET UP (page 60) menu is displayed. The settings you make are effective when you print images in the PictBridge mode. Printing from a PictBridge camera (PictBridge mode) Continued 83 GB
-
 1
1 -
2
-
3
-
4
-
5
-
6
-
7
-
8
-
9
-
10
-
11
-
12
-
13
-
14
-
15
-
16
-
17
-
18
-
19
-
20
-
21
-
22
-
23
-
24
-
25
-
26
-
27
-
28
-
29
-
30
-
31
-
32
-
33
-
34
-
35
-
36
-
37
-
38
-
39
-
40
-
41
-
42
-
43
-
44
-
45
-
46
-
47
-
48
-
49
-
50
-
51
-
52
-
53
-
54
-
55
-
56
-
57
-
58
-
59
-
60
-
61
-
62
-
63
-
64
-
65
-
66
-
67
-
68
-
69
-
70
-
71
-
72
-
73
-
74
-
75
-
76
-
77
-
 78
78 -
 79
79 -
 80
80 -
 81
81 -
 82
82 -
 83
83 -
 84
84 -
 85
85 -
 86
86 -
 87
87 -
 88
88 -
89
-
90
-
91
-
92
-
93
-
94
-
95
-
96
-
97
-
98
-
99
-
100
-
101
-
102
-
103
-
104
-
105
-
106
-
107
-
108
-
109
-
110
-
111
-
112
-
113
-
114
-
115
-
116
-
117
-
118
-
119
-
120
-
121
-
122
-
123
-
124
-
125
-
126
-
127
-
128
-
129
-
130
-
131
-
132
-
133
-
134
-
135
-
136
-
137
-
138
-
139
-
140
-
141
-
142
-
143
-
144
 |
 |