Sony DSC H7 Instruction Manual
Sony DSC H7 - Cybershot 8.1MP Digital Camera Manual
 |
UPC - 027242712935
View all Sony DSC H7 manuals
Add to My Manuals
Save this manual to your list of manuals |
Sony DSC H7 manual content summary:
- Sony DSC H7 | Instruction Manual - Page 1
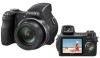
Digital Still Camera Instruction Manual GB DSC-H7/H9 For details on the advanced operations, please access "Cyber-shot Handbook" and "Cyber-shot Step-up Guide" contained on the supplied CD-ROM via a computer. Operating Instructions Before operating the unit, please read this manual thoroughly, - Sony DSC H7 | Instruction Manual - Page 2
call upon your Sony dealer regarding this product. Model No. DSC-H7/H9 Serial No servicing) instructions in the literature accompanying the appliance. 2 IMPORTANT SAFEGUARDS For your protection, please read these safety instructions completely before operating the appliance, and keep this manual - Sony DSC H7 | Instruction Manual - Page 3
[ Accessories Do instructions. Improper adjustment of other controls may result in damage and will often require extensive work by a qualified technician to restore the set to normal operation. - When the set exhibits a distinct change in performance - this indicates a need for service. [ Servicing - Sony DSC H7 | Instruction Manual - Page 4
Battery charger This power unit is intended to be correctly orientated in a vertical or floor mount position. For Customers in the U.S.A. If you have any questions about this product, you may call: Sony Customer Information Center 1-800-222-SONY SONY Model No.: DSC-H9 Responsible Party: Sony - Sony DSC H7 | Instruction Manual - Page 5
manual could void your authority to operate this equipment. [ Note: This equipment has been tested and found to comply with the limits for a Class B digital the instructions, Lithium battery contains service or the shop where you purchased the product. Applicable Accessories: Remote Control 5 - Sony DSC H7 | Instruction Manual - Page 6
cover after you change the fuse. Never use the plug without the fuse cover. If you should lose the fuse cover, please contact your nearest Sony service station. 6 - Sony DSC H7 | Instruction Manual - Page 7
"Cyber-shot Handbook" and "Cyber-shot Step-up Guide" ....... 29 Indicators on the screen 30 Battery life and memory capacity 32 Battery life and number of images that can be recorded/viewed .......... 32 Number of still images and recording time of movies 33 Troubleshooting 34 Battery pack - Sony DSC H7 | Instruction Manual - Page 8
pixels are operational for effective use. However, there may be some tiny black points and/or bright points (white, red, blue or green in color When the battery level becomes low, the lens might stop moving. Insert a charged battery pack and turn on the camera again. • Do not hold the camera by - Sony DSC H7 | Instruction Manual - Page 9
[ No compensation for contents of the recording The contents of the recording cannot be compensated for if recording or playback is not possible due to a malfunction of your camera or recording media, etc. 9 - Sony DSC H7 | Instruction Manual - Page 10
, A/V cable for multi-use terminal (1) • CD-ROM (Cyber-shot application software/ "Cyber-shot Handbook"/"Cyber-shot Step-up Guide") (1) • Instruction Manual (this manual) (1) Attaching the shoulder strap and the lens cap Attach the strap to prevent the camera from damage by being dropped, etc. 10 - Sony DSC H7 | Instruction Manual - Page 11
weak, the operating distance of the Remote Control may shorten, or the Remote Control may not function properly. In this case, replace the battery with a Sony CR2025 lithium battery. Use of another battery may present a risk of fire or explosion. • The Remote Control has a button type lithium - Sony DSC H7 | Instruction Manual - Page 12
it is connected to the wall outlet (wall socket). If some trouble occurs while using the battery charger, immediately shut off the power by disconnecting the plug from the wall (wall socket), and remove the battery pack from the battery charger. • Designed for use with compatible Sony batteries. 12 - Sony DSC H7 | Instruction Manual - Page 13
the "Memory Stick Duo" (not supplied) all the way in until it clicks. 3 Insert the battery pack. 4 Close the battery/"Memory Stick Duo" cover. [ When there is no "Memory Stick Duo" inserted The camera records/plays back images using the internal memory (approx. 31 MB). [ To check the remaining - Sony DSC H7 | Instruction Manual - Page 14
Make sure that the access lamp is not lit, Slide the battery eject lever. Be sure not to drop the battery pack. then push the "Memory Stick Duo" in once. • Never remove the battery pack/"Memory Stick Duo" when the access lamp is lit. This may cause damage to data in the "Memory - Sony DSC H7 | Instruction Manual - Page 15
, and select [ Clock Settings] in (Settings) (pages 23, 24). [ When you turn on the power If the camera is running on battery power and you do not operate the camera for about three minutes, the camera turns off automatically to prevent wearing down the battery pack (Auto power-off function). 15 - Sony DSC H7 | Instruction Manual - Page 16
button 1Select the desired function from the mode dial. When shooting still images (Auto Adjustment mode): Select . When shooting movies: Select . 2Hold the camera steady, keeping your arm at your side. Position the subject in the center of the focus frame. 3Shoot with the shutter button. When - Sony DSC H7 | Instruction Manual - Page 17
. A Aperture priority Shooting Allows you to shoot after adjusting the aperture value manually. M Manual Exposure Shooting Allows you to shoot after adjusting the exposure manually. Movie Recording Allows you to record movies with audio. High Sensitivity Shoot images without a flash even in low - Sony DSC H7 | Instruction Manual - Page 18
LCD backlight up r Histogram on r Indicators off r Indicators on* * The LCD backlight will return to normal brightness. [ Shooting in the dark (DSC-H9 only) The Night Shot function lets you shoot subjects in the dark places without using the flash. Set NIGHTSHOT switch to ON. [ To shoot using the - Sony DSC H7 | Instruction Manual - Page 19
hood clockwise until it clicks. Adaptor ring 2 Turn the position ring and position the indicator of the adaptor ring to the indicator of this camera, as illustrated below. Indicators Position ring 3 Turn the lens hood and position the indicator to the indicator of the position ring until it clicks - Sony DSC H7 | Instruction Manual - Page 20
following settings by using the wheel dial. • ISO value • Shutter speed • Aperture value • Exposure value (EV) • AF range finder frame indicator - When manual focus is selected, the distance which the focus is set is adjusted. AF range finder frame indicator Exposure value Aperture value Shutter - Sony DSC H7 | Instruction Manual - Page 21
button (playback zoom) button ɟ Control button (inside)/ Wheel dial (outside) Speaker (bottom) 1 Press (Playback) button. If you press when the camera is powered off, the camera is turned on automatically and set to playback mode. To switch to the shooting mode, press again. 2 Select an image with - Sony DSC H7 | Instruction Manual - Page 22
[OK] with v, then press z. • This is same as pressing the SLIDE SHOW button on the Remote Control. [ To view images on TV screen Connect the camera to the TV with the cable for multi-use terminal (supplied). To the multi connector Cable for multi-use terminal To audio/video input jacks - Sony DSC H7 | Instruction Manual - Page 23
HOME screen is the gateway screen for all the functions of your camera. You can select the shooting mode or playback mode, or change the button HOME button 1 Press HOME to display the HOME screen. Category Item z button Guide 2 Select a category with b/B on the control button. 3 Select an item - Sony DSC H7 | Instruction Manual - Page 24
items. Details on the items are displayed on the screen by the guide. Category Shooting View Images Printing, Other Manage Memory Settings 24 Items Sync. Auto Review Clock Settings Language Setting Format Music Create REC. Folder Copy Function Guide COMPONENT Grid Line Digital Zoom Auto - Sony DSC H7 | Instruction Manual - Page 25
Using menu items MENU button ɟ Control button z button 1 Press MENU to display the menu. Function Guide • The menu will be displayed only during shooting and playback mode. • Different items will become visible depending on the selected mode. 2 Select the desired item - Sony DSC H7 | Instruction Manual - Page 26
page 25 Menu items The available menu items vary depending on the camera mode. The shooting menu is available only in the shooting mode be set on the menu screen only on DSC-H7. To set menu items on DSC-H9, press the buttons for each function. DSC-H9 /BRK button (REC Mode) button (Metering Mode - Sony DSC H7 | Instruction Manual - Page 27
For details on the operation 1 page 25 Menu for viewing (Delete) (Slide Show) (Retouch) (Protect) (Print) (Rotate) (Select Folder) Deletes images. Plays back a series of images. Retouches images. Prevents accidental erasure. Adds a Print order mark on image that you want to print out. Prints - Sony DSC H7 | Instruction Manual - Page 28
the computer. Also, you can use still images and movies from the camera more than ever by taking advantage of the software. For details, refer to "Cyber-shot Handbook". Supported Operating Systems for USB connection and application software (supplied) USB connection Application software "Picture - Sony DSC H7 | Instruction Manual - Page 29
. When you click the [Cyber-shot Handbook] button, the screen for copying "Cyber-shot Handbook" appears. 2 Follow the on-screen instructions to copy. When you click the "Cyber-shot Handbook" button, the both of the "Cyber-shot Handbook" and the "Cyber-shot Step-up Guide" will be installed. 3 After - Sony DSC H7 | Instruction Manual - Page 30
page 18). [ When shooting still images [ When shooting movies [ When playing back A E Battery remaining Low battery warning Image size P S A M Mode dial/Menu (Scene Selection) Mode dial Night Shot (DSC-H9 only) White balance VOL. Recording mode Metering mode Face Detection SteadyShot Vibration - Sony DSC H7 | Instruction Manual - Page 31
Manual focus bar Macro Playback Playback bar Counter/Recording time Histogram • appears when histogram display is disabled. 101-0012 Folder-file number 2007 1 1 9:30 AM Recorded date/time of the playback image z SET z OK MOVE MOVE Operation guide for shooting image z STOP z PLAY Operation - Sony DSC H7 | Instruction Manual - Page 32
is based on the CIPA standard. (CIPA: Camera & Imaging Products Association) • The number of images/battery life does not change, regardless of image size. [ When viewing still images No. of Images DSC-H9 Approx. 6000 DSC-H7 Approx. 7200 Battery life (min.) Approx. 300 Approx. 360 • Viewing - Sony DSC H7 | Instruction Manual - Page 33
999, the ">9999" indicator appears. • When images recorded using earlier Sony models are played back on this camera, the display may differ from the actual image size. [ The approximate size of the movie reaches approx. 2 GB. • This camera does not support HD recordings or playbacks for movies. 33 - Sony DSC H7 | Instruction Manual - Page 34
Troubleshooting If you experience trouble with your camera, try the following solutions. 1 Check the items below, and refer to "Cyber-shot Handbook" (PDF). If a code such as "C/E:ss:ss" appears on the screen, refer to "Cyber-shot Handbook". 2 Remove the battery pack, and insert the battery pack - Sony DSC H7 | Instruction Manual - Page 35
charge the battery pack. • You cannot charge the battery pack using the AC Adaptor (not supplied). Shooting still images/movies Your camera cannot record and white, black, red, purple, or other streaks appear on the image. This phenmenon is not a malfunction. Viewing images Your camera cannot play - Sony DSC H7 | Instruction Manual - Page 36
with moisture remaining inside the lens, you will be unable to record clear images. [ On the internal rechargeable backup battery This camera has an internal rechargeable battery for maintaining the date and time and other settings regardless of whether the power is on or off. This rechargeable - Sony DSC H7 | Instruction Manual - Page 37
mm still camera) F2.7 - 4.5 Exposure control: Automatic exposure, Shutter speed priority, Aperture priority, Manual exposure, ) (W/H/D, excluding protrusions) (for both DSC-H9 and DSC-H7) Mass: DSC-H9: Approx. 546 g (1 lb 3.3 oz) (including NP-BG1 battery pack, shoulder strap, adaptor ring, lens - Sony DSC H7 | Instruction Manual - Page 38
", , "Memory Stick Micro", "MagicGate", and are trademarks of Sony Corporation. • Microsoft, Windows and DirectX are either registered trademarks or . • In addition, system and product names used in this manual are, in general, trademarks or registered trademarks of their respective developers - Sony DSC H7 | Instruction Manual - Page 39
39 - Sony DSC H7 | Instruction Manual - Page 40
Additional information on this product and answers to frequently asked questions can be found at our Customer Support Website. Printed on 70% or more recycled paper using VOC (Volatile Organic Compound)-free vegetable oil based ink. Printed in Japan
-
 1
1 -
 2
2 -
 3
3 -
 4
4 -
 5
5 -
 6
6 -
 7
7 -
8
-
9
-
10
-
11
-
12
-
13
-
14
-
15
-
16
-
17
-
18
-
19
-
20
-
21
-
22
-
23
-
24
-
25
-
26
-
27
-
28
-
29
-
30
-
31
-
32
-
33
-
34
-
35
-
36
-
37
-
38
-
39
-
40
 |
 |

© 2007 Sony Corporation
3-196-623-
11
(1)
Instruction Manual
DSC-H7/H9
Digital Still Camera
Operating Instructions
Before operating the unit, please read this manual thoroughly, and retain it for future reference.
For details on the advanced operations, please access
“Cyber-shot Handbook”
and
“Cyber-shot Step-up Guide”
contained on the supplied CD-ROM via a computer.
GB