Sony DSCU50 Operating Instructions
Sony DSCU50 - Cybershot 2MP Digital Camera Manual
 |
UPC - 027242635142
View all Sony DSCU50 manuals
Add to My Manuals
Save this manual to your list of manuals |
Sony DSCU50 manual content summary:
- Sony DSCU50 | Operating Instructions - Page 1
upon your Sony dealer regarding this product. Model No. DSC-U50 Serial No. DSC-U50 © 2003 Sony Corporation 3-084-891-11(1) Getting started Shooting still images Enjoying still images Enjoying movies Deleting images Enjoying images on your computer ______ Troubleshooting Additional information - Sony DSCU50 | Operating Instructions - Page 2
product, you may call: Sony Customer Information Services Center 1-800-222-SONY (7669) The number below is for the FCC related matters only. Regulatory Information Declaration of Conformity Trade Name: SONY Model No.: DSC-U50 Responsible Party:Sony Electronics Inc. Address: 680 Kinderkamack - Sony DSCU50 | Operating Instructions - Page 3
should lose the fuse cover, please contact your nearest Sony service station. Attention for the Customers in Europe This product has been tested and found compliant with the limits sets out in OPERATION. For the Customers in Canada THIS CLASS B DIGITAL APPARATUS COMPLIES WITH CANADIAN ICES-003. 3 - Sony DSCU50 | Operating Instructions - Page 4
the pixels are operational for effective use. However, there may be some tiny black points and/or bright points (white, red, blue or green in color • Be careful when placing the camera near a window or outdoors. Exposing the LCD screen, the LCD finder or the lens to direct sunlight for long periods - Sony DSCU50 | Operating Instructions - Page 5
or play back properly. The pictures used in this manual The photographs used as examples of pictures in this manual are reproduced images, and are not actual images shot using this camera. Trademarks • "Memory Stick Duo" and are trademarks of Sony Corporation. • "Memory Stick PRO Duo" and are - Sony DSCU50 | Operating Instructions - Page 6
still image size 18 Image size 19 Basic still image shooting - Using auto adjustment mode ..... 20 Using the self-timer 22 Rotating the lens users 53 Installing the USB driver 54 Installing "Image Transfer 55 Installing "ImageMixer 56 Connecting the camera to your computer 57 Copying - Sony DSCU50 | Operating Instructions - Page 7
Troubleshooting Troubleshooting 67 Warnings and messages 74 Self-diagnosis display - If a code starting with an alphabet letter appears 76 Additional information Menu items 77 Precautions 80 On " - Sony DSCU50 | Operating Instructions - Page 8
for details of operation. 1 2 POWER button POWER lamp 3 Attaching the lens cap Opening the lens cap 5 A Shutter button (20) B POWER button/POWER lamp (14) C RESET button (bottom surface) 6 (67) D Lens cap E Flash (24) F Lens 7 G Self-timer lamp (23) H Hook for neck strap Attaching the - Sony DSCU50 | Operating Instructions - Page 9
E USB jack (57) 4 F (USB) jack cover G EXEC/ (Enlarged playback) 0 button (15, 39) H Mode switch qa : To view images (35) : To shoot still images (20) 5 To shoot images 6 continuously (31) : To shoot movies (46) I Access lamp (17) J Battery/"Memory Stick Duo" cover K OPEN button (12) 9 - Sony DSCU50 | Operating Instructions - Page 10
Be sure to charge the Nickel-Metal Hydride batteries supplied with your camera before using them for the first time. • Connect the battery charger as it is connected to the wall outlet (wall socket). If some trouble occurs while using the battery charger, immediately shut off the power by - Sony DSCU50 | Operating Instructions - Page 11
fully using up the existing charge, the low battery warning may be displayed sooner than expected. This is called the "memory effect."* If this problem occurs, charging the batteries only after using up the existing charge will correct it. * The "memory effect" - the situation in which the capacity - Sony DSCU50 | Operating Instructions - Page 12
. Close the battery/"Memory Stick Duo" cover while holding the batteries in. Make sure the cover is closed securely. To remove the batteries Hold the camera with the battery/"Memory Stick Duo" cover facing upward, open the cover, and remove the batteries. • Be careful not to drop the batteries when - Sony DSCU50 | Operating Instructions - Page 13
. • Based on the conditions under which the camera is being used and the state of the charge OFF Approx. 60 Approx. 30 • When using Sony alkaline batteries 1) Shooting in the following situations: - turns on and off once every ten times. Viewing still images2) Image size 2M VGA NH-AAA-DA - Sony DSCU50 | Operating Instructions - Page 14
at 160×112 image size • The remaining indicator will decrease under the following conditions: - The surrounding temperature is low - The flash is used - The camera has been turned on and off many times - [LCD LIGHT] is set to [ON] - The battery capacity decreases as you use it more and more - Sony DSCU50 | Operating Instructions - Page 15
connected to a computer with the USB cable. How to use the buttons Control buttons EXEC/ MENU To change the current settings of the camera, bring up the menu, and use the control buttons to make the changes. For each item, press MENU to display the menu and press the - Sony DSCU50 | Operating Instructions - Page 16
DATE&TIME SET Y/M/D 2003 1 1 12:00 AM EXEC/ 2 , Select the desired date display format with the control buttons v/V, then press EXEC. Select from [Y/M/D] (year/month/day), [M/D/Y] (month/day/year) or [D/M/Y] (day/month/year). Then DATE&TIME SET screen appears on the LCD screen. • If the rechargeable - Sony DSCU50 | Operating Instructions - Page 17
images Inserting and removing a "Memory Stick Duo" Access lamp Terminal side Shooting still images 1 , Open the battery/"Memory Stick Duo" cover. Hold the camera with the battery/"Memory Stick Duo" cover up, then slide the cover in the direction of the arrow 1 while pressing OPEN. The battery - Sony DSCU50 | Operating Instructions - Page 18
Setting the still image size RETURN SIZE•BURST 2M FOCUS AUTO SELFTIMER OFF WHITE BAL AUTO MENU 1 , Set the mode switch to , and turn on the power, then - Sony DSCU50 | Operating Instructions - Page 19
still 326 656 1316 2380 4840 • When the images recorded using earlier Sony models are played back, the image size indication may be different from the actual image size. • Images viewed on the LCD screen of the camera all appear the same size. • The actual number of images may differ - Sony DSCU50 | Operating Instructions - Page 20
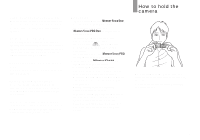
Basic still image shooting - Using auto adjustment mode 2M 101 10 1 , Set the "Memory Stick Duo" (page 25). 2 , Hold the camera steadily with both hands and position the subject in the center of the LCD screen. Do not cover the lens or flash with your fingers. • When recording outdoors during - Sony DSCU50 | Operating Instructions - Page 21
, release the shutter button, then recompose the shot and focus again. If the Auto Focus function can still not bring the subject into focus, use the that you set [LCD LIGHT] to [OFF] when using alkaline batteries. • This camera is equipped with a Hybrid-type LCD screen that allows you to see the LCD - Sony DSCU50 | Operating Instructions - Page 22
Using the self-timer LCD screen display during shooting You can use [DISPLAY] under [ ] with MENU and the control buttons v/V to turn the display on and off. This is useful when recording under conditions where it is difficult to check the image on the LCD screen. When [DISPLAY] is [ON] All - Sony DSCU50 | Operating Instructions - Page 23
lens Shooting still images flashes red and a continuous beep sounds. The image will be shot after approximately 10 seconds. To cancel the self-timer in the camera, the focus and the exposure may not be correctly set. Shooting in mirror mode , Adjust the lens section angle. You can rotate the lens - Sony DSCU50 | Operating Instructions - Page 24
indicator changes as follows. No indicator (Auto): Based on the lighting conditions, the camera will decide if there is enough light, and will use the flash accordingly. ( screen in a dark place, but this will have no effect on the shot image. • While you are using (No flash) mode, the shutter speed - Sony DSCU50 | Operating Instructions - Page 25
Shooting still images Creating or selecting a folder Your camera can create multiple folders in a "Memory Stick Duo." Also, you a new folder, you cannot delete the new folder with the camera. • Images are recorded in the newly created folder until a different folder is created or selected. 25 - Sony DSCU50 | Operating Instructions - Page 26
Selecting the recording folder CREATE REC.FOLDER CREATING 102MSDCF OK CANCEL EXEC/ 3 , Select [OK] with the control button v, then press EXEC. A new folder is created with a number one higher than the largest number in the "Memory Stick Duo," and the folder becomes the recording folder. When you - Sony DSCU50 | Operating Instructions - Page 27
Shooting still images CHANGE REC. FOLDER : 102MSDCF : 0 IMAGE CREATED: 2003 7 4 1:05PM CHANGE REC. is stored in the newly selected folder. You cannot move recorded images to a different folder with this camera. EXEC/ 4 , Select [OK] with the control button v, then press EXEC. When you press - Sony DSCU50 | Operating Instructions - Page 28
Shooting according to scene conditions - Scene Selection When shooting portraits, landscapes, twilight scenes, twilight portraits, or moving subjects, use the modes below to improve the quality of your images. Soft snap mode This mode lets you shoot skin colors in brighter and warmer tones for more - Sony DSCU50 | Operating Instructions - Page 29
Shooting still images Vivid nature mode This mode enhances blues and greens such is adjusted to telephoto. Active outdoor mode This mode lets you stop the movement of your subject and get lively shots of those moving objects in bright outdoor conditions. , Set the mode switch to , and turn on the - Sony DSCU50 | Operating Instructions - Page 30
Setting the distance to the subject - Focus preset 0.5 m 0.2 m RETURN SIZE•BURST 2M FOCUS AUTO SELFTIMER OFF WHITE BAL AUTO RETURN SIZE•BURST 2M FOCUS AUTO SELFTIMER OFF WHITE BAL AUTO When shooting an image using a previously set distance to the subject, or when shooting a subject through a - Sony DSCU50 | Operating Instructions - Page 31
Shooting images continuously - Burst Shooting still images FOCUS AUTO 0.2m 0.5m 1.0m RETURN SIZE•BURST 2M FOCUS AUTO SELFTIMER OFF WHITE BAL AUTO RETURN SIZE•BURST 2M FOCUS AUTO SELFTIMER OFF - Sony DSCU50 | Operating Instructions - Page 32
the shutter button. • If you release the shutter button in the middle of shooting, shooting will stop at that point. Only the images that were shot while the shutter button was held down are recorded. 32 - Sony DSCU50 | Operating Instructions - Page 33
Shooting still images Adjusting color tones - White Balance When the white balance is set to conditions. However, when you shoot under fixed conditions or special lighting conditions, you can manually adjust the white balance. No indicator (Auto) Adjusts the white balance automatically (Daylight) - Sony DSCU50 | Operating Instructions - Page 34
reactivate auto adjustment Select [AUTO] in step 3. • When the flash strobes, the manual setting is canceled, and the image is recorded in the Auto mode. • The resolve these problems, but digital still cameras cannot recognize the correct colors without adjustments. Normally, the camera makes these - Sony DSCU50 | Operating Instructions - Page 35
still images Viewing still images on the LCD screen Single (singleimage) screen Index (four-image) screen 2M 101 7 / 8 101-0007 2003 7 4 12:00PM You can view images shot with your camera For details on viewing movies, see page 49. Enjoying still images Viewing single images 2M 101 7 / 8 - Sony DSCU50 | Operating Instructions - Page 36
Viewing an index screen (four-image) RETURN DELETE DELETE IN FOLDER INDEX DPOF RETURN DELETE DELETE IN FOLDER INDEX DPOF To return to the single-image screen Select [SINGLE] in step 2. Or when four frames are displayed, press EXEC to display the single image shown with the yellow border. MENU 1 - Sony DSCU50 | Operating Instructions - Page 37
Enjoying still images Selecting the folder and playing back images - Folder RETURN DELETE DELETE IN FOLDER INDEX DPOF MENU 1 , Set the mode switch to , and turn on - Sony DSCU50 | Operating Instructions - Page 38
2003 7 4 12:00PM • When no images are stored in the folder, "NO FILE IN THIS FOLDER" appears. • You can play back images from the last-shot one without selecting the folder. 38 - Sony DSCU50 | Operating Instructions - Page 39
Enjoying still images Enlarging an image - Enlarged playback You can zoom in on an image shot with your camera to enlarge it to 2.5 or 5 times the original size. 1× (normal) 2.5× 5× 2M 101 7 / 8 101-0007 2003 7 4 1:30PM 1 , Set the mode switch to , and turn on the - Sony DSCU50 | Operating Instructions - Page 40
images to print - Print (DPOF) mark You can mark still images shot with your camera that you want to have printed. This function is convenient when you have images printed at a shop or using a printer that conforms with the DPOF (Digital Print Order Format) standard. • You cannot mark movies. • You - Sony DSCU50 | Operating Instructions - Page 41
Enjoying still images RETURN DELETE DELETE IN FOLDER INDEX DPOF EXEC/ 3 , Select [DPOF] with the control button V, then press EXEC. DPOF ON OFF EXEC/ 4 , Select [ON] with - Sony DSCU50 | Operating Instructions - Page 42
shot with this camera even if you do not have a computer. All you need to do is to prepare for the connection in the menu of the camera, and then to connect the camera to print with the control buttons v/V. Do not connect your camera to your printer at this time. RETURN 101 FORMAT PRINT CHANGE - Sony DSCU50 | Operating Instructions - Page 43
Enjoying still images RETURN 101 FORMAT PRINT CHANGE FOLDER CONNECT A PRINTER 3 EXEC/ CANCEL , to make the connection Select [CANCEL] in step 3. CONNECTING PictBridge 4 , Connect the camera to the printer. When the connection is completed, the selected image is displayed and the - Sony DSCU50 | Operating Instructions - Page 44
Printing images 2M 101 6 / 8 101-0006 2003 7 4 10:30AM 1 , Complete the procedures in steps 1 to 4 on pages 42 and 43, then connect the camera to the printer. When the connection is completed, the (PictBridge) mark appears on the screen. • If a warning message appears on the screen, check the - Sony DSCU50 | Operating Instructions - Page 45
Enjoying still images USB cable or remove a "Memory Stick Duo" or the batteries from the camera. To cancel printing Select [CANCEL] in step 4. To print other images be attached to the image to be printed. Some printers may not support this function. * The setting selected in [DATE NOTATION] under - Sony DSCU50 | Operating Instructions - Page 46
Shooting movies Enjoying movies RETURN SIZE 320 FOCUS AUTO SELFTIMER OFF WHITE BAL AUTO RETURN SIZE 320 FOCUS AUTO SELFTIMER OFF WHITE BAL AUTO SIZE 320 320×240 160 160×112 1 MENU , Set the mode switch to , and turn on the power, then press MENU. The menu appears. • Sound cannot be - Sony DSCU50 | Operating Instructions - Page 47
320REC 101 0:00/ 16:32 320 101 Enjoying movies 4 , Press the shutter button fully down. "REC" appears on the LCD screen and the camera starts recording the image. • Recording stops when the "Memory Stick Duo" is full. • The auto focus function can set the focus at any distance from - Sony DSCU50 | Operating Instructions - Page 48
sec. 23 min. 39 sec. 42 min. 47 sec. 1 h. 27 min. 1 sec. • The shooting time may vary, depending on the shooting conditions. • For numbers of still images that can be recorded, see page 19. • When shooting time exceeds 99 minutes 59 seconds ">99:59" is displayed. 48 - Sony DSCU50 | Operating Instructions - Page 49
a size of [ 320 320×240] is displayed full-sized on the screen, and an image shot with a size of [ 160 160×112] is displayed in a smaller size. • Movies cannot be rewound or fast-forwarded with this camera. 320 101 16 0:05 101-0016 EXEC/ 3 , Press EXEC. The movie is played back. To - Sony DSCU50 | Operating Instructions - Page 50
Deleting images Deleting images 2M 101 7 / 8 101-0007 2003 7 4 12:00PM 1 , Set the mode switch to , and turn on the power. Press the control buttons v/V to select the image you want to delete. RETURN DELETE DELETE IN FOLDER INDEX DPOF EXEC/ 2 MENU , Press MENU and select [ ] with the - Sony DSCU50 | Operating Instructions - Page 51
cancel deleting Select [CANCEL] in step 4. RETURN DELETE DELETE IN FOLDER INDEX DPOF 1 , Insert the "Memory Stick Duo" you want to format into the camera. Do not open the battery/"Memory Stick Duo" cover while formatting the "Memory Stick Duo" as this may damage the "Memory Stick Duo." • The term - Sony DSCU50 | Operating Instructions - Page 52
RETURN 101 FORMAT PRINT CHANGE FOLDER EXEC/ 3 , Select [ ] with the control button V, then press EXEC. Select [FORMAT] with the control buttons v/V, then press EXEC. FORMAT OK CANCEL 4 EXEC/ FORMATTING , Select [OK] with the control button v, then press EXEC. When the message "FORMATTING" - Sony DSCU50 | Operating Instructions - Page 53
nor a "Memory Stick" slot is provided, you can copy images using an additional device. See the Sony Website for details. http://www.sony.net/ Contents of the CD-ROM x USB Driver This driver is needed in order to connect the camera to a computer. • When using Windows XP, you need not install the USB - Sony DSCU50 | Operating Instructions - Page 54
the CD-ROM drive. Do not connect your camera to your computer at this time. The model selection screen appears. If it does not appear, double-click (My Computer) t (ImageMixer) in that order. b Click [Cyber-shot] on the model selection screen. c Click [USB Driver] on the installing menu screen. The - Sony DSCU50 | Operating Instructions - Page 55
can use the "Image Transfer" software to copy images to your computer automatically when you connect the camera to your computer with the supplied USB cable. a Click [Cyber-shot] on the model selection screen. c Click [Next]. When the "Licence Agreement" screen appears, click [Yes]. e Select the - Sony DSCU50 | Operating Instructions - Page 56
not already installed on your computer, a screen that asks if you want to install the driver will appear. Follow the instructions that appear on the screen. 56 Installing "ImageMixer" You can use the "ImageMixer Ver.1.5 for Sony" software to copy, view, and edit images and to create Video CDs. For - Sony DSCU50 | Operating Instructions - Page 57
Duo," see page 17. b Turn on your computer. c Open the (USB) jack cover, and connect the supplied USB cable to the USB jack of the camera. USB jack • Operations are not guaranteed when using a USB hub. Connect the USB cable directly to your computer, without using a USB hub. d Connect the USB - Sony DSCU50 | Operating Instructions - Page 58
Copying images using "Image Transfer" - Windows 98/98SE/2000/Me Connect the camera and your computer with the USB cable. "Image Transfer" launches and the images are automatically copied to the computer. 2 Click (Sony DSC), then click [Stop]. 3 Confirm the device on the confirmation screen, then - Sony DSCU50 | Operating Instructions - Page 59
images as following procedure. a Double-click [My Computer], then double-click [Removable Disk]. The contents of the "Memory Stick Duo" inserted in your camera appear. • This section describes an example of copying images to the "My Documents" folder. • When the "Removable Disk" icon is not shown - Sony DSCU50 | Operating Instructions - Page 60
Sony DSC]. • When using Windows 2000, right-click [ Sony DSC]. 2 Click [Remove] (or [Uninstall] in Windows 2000). The "Confirm Device Removal" screen appears. 3 Click [OK]. The device is deleted. Try the USB driver [Next]. The "Completing the Scanner and Camera Wizard" screen appears. f Click [Finish - Sony DSCU50 | Operating Instructions - Page 61
in the "My Documents" folder. • When not using Windows XP, double-click [My Documents] on the desktop. • You can use the "ImageMixer Ver.1.5 for Sony" software to view and edit images on your computer. For details, see the software's help files. b Double-click the desired folder and image file. The - Sony DSCU50 | Operating Instructions - Page 62
function Folder 101MSDCF up to 999MSDCF File name DSC0ssss.JPG MOV0ssss.MPG File meaning Still image files Movie files 62 • Data in the "100MSDCF" or "MSSONY" folders is for playback only, and your camera cannot record images in these folders. • For more information about the folder, see page - Sony DSCU50 | Operating Instructions - Page 63
"Memory Stick Duo" from your computer first. Then you can play back the image with this camera. • If you have not changed any of the file names that were given automatically to images shot with this camera, you can skip step 1. • You may not be able to play back a particular image, due to - Sony DSCU50 | Operating Instructions - Page 64
equipment to a single computer at the same time, some equipment, including your camera, may not operate depending on the type of USB equipment. • Operations can copy images using an additional device. See the Sony Website for details. http://www.sony.net/ Steps required by your OS Follow the steps - Sony DSCU50 | Operating Instructions - Page 65
Cyber-shot] on the model selection screen. The installing menu screen appears. 3 Click [USB Driver]. The "USB Driver Duo" inserted in your camera appear. 2 Double-click Sony" software to copy images to your computer, to view images on your computer, and to create video CDs. See the operation manual - Sony DSCU50 | Operating Instructions - Page 66
Creating a Video CD using "ImageMixer" You can create a Video CD using "ImageMixer Ver.1.5 for Sony." You can play back created Video CDs on a Video CD-compatible DVD player, or on a computer using Video CD application software. a Start "ImageMixer." b Click . The - Sony DSCU50 | Operating Instructions - Page 67
. (All the settings including date and time are cleared.) RESET button 3 Should your camera still not work properly, consult your Sony dealer or local authorized Sony service facility. Troubleshooting Batteries and power Symptom Cause Solution The battery remaining indicator is incorrect, or - Sony DSCU50 | Operating Instructions - Page 68
. p Turn on the camera again (page 14). p Replace them with charged batteries (page 10). Shooting still images/movies Symptom Cause Solution mode switch to or (pages 20 and 46). p Make sure to position the lens farther away from the subject than the minimum shooting distance of 10 cm (4 inches) - Sony DSCU50 | Operating Instructions - Page 69
and time are recorded incorrectly. • The mode switch is not set to a still image. • The mode switch is not set to a movie. when shooting p Set the correct date and time (page 15). Troubleshooting Viewing images Symptom Cause Solution Your camera cannot play back images. • The mode switch is - Sony DSCU50 | Operating Instructions - Page 70
print (DPOF) marks on movies. Solution - - Deleting images Symptom Your camera cannot delete an image. You have deleted an image by mistake. Cause • OS of - your computer is compatible. You cannot install the USB - driver. Solution p Check "Recommended computer environment" (pages 53 and 64). p - Sony DSCU50 | Operating Instructions - Page 71
mouse, and your camera. p Connect the camera directly to your computer without passing through a hub or other device. p Install the USB driver (pages 54 and the "ImageMixer Ver.1.5 for Sony" application software, click on HELP. p Consult the computer or software manufacturer. Troubleshooting 71 - Sony DSCU50 | Operating Instructions - Page 72
the printer settings. p Click on HELP for the "ImageMixer Ver.1.5 for Sony" application software. p Set the computer display as follows: Windows: 800 p Insert it from the right side (page 17). p Insert it directly into the camera. • You are using a "Memory Stick Duo" with a write-protect switch, and - Sony DSCU50 | Operating Instructions - Page 73
(pages 42 and 43). p Confirm that your camera is correctly connected to the printer using the USB cable. p Turn the printer on. For details, see the operation manual supplied with the printer. - - p Ask the printer manufacturer if the printer supports this function. Solution p Charge the batteries - Sony DSCU50 | Operating Instructions - Page 74
MORE FOLDERS CANNOT RECORD • A folder with the same first three digits number already exists in the "Memory Stick Duo." (For example: cannot be played back on your camera. • You are using the PictBridge function to print an image shot with another camera. INVALID OPERATION • You are attempting - Sony DSCU50 | Operating Instructions - Page 75
Enlarged playback is not available for images processed using a computer. • An error occurred while your camera was performing enlarged playback. PRINTER IS BUSY • The printer cannot accept a job because it is being transferred to the printer. Do not disconnect the USB cable. Troubleshooting 75 - Sony DSCU50 | Operating Instructions - Page 76
located on the bottom of the camera, then turn the power on again. Self-diagnosis display If you are unable to solve the problem even after trying the corrective actions a few times, repairs may be necessary. Contact your Sony dealer or local authorized Sony service facility and inform them of the - Sony DSCU50 | Operating Instructions - Page 77
BURST xAUTO / 0.2 m / 0.5 m / 1.0 m / SELFTIMER WHITE BAL ON / xOFF xAUTO / / / / ] is selected in the menu settings) Description Selects the image size when shooting still images (pages 18 and 31). Selects the auto focus method or sets the focus preset distance (page 30). Sets the self-timer - Sony DSCU50 | Operating Instructions - Page 78
and single image display (page 35). Marks/unmarks the print (DPOF) mark on still images you want to print (page 40). When the mode switch is set to by another device, will be permanently erased (page 51). Connects the camera to a PictBridge compliant printer, and then prints the image (page 42 - Sony DSCU50 | Operating Instructions - Page 79
in the menu settings during a connection with a PictBridge compliant printer Item PRINT 1 PAGE INSERT DATE Setting OK / CANCEL - Description Connects the camera to a PictBridge compliant printer, and then print the image (page 44). Attaches a date to an image to be printed (page 45). The - Sony DSCU50 | Operating Instructions - Page 80
cannot be repaired. On cleaning Cleaning the LCD screen Wipe the screen surface with an LCD cleaning kit (not supplied) to remove fingerprints, dust, etc. Cleaning the lens Wipe the lens with a soft cloth to remove fingerprints, dust, etc. Cleaning the camera surface Clean the camera surface with - Sony DSCU50 | Operating Instructions - Page 81
remaining inside the lens, you will be unable to record clear images. On internal rechargeable button battery This camera has an internal rechargeable battery before using the camera. However, even if this rechargeable button battery is not charged, you can still use the camera as long as you do - Sony DSCU50 | Operating Instructions - Page 82
or the shape of the write-protect switch** may differ depending on the "Memory Stick Duo" you use. **The "Memory Stick Duo" supplied with this camera does not have a write-protect switch. • Do not remove the "Memory Stick Duo" while reading or writing data. • Data may be corrupted in the following - Sony DSCU50 | Operating Instructions - Page 83
will be used up faster. • We recommend having spare batteries handy for two or three times the expected shooting time, and try test shooting before actually using the camera. • Do not expose the battery to water. The battery is not water-resistant. Battery life • The battery life is limited. The - Sony DSCU50 | Operating Instructions - Page 84
On the battery charger • Do not charge any other batteries except Sony Nickel-Metal Hydride batteries in the battery charger supplied with your camera. If you try to charge any other type of battery (e.g., manganese batteries, alkaline dry cells, primary lithium batteries, or Ni-Cd batteries) than - Sony DSCU50 | Operating Instructions - Page 85
(1) • Power cord (mains lead) (1) • USB cable (1) • Neck strap (1) • "Memory Stick Duo" (8MB) (1) • Memory Stick Duo Adaptor (1) • Lens cap (1) • CD-ROM (USB driver SPVD-010) (1) • Operating instructions (1) Design and specifications are subject to change without notice. 85 Additional information - Sony DSCU50 | Operating Instructions - Page 86
LCD screen displays When shooting still images 7 8 2M 101 9 15 q; C:32:ss qa 5 qs 6 qd A Image size indicator (18, 31) B Battery remaining indicator (13) C Flash mode indicator (24)/ Red-eye reduction - Sony DSCU50 | Operating Instructions - Page 87
When playing back still images 6 1 7 2 2M 101 12 8 2.5 /12 3 4 101-0012 9 5 2003 7 4 9:30AM q; A Image size indicator (18, 31) B Print (DPOF) mark indicator (40) C PictBridge connecting indicator (43) D Enlarged playback/ - Sony DSCU50 | Operating Instructions - Page 88
destinations 62 Image size 18, 19 Image Transfer 55 ImageMixer 56 Index screen 36 J JPG 62 L LCD screen DISPLAY 22, 86 LCD light 21 Lens cap 8 M Memory Stick 17, 82 Memory Stick Duo 17, 82 MENU 15 Menu settings 77 Mode switch 9 Moisture condensation 80 Movie shooting movies 46 - Sony DSCU50 | Operating Instructions - Page 89
auto adjustment mode 20 Burst 31 movie 46 Single image screen 35 Still image deleting 50 shooting 20 viewing images on the LCD screen 35 53, 64 USB cable 57, 58, 65 USB connection 57 USB driver 54, 65 Using your camera abroad 14 V Video CD 66 Viewing images on the LCD screen - Sony DSCU50 | Operating Instructions - Page 90
- Sony DSCU50 | Operating Instructions - Page 91
- Sony DSCU50 | Operating Instructions - Page 92
308489111 Printed on 100% recycled paper using VOC (Volatile Organic Compound)-free vegetable oil based ink. Sony Corporation Printed in Japan Additional information on this product and answers to frequently asked questions can be found at our Customer Support Website.
-
 1
1 -
 2
2 -
 3
3 -
 4
4 -
 5
5 -
 6
6 -
 7
7 -
8
-
9
-
10
-
11
-
12
-
13
-
14
-
15
-
16
-
17
-
18
-
19
-
20
-
21
-
22
-
23
-
24
-
25
-
26
-
27
-
28
-
29
-
30
-
31
-
32
-
33
-
34
-
35
-
36
-
37
-
38
-
39
-
40
-
41
-
42
-
43
-
44
-
45
-
46
-
47
-
48
-
49
-
50
-
51
-
52
-
53
-
54
-
55
-
56
-
57
-
58
-
59
-
60
-
61
-
62
-
63
-
64
-
65
-
66
-
67
-
68
-
69
-
70
-
71
-
72
-
73
-
74
-
75
-
76
-
77
-
78
-
79
-
80
-
81
-
82
-
83
-
84
-
85
-
86
-
87
-
88
-
89
-
90
-
91
-
92
 |
 |
3-084-891-
11
(1)
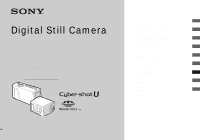
Digital Still Camera
Operating Instructions
Before operating the unit, please read this manual thoroughly, and retain
it for future reference.
Owner’s Record
The model and serial numbers are located on the bottom. Record the
serial number in the space provided below. Refer to these numbers
whenever you call upon your Sony dealer regarding this product.
Model No. DSC-U50
Serial No.
DSC-U50
© 2003 Sony Corporation
Getting started
________________________
Shooting still images
__________________
Enjoying still images
__________________
Enjoying movies
______________________
Deleting images
_______________________
Enjoying images on your computer
______
Troubleshooting
______________________
Additional information
_________________
Index ______________________________