Sony DVP-FX970 Operating Instructions - Page 6
Remote, PHONES headphone jack A, B - usb
 |
UPC - 027242816268
View all Sony DVP-FX970 manuals
Add to My Manuals
Save this manual to your list of manuals |
Page 6 highlights
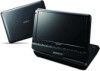
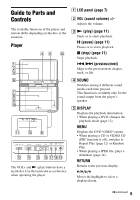
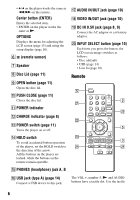
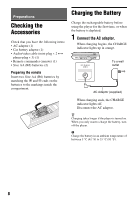
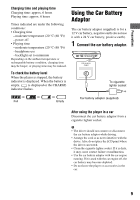
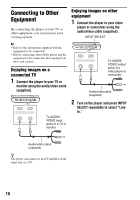
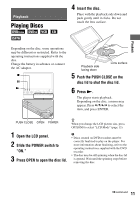
• C/c on the player works the same as m/M on the remote. Center button (ENTER) Enters the selected item. • ENTER on the player works the same as N. OPTIONS Displays the menu for adjusting the LCD screen (page 15) and using the setup display (page 16). F (remote sensor) G Speaker H Disc Lid (page 11) I OPEN button (page 11) Opens the disc lid. J PUSH CLOSE (page 11) Closes the disc lid. K POWER indicator Q AUDIO IN/OUT jack (page 10) R VIDEO IN/OUT jack (page 10) S DC IN 9.5V jack (page 8, 9) Connect the AC adaptor or car battery adaptor. T INPUT SELECT button (page 10) Each time you press the button, the LCD screen image switches as follows: • Disc (default) • USB (page 14) • Line In (page 10) Remote L CHARGE indicator (page 8) M POWER switch (page 11) Turns the player on or off. N HOLD switch To avoid accidental button operation of the player, set the HOLD switch to the direction of the arrow. All the buttons on the player are locked, while the buttons on the remote remain operable. O PHONES (headphone) jack A, B P USB jack (type A) (page 14) Connect a USB device to this jack. The VOL +, number 5, N and AUDIO buttons have a tactile dot. Use the tactile 6
-
 1
1 -
 2
2 -
 3
3 -
 4
4 -
 5
5 -
 6
6 -
 7
7 -
 8
8 -
 9
9 -
 10
10 -
 11
11 -
 12
12 -
13
-
14
-
15
-
16
-
17
-
18
-
19
-
20
-
21
-
22
-
23
-
24
-
25
-
26
-
27
-
28
-
29
-
30
-
31
-
32
 |
 |
