Sony FA-WRC1M Help Guide
Sony FA-WRC1M Manual
 |
View all Sony FA-WRC1M manuals
Add to My Manuals
Save this manual to your list of manuals |
Sony FA-WRC1M manual content summary:
- Sony FA-WRC1M | Help Guide - Page 1
Wireless Radio Commander FA-WRC1M Before use Camera software [1] Before use [2] Features of the Wireless Radio Commander [3] Identifying parts [4] Indicators on the screen [5] Preparations Turning on the power [6] Pairing with a Wireless Radio Receiver [7] Shooting Using MENU items [8] Groups [9] - Sony FA-WRC1M | Help Guide - Page 2
dedicated support site for information on camera compatibility. [2] Before use Before use This product can be used in combination with Sony the Sony website for your region for details on this product's compatibility with your camera. Along with this manual, refer to the operating instructions of - Sony FA-WRC1M | Help Guide - Page 3
controlled remotely by using this product and the Wireless Radio Receiver (sold separately). Wireless flash shooting The Wireless Radio Commander controls genuine Sony 's power level for each group. The Wireless Radio Commander supports TTL flash shooting, manual flash shooting, and High-speed sync ( - Sony FA-WRC1M | Help Guide - Page 4
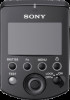
Control panel 1. LINK lamp 2. LCD panel 3. (flash sync) terminal 4. Multi/Micro USB Terminal be changed quickly. 9. SHUTTER button Releases the shutter of the camera to which a Wireless Radio Receiver is connected during remote release shooting. 10. TEST button Tests the flash before shooting - Sony FA-WRC1M | Help Guide - Page 5
. Quick Navi screen You can select an item by moving the cursor (which item is highlighted) using the top/bottom/right/left button on the control wheel, and change the value by turning the wheel. Menu screen You can select an item by moving the cursor using the top/bottom/right - Sony FA-WRC1M | Help Guide - Page 6
MANUAL mode MANUAL mode (ratio control) GROUP mode RELEASE mode - Sony FA-WRC1M | Help Guide - Page 7
flash mode is displayed when the product is in wireless flash mode. Otherwise, is displayed. 3. Shooting mode 4. Flash to the settings adjustment screen (Quick Navi). You can change the values quickly using the control wheel. Menu screen The menu screen is displayed when you press the MENU button. - Sony FA-WRC1M | Help Guide - Page 8
shooting using this product, the product must be paired with a Wireless Radio Receiver (sold separately). Perform pairing within 1 m (3.3 ft.) of the Wireless Radio Receiver. You can pair this product with up to 15 Wireless Radio Receivers. 1. Turn on the product, then select MENU button - [PAIRING - Sony FA-WRC1M | Help Guide - Page 9
Receivers that have just been paired. If you want to pair this product with two or more Wireless Radio Receivers, repeat steps 2 through 3 for each Wireless Radio Receiver. 4. Press the center button. Pairing will end and the LINK lamp on the product will light up in green. If the LINK lamp on - Sony FA-WRC1M | Help Guide - Page 10
Receiver to be unpaired, and then press the center button. When you set the cursor, the LINK lamp on the corresponding Wireless Radio Receiver will flash. Unpair a Wireless Radio Receiver while it is turned on. [8] Shooting Using MENU items You can use MENU items to change and confirm the settings - Sony FA-WRC1M | Help Guide - Page 11
the cursor on GP (group) or ZOOM (flash coverage) for the desired Wireless Radio Receiver using the top/bottom/right/left button on the control wheel, and then press the center button. 2. Change the setting by turning the control wheel, and then press the center button. CH SET (Channel setting) Sets - Sony FA-WRC1M | Help Guide - Page 12
be reset. INITIALIZE (Initialize) Resets this product to the factory settings. Pairing information will also be deleted. [9] Shooting Groups You can divide paired Wireless Radio Receivers in a maximum of five groups and set the flash mode or power level for each group. You can choose how to set the - Sony FA-WRC1M | Help Guide - Page 13
Make the following settings on the camera. Shooting mode: [Program Auto], [Aperture Priority], [Shutter Priority], or [Manual Exposure] Flash mode: [Wireless] Note On the flash attached to the Wireless Radio Receiver, set the flash mode to TTL and the flash coverage (zoom) to AUTO. If you are using - Sony FA-WRC1M | Help Guide - Page 14
button on the control wheel, and then select the desired mode by turning the wheel. Ratio You can set the lighting ratio for each group. Flash compensation MANUAL (Manual flash shooting mode) The flash level is set manually. You can divide receivers into up to three groups (A/B/C). Items that - Sony FA-WRC1M | Help Guide - Page 15
groups set to [TTL] mode) Flash level (only for groups set to [MANUAL] mode) [11] Shooting Remote release shooting You can perform remote release shooting using this product by connecting it to a paired Wireless Radio Receiver (sold separately) and a camera. 1. Connect the Multi/Micro USB Terminals - Sony FA-WRC1M | Help Guide - Page 16
press the camera's shutter button. Set the camera's [Flash Mode] to [Wireless]. You do not need to connect the Multi/Micro USB Terminals of the product cannot be used if it is attached to the Multi Interface Shoe on the Wireless Radio Receiver. [12] Notes on use Notes on use Product Do not put the - Sony FA-WRC1M | Help Guide - Page 17
Temperature This product is designed for use under temperatures between 0°C and 40°C (32°F and 104°F). Do not expose the product to extremely high temperatures (e.g. under direct sunlight inside a vehicle) or high humidity. To prevent moisture from condensing inside the product when you bring the
-
 1
1 -
 2
2 -
 3
3 -
 4
4 -
 5
5 -
 6
6 -
 7
7 -
8
-
9
-
10
-
11
-
12
-
13
-
14
-
15
-
16
-
17
 |
 |

Wireless Radio Commander
FA-WRC1M
Before use
Camera software [1]
Before use [2]
Features of the Wireless Radio Commander [3]
Identifying parts [4]
Indicators on the screen [5]
Preparations
Turning on the power [6]
Pairing with a Wireless Radio Receiver [7]
Shooting
Using MENU items [8]
Groups [9]
Wireless flash shooting [10]
Remote release shooting [11]
Notes on use
Notes on use [12]
[1] Before use
Camera software
Update the software of your camera to the latest version before use.