Sony FWD-32LX1R Operating Instructions - Page 16
Using On-screen Menus
 |
View all Sony FWD-32LX1R manuals
Add to My Manuals
Save this manual to your list of manuals |
Page 16 highlights
Using On-screen Menus Using On-screen Menus Operating Through Menus Menu operating buttons Use the buttons on the display unit or the Remote Commander for menu operations. Remote Commander MENU Control button section ENTER Operation of the unit is explained in these operating instructions for the case of operation using the Remote Commander. The M/m and ENTER buttons on the Remote Commander have the same functions as the M/m and ENTER buttons on the display. Note Operation may differ in some cases since there is no
-
 1
1 -
2
-
3
-
4
-
5
-
6
-
7
-
8
-
9
-
10
-
 11
11 -
 12
12 -
 13
13 -
 14
14 -
 15
15 -
 16
16 -
 17
17 -
 18
18 -
 19
19 -
 20
20 -
 21
21 -
22
-
23
-
24
-
25
-
26
-
27
-
28
-
29
-
30
-
31
-
32
-
33
-
34
-
35
-
36
-
37
-
38
-
39
-
40
-
41
-
42
-
43
-
44
-
45
 |
 |
16
(GB)
Using On-screen Menus
Using On-screen Menus
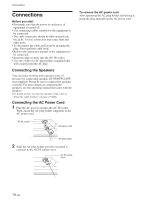
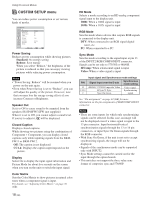
Operating Through Menus
Menu operating buttons
Use the buttons on the display unit or the Remote
Commander for menu operations.
MENU
ENTER
Operation of the unit is explained in these operating
instructions for the case of operation using the Remote
Commander. The
M
/
m
and ENTER buttons on the
Remote Commander have the same functions as the
M
/
m
and ENTER buttons on the display.
Note
Operation may differ in some cases since there is no
<
/
,
button on the display.
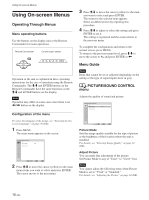
Configuration of the menu
To select the language of the menus, see “Selecting the On-
screen Language” on page 36 (GB).
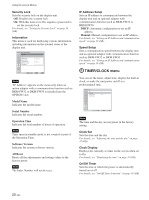
1
Press MENU.
The main menu appears on the screen.
PICTURE/SOUND CONTROL
Picture Mode:
Adjust Picture
Adjust Sound
Vivid
Set
ENTER
Exit
MENU
Select
2
Press
M
/
m
to move the cursor (yellow) to the main
menu items you want to select and press ENTER.
The cursor moves to the next menu.
3
Press
M
/
m
to move the cursor (yellow) to the item
you want to select and press ENTER.
The menu for the selected item appears.
Select an different item by repeating this
procedure.
4
Press
M
/
m
to adjust or select the setting and press
ENTER to set it.
The setting is registered and the menu returns to
the previous menu.
To complete the configuration and return to the
normal screen, press MENU.
To return to the previous menu level, press
M
/
m
to
move the cursor to
and press ENTER or
<
.
Menu Guide
Note
Items that cannot be set or adjusted (depending on the
setting or the type of signal input) show in gray.
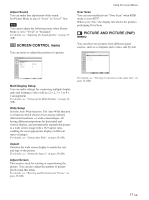
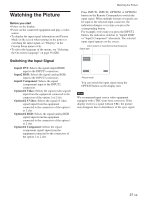
PICTURE/SOUND CONTROL
menu
Adjusts the quality of sound and picture.
PICTURE/SOUND CONTROL
Picture Mode:
Adjust Picture
Adjust Sound
Vivid
Set
ENTER
Exit
MENU
Select
Picture Mode
Sets the image quality suitable for the type of picture
or the brightness of the location where the unit is
installed.
For details, see “Selecting Image Quality” on page 24
(GB).
Adjust Picture
You can make fine adjustment of the picture.
Set Picture Mode to any of “User1” to “User3” first.
Note
You cannot adjust the following items when Picture
Mode is set to “Vivid” or “Standard.”
For details, see “Adjusting the Picture” on page 24 (GB).
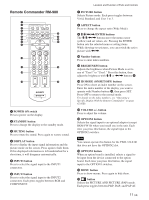
Remote Commander
Control button section