Sony FWD-32LX1R Operating Instructions - Page 33
Zooming in on a picture, Adjusting the position of the inset, picture For PinP only
 |
View all Sony FWD-32LX1R manuals
Add to My Manuals
Save this manual to your list of manuals |
Page 33 highlights
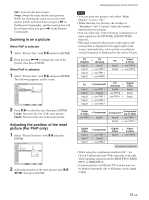
Sub: Activates the inset picture. Swap: Swaps the main and the inset pictures. While not showing the menu screen, the main picture will be activated when you press < on the Remote Commander, and the inset picture will be activated when you press , on the Remote Commander. Zooming in on a picture When P&P is selected 1 Select "Picture Size" with M/m and press ENTER. 2 Keep pressing
-
 1
1 -
2
-
3
-
4
-
5
-
6
-
7
-
8
-
9
-
10
-
11
-
12
-
13
-
14
-
15
-
16
-
17
-
18
-
19
-
20
-
21
-
22
-
23
-
24
-
25
-
26
-
27
-
 28
28 -
 29
29 -
 30
30 -
 31
31 -
 32
32 -
 33
33 -
 34
34 -
 35
35 -
 36
36 -
 37
37 -
 38
38 -
39
-
40
-
41
-
42
-
43
-
44
-
45
 |
 |
33
(GB)
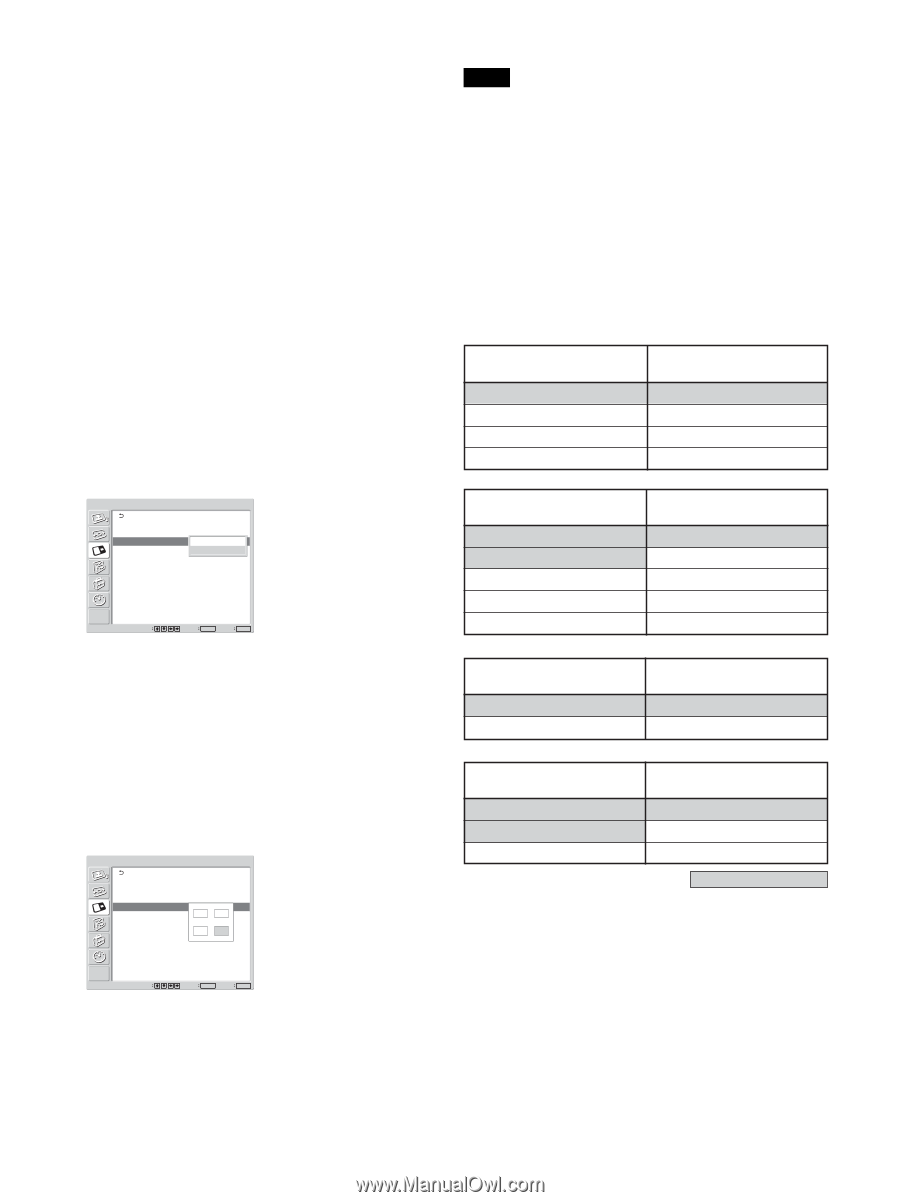
Sub:
Activates the inset picture.
Swap:
Swaps the main and the inset pictures.
While not showing the menu screen, the main
picture will be activated when you press
<
on
the Remote Commander, and the inset picture will
be activated when you press
,
on the Remote
Commander.
Zooming in on a picture
When P&P is selected
1
Select “Picture Size” with
M
/
m
and press ENTER.
2
Keep pressing
<
/
,
to change the size of the
picture, then press ENTER.
When PinP is selected
1
Select “Picture Size” with
M
/
m
and press ENTER.
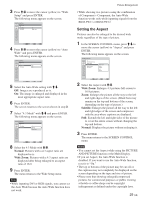
The following appears on the screen.
PICTURE AND PICTURE(PAP)
PAP:
Active Picture:
Picture Size:
Picture Position
PinP
Main
Exit
MENU
Select
Set
ENTER
Large
Small
2
Press
M
/
m
to select the size, then press ENTER.
Large:
Increases the size of the inset picture.
Small:
Decreases the size of the inset picture.
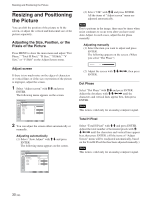
Adjusting the position of the inset
picture (For PinP only)
1
Select “Picture Position” with
M
/
m
and press
ENTER.
PICTURE AND PICTURE(PAP)
PAP:
Active Picture:
Picture Size:
Picture Position
PinP
Main
Small
Exit
MENU
Select
Set
ENTER
2
Adjust the position of the inset picture with
M
/
m
/
<
/
,
, then press ENTER.
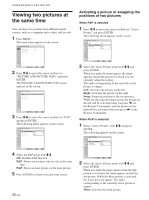
Viewing two pictures at the same time
Notes
• You can show two pictures only when “Multi
Display” is set to “Off.”
• While showing two pictures, the settings of
“Brightness” and “Contrast” adjust the balance
between the two pictures.
• You can select any of the following combinations of
input signals for the PICTURE AND PICTURE
function.
• The input system for the picture on the right or the
inset picture is displayed in the upper right on the
screen. And under this, color system or resolution/
vertical frequency is displayed for the Active Picture.
PC
+
PC
PC
+
Video/
(Digital)
(Analog)
S Video
Input1
+
Input2
Input1
+
BKM
-FW10
Input1
+
BKM
-FW12
Input2
+
BKM
-FW10
Input1
+
BKM
-FW11
Input1
+
BKM
-FW50
PC
+
Component
PC
+
Digital
(Analog)
Video
Input1
+
BKM
-FW11
Input2
+
Input1
Input1
+
Input2
BKM
-FW12
+
Input1
Input2
+
BKM
-FW11
BKM
-FW11
+
Input1
Input1
+
BKM
-FW12
Input2
+
BKM
-FW12
Video/
+
Component
Component
+
Component
S video
(up to 480i)
BKM
-FW10
+
Input2
*
Input2
+
BKM
-FW11
*
Input2
+
BKM
-FW12
*
Digital
+
Component
Digital
+
Video/
Video
Video
S video
Input1
+
BKM
-FW11
Input1
+
BKM
-FW10
Input1
+
Input2
Input1
+
BKM
-FW12
Recommended combinations
• While using the combination marked with *, the
Closed Caption and Auto Wide functions work only
while inputting signals from the BKM-FW10, BKM-
FW11 or BKM-FW12.
• 2 motion pictures of different TV systems may not
be displayed properly due to difference in the signal
format.