Sony FWD-32LX1R Operating Instructions - Page 37
Controlling Power On/Off, Automatically Timer, Function
 |
View all Sony FWD-32LX1R manuals
Add to My Manuals
Save this manual to your list of manuals |
Page 37 highlights
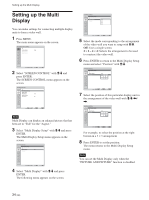
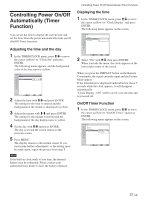
Controlling Power On/Off Automatically (Timer Function) You can set the time to display the current time and set the time when the power automatically turns on/off (On/Off Timer function). Adjusting the time and the day 1 In the TIMER/CLOCK menu, press M/m to move the cursor (yellow) to "Clock Set" and press ENTER. The following menu appears, and the background color of the time turns to yellow. TIMER/CLOCK Clock Set Clock Set: 00 : 00 Mon Select Set ENTER Exit MENU 2 Adjust the hour with M/m and press ENTER. The setting for the hour is entered and the background of the minute is displayed in yellow. 3 Adjust the minute with M/m and press ENTER. The setting for the minute is entered and the background of the day display turns to yellow. 4 Set the day with M/m and press ENTER. The day is set and the screen returns to the previous screen. 5 Press MENU. The display returns to the normal screen. If you must make further adjustments, or the setting must be made again, repeat the process from step 1. Note If the built-in clock tends to lose time, the internal battery may be exhausted. Please contact your authorized Sony dealer to have the battery replaced. Controlling Power On/Off Automatically (Timer Function) Displaying the time 1 In the TIMER/CLOCK menu, press M/m to move the cursor (yellow) to "Clock Display" and press ENTER. The following menu appears on the screen. TIMER/CLOCK Clock Set Clock Display: Off On/Off Timer On Select Set ENTER Exit MENU 2 Select "On" with M/m, then press ENTER. When you hide the menu, the clock appears on the lower right corner of the screen. When you press the DISPLAY button on the Remote Commander, the signal currently input and the Picture Mode appear. If the information is displayed undisturbed for about 5 seconds while the clock appears, it will disappear automatically. "Clock Display : ON" will be saved even after the unit is powered off. On/Off Timer Function 1 In the TIMER/CLOCK menu, press M/m to move the cursor (yellow) to "On/Off Timer" and press ENTER. The following menu appears on the screen. TIMER/CLOCK Clock Set Clock Display: On/Off Timer Off Every day Day of Week Select Set ENTER Exit MENU 37 (GB)
-
 1
1 -
2
-
3
-
4
-
5
-
6
-
7
-
8
-
9
-
10
-
11
-
12
-
13
-
14
-
15
-
16
-
17
-
18
-
19
-
20
-
21
-
22
-
23
-
24
-
25
-
26
-
27
-
28
-
29
-
30
-
31
-
 32
32 -
 33
33 -
 34
34 -
 35
35 -
 36
36 -
 37
37 -
 38
38 -
 39
39 -
 40
40 -
 41
41 -
 42
42 -
43
-
44
-
45
 |
 |