Sony FWD-32LX1R Operating Instructions - Page 41
Self-diagnosis Function
 |
View all Sony FWD-32LX1R manuals
Add to My Manuals
Save this manual to your list of manuals |
Page 41 highlights
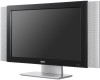
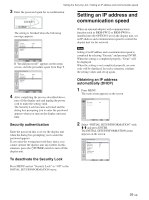
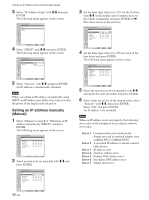
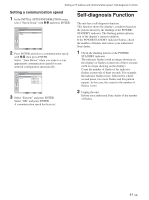
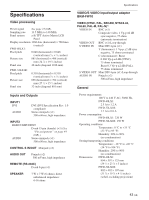
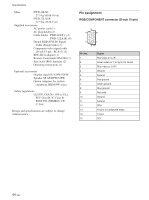
Setting an IP address and communication speed / Self-diagnosis Function Setting a communication speed 1 In the INITIAL SETUP/INFORMATION menu, select "Speed Setup" with M/m and press ENTER. INITIAL SETUP/INFORMATION Speed Setup Speed: Execute Auto Detect Select Set ENTER Exit MENU 2 Press ENTER and select a communication speed with M/m, then press ENTER. Select "Auto Detect" when you want to set an appropriate communication speed for your network configuration automatically. INITIAL SETUP/INFORMATION Speed Setup Speed: Execute Auto Detect 10Mbps/Half Dup 10Mbps/Full Dup 100Mbps/Half Dup 100Mbps/Full Dup Select Set ENTER Exit MENU 3 Select "Execute" and press ENTER. Select "OK" and press ENTER. A communication speed has been set. Self-diagnosis Function The unit has a self-diagnosis function. This function shows the display's condition based on the pattern shown by the flashing of the POWER/ STANDBY indicator. The flashing pattern informs you of the display's current condition. If the POWER/STANDBY indicator flashes, check the number of flashes and contact your authorized Sony dealer. 1 Check the flashing pattern of the POWER/ STANDBY indicator. The indicator flashes (with an image showing on the display) or flashes at intervals of three seconds (with no image showing on the display). Count the number of flashes if the indicator flashes at intervals of three seconds. For example, the indicator flashes twice, followed by a three second pause, two more flashes and this pattern repeats. In this case, the count for the number of flashes is two. 2 Unplug the unit. Inform your authorized Sony dealer of the number of flashes. 41 (GB)
-
 1
1 -
2
-
3
-
4
-
5
-
6
-
7
-
8
-
9
-
10
-
11
-
12
-
13
-
14
-
15
-
16
-
17
-
18
-
19
-
20
-
21
-
22
-
23
-
24
-
25
-
26
-
27
-
28
-
29
-
30
-
31
-
32
-
33
-
34
-
35
-
 36
36 -
 37
37 -
 38
38 -
 39
39 -
 40
40 -
 41
41 -
 42
42 -
 43
43 -
 44
44 -
 45
45
 |
 |