Sony HCD-E300 Operating Instructions - Page 22
Connecting the TV (Audio connection), Method 1: Audio cord, connection, Method 2: Digital optical cord
 |
View all Sony HCD-E300 manuals
Add to My Manuals
Save this manual to your list of manuals |
Page 22 highlights
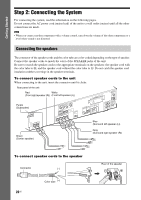
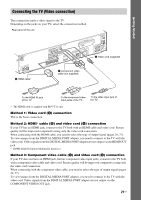
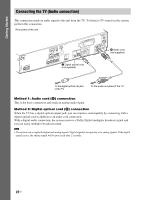
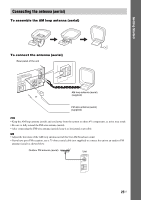
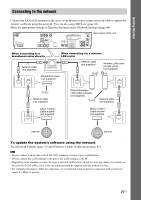
Getting Started Connecting the TV (Audio connection) This connection sends an audio signal to the unit from the TV. To listen to TV sound via the system, perform this connection. Rear panel of the unit SPEAKER CENTER SUBWOOFER EZW-T100 COMPONENT VIDEO OUT PR / CR PB / CB Y LAN(1S0PE0A)KER VIDEO OUT HDMI OUT DMPORT D70C05mVA MAX SDAIGT/ICTAALBLINE TV DIGITAL IN DC5V EXT 500mA MAX COAXIAL OPTICAL FRONT R FRONT L SUR R SUR L E Digital optical cord (not supplied) COAAXNITAELN7N5 A FM TV L R AUDIO IN AUDIO L AM AE.CCMAL-AMCI2C R AUDIO IN D Audio cord (not supplied) To the digital optical out jack of the TV. To the audio out jacks of the TV. Method 1: Audio cord (D) connection This is the basic connection and sends an analog audio signal. Method 2: Digital optical cord (E) connection When the TV has a digital optical output jack, you can improve sound quality by connecting with a digital optical cord in addition to an audio cord connection. With a digital audio connection, the system receives a Dolby Digital multiplex broadcast signal and you can enjoy multiplex broadcast sound. Note • The system can accept both digital and analog signals. Digital signals have priority over analog signals. If the digital signal ceases, the analog signal will be processed after 2 seconds. 22US
-
 1
1 -
2
-
3
-
4
-
5
-
6
-
7
-
8
-
9
-
10
-
11
-
12
-
13
-
14
-
15
-
16
-
 17
17 -
 18
18 -
 19
19 -
 20
20 -
 21
21 -
 22
22 -
 23
23 -
 24
24 -
 25
25 -
 26
26 -
 27
27 -
28
-
29
-
30
-
31
-
32
-
33
-
34
-
35
-
36
-
37
-
38
-
39
-
40
-
41
-
42
-
43
-
44
-
45
-
46
-
47
-
48
-
49
-
50
-
51
-
52
-
53
-
54
-
55
-
56
-
57
-
58
-
59
-
60
-
61
-
62
-
63
-
64
-
65
-
66
-
67
-
68
-
69
-
70
-
71
-
72
-
73
-
74
-
75
-
76
-
77
-
78
-
79
-
80
-
81
-
82
-
83
-
84
-
85
-
86
-
87
-
88
-
89
-
90
-
91
-
92
-
93
-
94
-
95
-
96
-
97
-
98
-
99
-
100
-
101
-
102
-
103
-
104
-
105
-
106
-
107
-
108
-
109
-
110
-
111
-
112
-
113
-
114
-
115
-
116
-
117
-
118
-
119
 |
 |
