Sony HCD-E300 Operating Instructions - Page 75
[Network Update], Updating the system’s software using the network, Updating the system's
 |
View all Sony HCD-E300 manuals
Add to My Manuals
Save this manual to your list of manuals |
Page 75 highlights
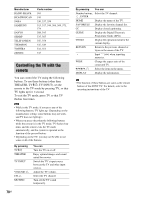
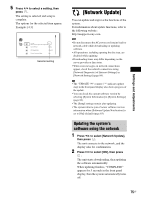
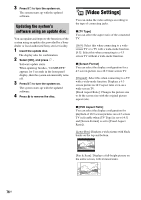
Settings and Adjustments 5 Press X/x to select a setting, then press . The setting is selected and setup is complete. The options for the selected item appear. Example: [4:3] Setup TV Type 4 : 3 Set the screen aspect ratio of your TV. Screen Format Original DVD Aspect Ratio Letter Box Cinema Conversion Mode Auto Selected setting [Network Update] You can update and improve the functions of the system. For information about update functions, refer to the following website: http://esupport.sony.com Note • Do not disconnect the AC power cord (mains lead) or network cable while downloading or updating software. • All operations, including opening the disc tray, are disabled while updating. • Downloading times may differ depending on the server provider or line status. • When error messages on network connections appear, check the network connections using [Network Diagnostic] of [Internet Settings] in [Network Settings] (page 84). Tip • The "UPDATE */9" counter ("*" indicates update step) in the front panel display also shows progress of the update. • You can check the current software version by selecting [System Information] in [System Settings] (page 83). • The [Setup] settings remain after updating. • The system informs you of newer software version information when [Software Update Notification] is set to [On] (default) (page 83). Updating the system's software using the network 1 Press X/x to select [Network Update], then press . The unit connects to the network, and the display asks for confirmation. 2 Press C/c to select [OK], then press . The unit starts downloading, then updating the software automatically. When updating finishes, "COMPLETE" appears for 5 seconds in the front panel display, then the system automatically turns off. 75US
-
 1
1 -
2
-
3
-
4
-
5
-
6
-
7
-
8
-
9
-
10
-
11
-
12
-
13
-
14
-
15
-
16
-
17
-
18
-
19
-
20
-
21
-
22
-
23
-
24
-
25
-
26
-
27
-
28
-
29
-
30
-
31
-
32
-
33
-
34
-
35
-
36
-
37
-
38
-
39
-
40
-
41
-
42
-
43
-
44
-
45
-
46
-
47
-
48
-
49
-
50
-
51
-
52
-
53
-
54
-
55
-
56
-
57
-
58
-
59
-
60
-
61
-
62
-
63
-
64
-
65
-
66
-
67
-
68
-
69
-
 70
70 -
 71
71 -
 72
72 -
 73
73 -
 74
74 -
 75
75 -
 76
76 -
 77
77 -
 78
78 -
 79
79 -
 80
80 -
81
-
82
-
83
-
84
-
85
-
86
-
87
-
88
-
89
-
90
-
91
-
92
-
93
-
94
-
95
-
96
-
97
-
98
-
99
-
100
-
101
-
102
-
103
-
104
-
105
-
106
-
107
-
108
-
109
-
110
-
111
-
112
-
113
-
114
-
115
-
116
-
117
-
118
-
119
 |
 |