Sony HCD-E300 Operating Instructions - Page 89
Troubleshooting, Additional Information
 |
View all Sony HCD-E300 manuals
Add to My Manuals
Save this manual to your list of manuals |
Page 89 highlights
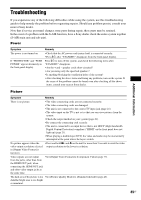
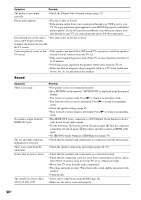
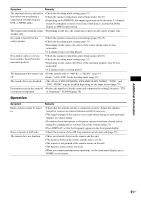
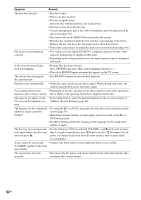
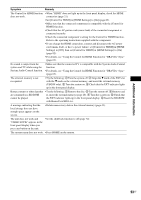
Additional Information Troubleshooting If you experience any of the following difficulties while using the system, use this troubleshooting guide to help remedy the problem before requesting repairs. Should any problem persist, consult your nearest Sony dealer. Note that if service personnel changes some parts during repair, these parts may be retained. In the event of a problem with the S-AIR function, have a Sony dealer check the entire system together (S-AIR main unit and sub unit). Power Symptom The power is not turned on. If "PROTECTOR" and "PUSH POWER" appear alternately in the front panel display. Remedy • Check that the AC power cord (mains lead) is connected securely. • Press "/1 after "STANDBY" disappears from the front panel display. Press "/1 to turn off the system, and check the following items after "STANDBY" disappears. • Are the + and - speaker cords short-circuited? • Are you using only the specified speakers? • Is anything blocking the ventilation holes of the system? • After checking the above items and fixing any problems, turn on the system. If the cause of the problem cannot be found even after checking all the above items, consult your nearest Sony dealer. Picture Symptom Remedy There is no picture. • The video connecting cords are not connected securely. • The video connecting cords are damaged. • The unit is not connected to the correct TV input jack (page 21). • The video input on the TV is not set so that you can view pictures from the system. • Check the output method on your system (page 21). • Re-connect the connecting cord securely. • The unit is connected to an input device that is not HDCP (High-bandwidth Digital Content Protection) compliant ("HDMI" on the front panel does not light up) (page 21). • When playing a double-layer DVD, the video and audio may be momentarily interrupted at the point where the layers switch. No picture appears when the video output resolution selected in [Output Video Format] is incorrect. • Press and hold N and Z on the unit for more than 5 seconds to reset the video output resolution to the lowest resolution. Video signals are not output • Set [Output Video Format] to [Component Video] (page 77). from the jacks, other than from the HDMI OUT jack, when connecting the HDMI OUT jack and other video output jacks at the same time. The dark area of the picture is too • Set [Picture Quality Mode] to [Standard] (default) (page 42). dark/the bright area is too bright or unnatural. 89US
-
 1
1 -
2
-
3
-
4
-
5
-
6
-
7
-
8
-
9
-
10
-
11
-
12
-
13
-
14
-
15
-
16
-
17
-
18
-
19
-
20
-
21
-
22
-
23
-
24
-
25
-
26
-
27
-
28
-
29
-
30
-
31
-
32
-
33
-
34
-
35
-
36
-
37
-
38
-
39
-
40
-
41
-
42
-
43
-
44
-
45
-
46
-
47
-
48
-
49
-
50
-
51
-
52
-
53
-
54
-
55
-
56
-
57
-
58
-
59
-
60
-
61
-
62
-
63
-
64
-
65
-
66
-
67
-
68
-
69
-
70
-
71
-
72
-
73
-
74
-
75
-
76
-
77
-
78
-
79
-
80
-
81
-
82
-
83
-
 84
84 -
 85
85 -
 86
86 -
 87
87 -
 88
88 -
 89
89 -
 90
90 -
 91
91 -
 92
92 -
 93
93 -
 94
94 -
95
-
96
-
97
-
98
-
99
-
100
-
101
-
102
-
103
-
104
-
105
-
106
-
107
-
108
-
109
-
110
-
111
-
112
-
113
-
114
-
115
-
116
-
117
-
118
-
119
 |
 |
