Sony HCD-FX80 DAVFX80 Instructions (complete HT system) - Page 13
Getting Started, Unpacking, Inserting Batteries into the Remote - remote control
 |
View all Sony HCD-FX80 manuals
Add to My Manuals
Save this manual to your list of manuals |
Page 13 highlights
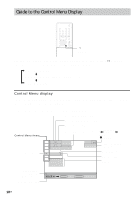
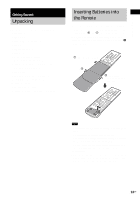
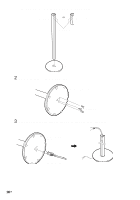
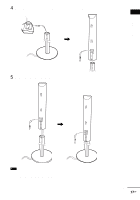
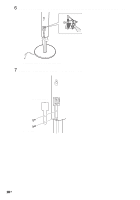
Getting Started Getting Started Unpacking Check that you have the following items: • Speakers (5) • Subwoofer (1) • Posts (long × 2, short × 2) • Bases (2) • Terminal covers (2) • Screws (10) • AM loop antenna (aerial) (1) • FM wire antenna (aerial) (1) • Speaker cords (5 m × 4, 15 m × 2) (16.5 ft. × 4, 49.5 ft. × 2) • Video Cord (1) • Remote Commander (remote) (1) • Size AAA (R03) batteries (2) • Wall-mount pads • Operating Instructions • Speaker and TV connections (card) (1) Inserting Batteries into the Remote You can control the system using the supplied remote. Insert two size AAA (R03) batteries by matching the 3 and # ends on the batteries to the markings inside the compartment. When using the remote, point it at the remote sensor on the system. 1 Slide open the cover. 2 2 Remove the cover by pinching the sides. Note • Do not leave the remote in an extremely hot or humid place. • Do not use a new battery with an old one. • Do not drop any foreign object into the remote casing, particularly when replacing the batteries. • Do not expose the remote sensor to direct light from the sun or lighting apparatus. Doing so may cause a malfunction. • If you do not intend to use the remote for an extended period of time, remove the batteries to avoid possible damage from battery leakage and corrosion. 13US
-
 1
1 -
2
-
3
-
4
-
5
-
6
-
7
-
 8
8 -
 9
9 -
 10
10 -
 11
11 -
 12
12 -
 13
13 -
 14
14 -
 15
15 -
 16
16 -
 17
17 -
 18
18 -
19
-
20
-
21
-
22
-
23
-
24
-
25
-
26
-
27
-
28
-
29
-
30
-
31
-
32
-
33
-
34
-
35
-
36
-
37
-
38
-
39
-
40
-
41
-
42
-
43
-
44
-
45
-
46
-
47
-
48
-
49
-
50
-
51
-
52
-
53
-
54
-
55
-
56
-
57
-
58
-
59
-
60
-
61
-
62
-
63
-
64
-
65
-
66
-
67
-
68
-
69
-
70
-
71
-
72
-
73
-
74
-
75
-
76
-
77
-
78
-
79
-
80
-
81
-
82
-
83
-
84
-
85
-
86
-
87
-
88
-
89
-
90
-
91
-
92
-
93
-
94
-
95
-
96
-
97
-
98
-
99
-
100
-
101
-
102
-
103
-
104
 |
 |