Sony HDR-AS30V Operating Guide
Sony HDR-AS30V Manual
 |
View all Sony HDR-AS30V manuals
Add to My Manuals
Save this manual to your list of manuals |
Sony HDR-AS30V manual content summary:
- Sony HDR-AS30V | Operating Guide - Page 1
4-479-707-11(1) Checking the bundled items Camera (1) Camera is set in the Waterproof Case. Open the cover of the case as illustrated below. Digital HD Video Camera Recorder Operating Guide HDR-AS30 / AS30V English Owner's Record The model and serial numbers are located inside the connector cover - Sony HDR-AS30V | Operating Guide - Page 2
the camera: Smart Remote Control mode or Copy mode. Android (Supporting NFC) Touch the (N mark) of the smartphone against the (N mark) of the camera. When "PlayMemories Mobile" starts, settings are automatically applied to establish Wi-Fi connection. iPhone Insert a memory card in
-
 1
1 -
 2
2
 |
 |
4-479-707-
11
(1)
© 2013 Sony Corporation Printed in China
HDR-AS30 / AS30V
Digital HD Video Camera Recorder
Operating Guide
The information on the sticker (in the perforated box, below) is required when
connecting the camera to a smartphone. If there is no sticker, refer to the supplied
English version of the instruction manual.
If the sticker is lost, you can recall your user ID and password by the following
procedure.
Insert a charged battery pack into the camera.
Connect the camera to a computer with the micro USB cable (supplied).
Press the NEXT or PREV button to power on.
Display [Computer]
[PMHOME]
[INFO]
[WIFI_INF.TXT] on your
computer, then confirm your ID and password.
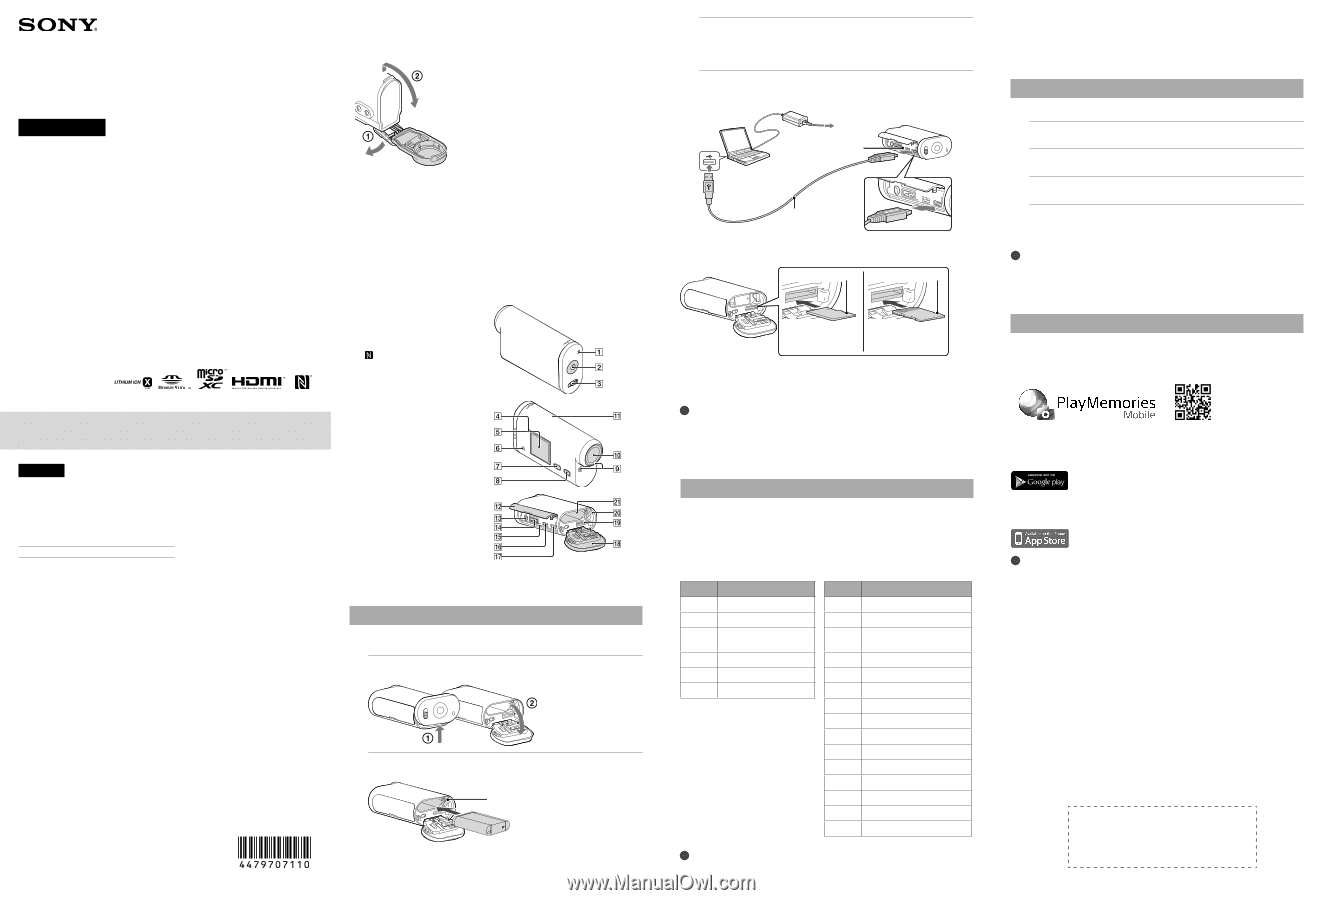
Checking the bundled items
Camera (1)
Camera is set in the Waterproof Case. Open the cover of the case as illustrated below.
Micro USB cable (1)
Rechargeable battery pack (NP-BX1) (1)
Waterproof Case (1)
Attachment Buckle (1)
Flat Adhesive Mount (1)
Curved Adhesive Mount (1)
Handbook
Included in the internal memory of this camera.
Set of printed documentation
Parts and controls
REC/access lamp
REC (Movie/Photo) button/
ENTER (Menu execute) button
REC HOLD switch
(N mark)
NFC: Near Field Communication
Display panel
Speaker
PREV button
NEXT button
Microphones
Lens
GPS sensor (HDR-AS30V only)
Connector cover
(Mic) jack
Expansion connector
CHG (Charge) lamp
HDMI OUT jack
Multi/Micro USB Terminal
Supports Micro USB compatible
devices.
Battery pack/memory card cover
Memory card insertion slot
Battery ejection lever
Battery insertion slot
Getting Started
Charging the battery pack
1
Open the cover.
2
Insert the battery pack.
Slide the battery ejection lever.
To close the cover, perform the operations in step 1 in opposite order.
3
Confirm that the camera is turned off.
To turn off the camera, press the NEXT button several times to display
[PwOFF], then press the ENTER button.
4
Connect the Multi/Micro USB Terminal of the camera to a
computer with the micro USB cable (supplied).
CHG (Charge) lamp
Micro USB cable
Inserting a memory card
“Memory Stick Micro”
(Mark2) media
microSD card/
microSDHC card/
microSDXC card
Printed side
Terminal side
Insert the memory card properly, confirming each side is facing the correct direction.
On the format of the memory card
For details, refer to the Handbook (PDF).
Notes
Operation with all memory cards is not assured.
Confirm the direction of the memory card. If you forcibly insert the memory card in the
wrong direction, the memory card, memory card slot, or image data may be damaged.
Format the memory card before use.
To eject the memory card, lightly push the memory card once.
Setting
Button operations
NEXT: Goes to the next menu
PREV: Goes to the previous menu
ENTER: Executes the menu
Menu items
List of modes
Items you can set in SETUP (Setup Mode)
Display
Modes
Display
Items
MOVIE
Movie Mode
VIDEO
Recording mode
PHOTO
Photo Mode
STEDY
SteadyShot
INTVL
Interval Photo Recording
Mode
ANGLE
Field Angle
SETUP
Setup Mode
SCENE
Scene
PLAY
Play Mode
LAPSE
Interval Photo Recording
PwOFF
Power off
Wi-Fi
Smart Remote Control
GPS
GPS Log
PLANE
Airplane Mode
A.OFF
Auto Power Off
BEEP
Beep
DATE
Date & Time Setting
USBPw
USB Power Supply
V.SYS
Switching NTSC/PAL
RESET
Resetting the Settings
FORMT
Format
Notes
Pressing the NEXT or PREV button repeatedly cycles through the respective mode/setup items.
To return to the [SETUP] menu from each setup item, select [BACK], then press the ENTER button.
The following operations are available when the power of the camera is turned off.
- Press the PREV or NEXT button to turn on the camera.
- Press the ENTER button to start recording in the shooting mode you set before turning
off the power of the camera.
The display language cannot be changed.
Recording
Attach accessories to the camera, as required.
1
Press the NEXT or PREV button to power on.
2
Select a shooting mode from [MOVIE], [PHOTO] and [INTVL].
3
Press the REC button to start recording.
To stop movie recording/interval photo recording
Press the REC button again.
Notes
Playback of images recorded with other cameras, is not assured on this camera.
During periods of extended shooting, camera temperature may rise to a point where
shooting stops automatically.
On what to do if this happens, see “Notes on long-time recording.”
Using the Wi-Fi function
Installing “PlayMemories Mobile” on your
smartphone
Android 2.3 or later (Android 4.0 or later is required to use One-touch
functions (NFC))
Search for “PlayMemories Mobile” on Google Play, then install it.
iOS 4.3 or later (One-touch functions (NFC) are not available)
Search for “PlayMemories Mobile” on App Store, then install it.
Notes
Update “PlayMemories Mobile” to the latest version if you have already installed it on your
smartphone.
Operation of this application with all smartphones and tablets is not assured.
Compliant OS version is information as at September 1, 2013.
The operation methods and display screens for the application are subject to change
without notice by future upgrades.
For more information about “PlayMemories Mobile,” refer to the following website.
English
Owner’s Record
The model and serial numbers are located inside the connector cover. Record the
serial number in the space provided below. Refer to these numbers whenever you
call your Sony dealer regarding this product.
Model No. HDR-AS
Serial No.
Read this first
This manual covers basic operations. For more detailed operations, refer to the
Handbook (PDF) built into this camera, by doing the following.
Insert a charged battery pack into the camera.
Connect the camera to a computer with the micro USB cable (supplied).
Press the NEXT or PREV button to power on.
Display [Computer]
[PMHOME]
[HANDBOOK] on your computer,
then install the Handbook (PDF).