Sony HDR-CX190 Operating Guide - Page 40
Saving Highlight Playback in HD image quality (Scenario Save) - setup
 |
View all Sony HDR-CX190 manuals
Add to My Manuals
Save this manual to your list of manuals |
Page 40 highlights
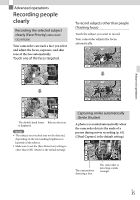
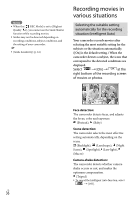
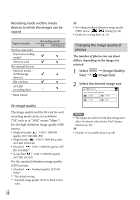
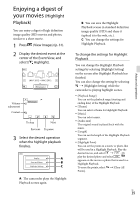
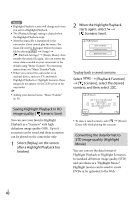
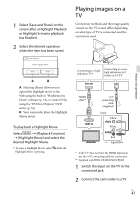
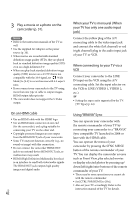
Notes Highlight Playback scenes will change each time you select a Highlight Playback. The [Playback Range] setting is cleared when the Highlight Playback stops. After the music file is transferred to the camcorder, if you cannot play the music, the music file may be damaged. Delete the music file by selecting [Setup] [ Playback Settings] [Empty Music], then transfer the music file again. You can restore the music data recorded on your camcorder at the default using "Music Transfer." For operating instructions, see "Music Transfer" help. When you connect the camcorder to an external device, such as a TV, and watch Highlight Playback or Highlight Scenario, these images do not appear on the LCD screen of the camcorder. Adding your desired music: "Music Transfer" (p. 51) 2 When the Highlight Playback starts again, select [ Scenario Save]. To play back a saved scenario Select [Playback Function] [ Scenario], select the desired scenario, and then select . Saving Highlight Playback in HD image quality ( Scenario Save) You can save your favorite Highlight Playback as a "Scenario" with high definition image quality (HD). Up to 8 scenarios can be saved and these scenarios can be played on the camcorder only. 1 Select [Replay] on the screen after a Highlight Playback has finished. To erase a saved scenario, select [Erase]/ [Erase All] while playing the scenario. Converting the data format to STD image quality (Highlight Movie) You can convert the data format of Highlight Playback or Highlight Scenarios to standard definition image quality (STD) and save them as a "Highlight Movie." Highlight movies can be used to create DVDs or be uploaded to the Web. US 40
-
 1
1 -
2
-
3
-
4
-
5
-
6
-
7
-
8
-
9
-
10
-
11
-
12
-
13
-
14
-
15
-
16
-
17
-
18
-
19
-
20
-
21
-
22
-
23
-
24
-
25
-
26
-
27
-
28
-
29
-
30
-
31
-
32
-
33
-
34
-
 35
35 -
 36
36 -
 37
37 -
 38
38 -
 39
39 -
 40
40 -
 41
41 -
 42
42 -
 43
43 -
 44
44 -
 45
45 -
46
-
47
-
48
-
49
-
50
-
51
-
52
-
53
-
54
-
55
-
56
-
57
-
58
-
59
-
60
-
61
-
62
-
63
-
64
-
65
-
66
-
67
-
68
-
69
-
70
-
71
-
72
-
73
-
74
-
75
-
76
-
77
-
78
-
79
-
80
-
81
-
82
-
83
-
84
-
85
-
86
-
87
-
88
-
89
-
90
-
91
-
92
-
93
-
94
-
95
-
96
-
97
-
98
-
99
-
100
-
101
-
102
-
103
-
104
-
105
-
106
-
107
-
108
-
109
-
110
-
111
-
112
-
113
-
114
-
115
-
116
-
117
-
118
-
119
-
120
-
121
-
122
-
123
-
124
-
125
-
126
-
127
-
128
-
129
-
130
-
131
-
132
-
133
-
134
-
135
-
136
-
137
-
138
-
139
-
140
-
141
-
142
-
143
-
144
-
145
-
146
-
147
-
148
-
149
-
150
-
151
-
152
-
153
-
154
-
155
 |
 |