Sony HDR-SR5/C Operating Guide - Page 30
Operating Picture Motion, Browser, Connecting your camcorder to a, computer - handycam usb cable
 |
View all Sony HDR-SR5/C manuals
Add to My Manuals
Save this manual to your list of manuals |
Page 30 highlights
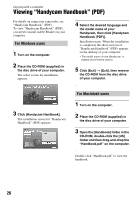
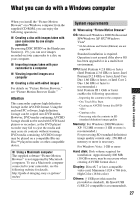
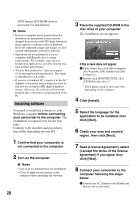
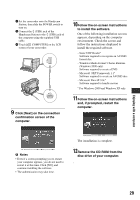
Operating "Picture Motion Browser" After you install the software, shortcut icons for "Picture Motion Browser" and "Picture Motion Browser Guide" are created on the desktop. For the basic operation of "Picture Motion Browser," see "Picture Motion Browser Guide." Double-click to start "Picture Motion Browser." Double-click to start "Picture Motion Browser Guide." Connecting your camcorder to a computer To import the images to the computer, etc., connect your camcorder to the computer by the following steps. 1 Connect the AC Adaptor to the Handycam Station and a wall outlet. 2 Set the camcorder onto the Handycam Station, then slide the POWER switch to turn on. 3 Connect the (USB) jack of the Handycam Station to a computer using the supplied USB cable (p. 28). The [USB SELECT] screen appears on the LCD screen of your camcorder. Touch the desired button on the screen. z Tips • If the [USB SELECT] screen does not appear, touch (HOME) t (OTHERS) t [COMPUTER] to display the screen. Recommended USB cable connection To assure the proper functioning of your camcorder, connect your camcorder to a computer as below. • Connect the USB ports of the Handycam Station and a computer using the USB cable. Do not connect anything to other USB ports of a computer. • When connecting to a computer with a USB keyboard and USB mouse connected as standard equipment, connect the Handycam Station to another USB port using the USB cable. b Notes • Operations are not guaranteed when multiple USB devices are connected to a computer. • Be sure to connect the USB cable to a USB port. If it is connected to a computer via a USB keyboard or USB hub, operations are not guaranteed. To disconnect the USB cable 1 Click the [Unplug or eject hardware] icon on the task tray on the bottom right of the desk top. 30
-
 1
1 -
2
-
3
-
4
-
5
-
6
-
7
-
8
-
9
-
10
-
11
-
12
-
13
-
14
-
15
-
16
-
17
-
18
-
19
-
20
-
21
-
22
-
23
-
24
-
 25
25 -
 26
26 -
 27
27 -
 28
28 -
 29
29 -
 30
30 -
 31
31 -
 32
32 -
 33
33 -
 34
34 -
 35
35 -
36
-
37
-
38
-
39
-
40
 |
 |
