Sony HDR-XR260V Operating Guide - Page 52
Capturing a photo from a movie - software
 |
View all Sony HDR-XR260V manuals
Add to My Manuals
Save this manual to your list of manuals |
Page 52 highlights
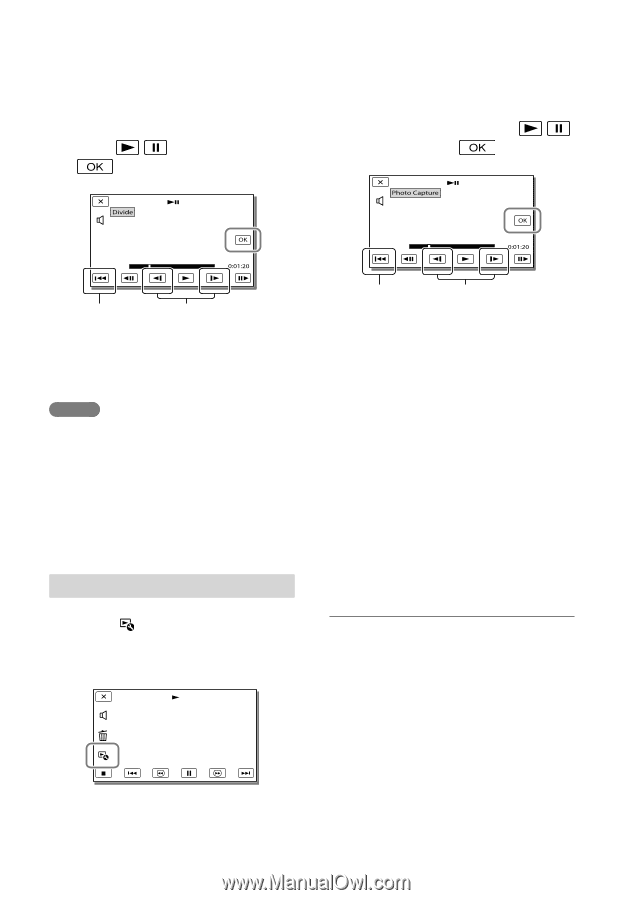
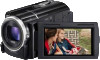
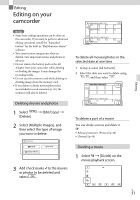
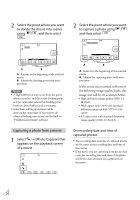
2 Select the point where you want to divide the movie into scenes using / , and then select . 2 Select the point where you want to capture a photo using / , and then select . A B A: Returns to the beginning of the selected movie B: Adjusts the dividing point with more precision Notes A slight difference may occur from the point where you select and the actual dividing point, as your camcorder selects the dividing point based on about half-second increments. Some basic editing operations can be done on the camcorder. If you want to do advanced editing operations, use the built-in "PlayMemories Home" software. A B A: Returns to the beginning of the selected movie B: Adjusts the capturing point with more precision If the movie was recorded with one of the following image quality levels, the image size will be set as shown below. High definition image quality (HD): 2.1 M (16:9) Wide aspect ratio (16:9) with standard definition image quality (STD): 0.2 M (16:9) 4:3 aspect ratio with standard definition image quality (STD): 0.3 M (4:3) Capturing a photo from a movie 1 Select [Photo Capture] that appears on the playback screen of a movie. On recording date and time of captured photos The recording date and time of captured photos are the same as the recording date and time of the movies. If the movie you are capturing from has no data code, the recording date and time of the photo will be the date and time you captured from the movie. US 52
-
 1
1 -
2
-
3
-
4
-
5
-
6
-
7
-
8
-
9
-
10
-
11
-
12
-
13
-
14
-
15
-
16
-
17
-
18
-
19
-
20
-
21
-
22
-
23
-
24
-
25
-
26
-
27
-
28
-
29
-
30
-
31
-
32
-
33
-
34
-
35
-
36
-
37
-
38
-
39
-
40
-
41
-
42
-
43
-
44
-
45
-
46
-
 47
47 -
 48
48 -
 49
49 -
 50
50 -
 51
51 -
 52
52 -
 53
53 -
 54
54 -
 55
55 -
 56
56 -
 57
57 -
58
-
59
-
60
-
61
-
62
-
63
-
64
-
65
-
66
-
67
-
68
-
69
-
70
-
71
-
72
-
73
-
74
-
75
-
76
-
77
-
78
-
79
-
80
-
81
-
82
-
83
-
84
-
85
-
86
-
87
-
88
-
89
-
90
-
91
-
92
-
93
-
94
-
95
-
96
-
97
-
98
-
99
-
100
-
101
-
102
-
103
-
104
-
105
-
106
-
107
-
108
-
109
-
110
-
111
-
112
-
113
-
114
-
115
-
116
-
117
-
118
-
119
-
120
-
121
-
122
-
123
-
124
-
125
-
126
-
127
-
128
-
129
-
130
-
131
-
132
-
133
-
134
-
135
-
136
-
137
-
138
-
139
-
140
-
141
-
142
-
143
-
144
-
145
-
146
-
147
-
148
-
149
-
150
-
151
-
152
-
153
-
154
-
155
-
156
-
157
-
158
-
159
-
160
-
161
-
162
-
163
-
164
-
165
-
166
-
167
-
168
-
169
-
170
-
171
-
172
-
173
-
174
-
175
-
176
-
177
-
178
-
179
-
180
-
181
-
182
-
183
-
184
-
185
-
186
-
187
-
188
-
189
-
190
-
191
 |
 |