Sony HXR-MC2000U Operation Guide
Sony HXR-MC2000U Manual
 |
View all Sony HXR-MC2000U manuals
Add to My Manuals
Save this manual to your list of manuals |
Sony HXR-MC2000U manual content summary:
- Sony HXR-MC2000U | Operation Guide - Page 1
4-263-129-11(1) Digital HD Video Camera Recorder HXR-MC2000U/MC2000N Operating Guide Before operating the unit, please read this manual thoroughly, and retain it for future reference. 2010 Sony Corporation - Sony HXR-MC2000U | Operation Guide - Page 2
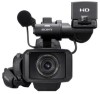
NP-F570 (1) CD-ROM "Video Camera Application Software" (1) "PMB" (software, including "PMB Help") CD-ROM "Manuals for Digital HD Video Camera Recorder" (1) "Operating Guide" (2) Lens hood Panel EVF block LCD panel Battery pack Microphone Viewfinder The camcorder is not dustproofed - Sony HXR-MC2000U | Operation Guide - Page 3
lights. The phenomena can be reduced by adjusting the shutter speed (p. 31). Notes on playing back The camcorder HD) on the camcorder with the following devices; Other AVCHD format compatible devices which are not compatible with High Profile Devices which are not compatible with the AVCHD - Sony HXR-MC2000U | Operation Guide - Page 4
for understandability. In this manual, the internal memory and the memory card are called "recording media." In this manual, the DVD disc recorded with high definition image quality (HD) is called AVCHD disc. Design and specifications of your camcorder and accessories are subject to change - Sony HXR-MC2000U | Operation Guide - Page 5
occur. ejecting the memory card when the access lamp (p. 22) is lit or flashing removing the battery pack or AC Adaptor from the camcorder, or applying mechanical shock or vibration to the camcorder when the (Movie)/ (Photo) lamps (p. 23) or the access lamp (p. 22) are lit or flashing When - Sony HXR-MC2000U | Operation Guide - Page 6
2 Notes on use 5 Getting started Step 1: Attaching the supplied microphone, eyecup and the lens hood 10 Attaching the supplied microphone 10 Attaching the eyecup 11 Attaching the lens hood 11 Step 2: Charging the battery pack 13 Step 3: Turning the power on, and setting the date and time 16 - Sony HXR-MC2000U | Operation Guide - Page 7
of your camcorder Deleting supplied software "PMB 54 Starting PMB (Picture Motion Browser 56 Reading "PMB Help 56 Selecting the method for creating a disc (computer 57 Creating a disc with one touch (One Touch Disc Burn 59 Importing movies and photos to a computer 60 Creating an AVCHD - Sony HXR-MC2000U | Operation Guide - Page 8
69 Creating a standard definition image quality (STD) disc with a recorder, etc 70 Customizing your camcorder Using menus 72 Operating menus 72 Using MY MENU 73 Using the OPTION MENU 74 Menu lists 75 MANUAL SETTINGS (Items to adjust for scene condition 77 SHOOTING SET (Items for customized - Sony HXR-MC2000U | Operation Guide - Page 9
Troubleshooting 93 Self-diagnosis display/Warning indicators 99 Recording time of movies/number of recordable photos 103 Expected time of recording and playback with each battery pack 103 Expected recording time of movies 103 Expected number of recordable photos 104 Using your camcorder - Sony HXR-MC2000U | Operation Guide - Page 10
started Step 1: Attaching the supplied microphone, eyecup and the lens hood Attaching the supplied microphone Attach the wind screen to the microphone . Unlock the stopper of the microphone holder and open the cover. Align the convex part of the microphone with the concave part of - Sony HXR-MC2000U | Operation Guide - Page 11
the eyecup securely until it fits the corresponding part properly. Attaching the lens hood Align the marks on the lens hood to those on the camcorder, and turn the lens hood in the direction of the arrow. US 11 - Sony HXR-MC2000U | Operation Guide - Page 12
and attach the lens cap by leading the grip belt through the attachment on the lens cap string. Then attach the grip belt to the camcorder again. US 12 - Sony HXR-MC2000U | Operation Guide - Page 13
the DC plug is facing to the mark on your camcorder. 4 Connect the AC Adaptor and the power cord (mains lead) to your camcorder and the wall outlet (wall socket). The CHG (charge) lamp lights up and charging starts. The CHG (charge) lamp turns off when the battery pack is fully charged. US 13 - Sony HXR-MC2000U | Operation Guide - Page 14
you fully charge a fully discharged battery pack. Battery pack NP-F570 (supplied) NP-F770 NP-F970 Charging time 265 475 645 Times measured with the camcorder at 25 C (77 °F). 10 C to 30 C (50 °F to 86 °F) is recommended. To remove the battery pack Slide the POWER switch to OFF (CHG). Push - Sony HXR-MC2000U | Operation Guide - Page 15
countries/regions using the AC Adaptor supplied with your camcorder within the AC 100 V - 240 V, 50 Hz/60 Hz range. Notes Do not use an electronic voltage transformer. Notes on the battery pack When you remove the battery pack or disconnect the AC Adaptor, slide the POWER switch to OFF (CHG - Sony HXR-MC2000U | Operation Guide - Page 16
on, and setting the date and time 1 Slide the POWER switch to ON while pressing the green button. 2 Select the desired geographical area with / , then touch [NEXT]. Touch the button on the LCD screen To - Sony HXR-MC2000U | Operation Guide - Page 17
CODE] [DATE/TIME] . If the button you touch does not react correctly, calibrate the touch panel (p. 111). To turn off the power Slide the POWER switch to OFF (CHG). Changing the language setting You can change the on-screen displays to show messages in a specified language. Touch - Sony HXR-MC2000U | Operation Guide - Page 18
Step 4: Making setting adjustments before recording The LCD panel Open the LCD panel (), then rotate it to the best angle to record or play (). 90 degrees (max.) 180 degrees (max.) 180 degrees (max.) Tips If you rotate the LCD panel 180 degrees to the - Sony HXR-MC2000U | Operation Guide - Page 19
You can view pictures using the viewfinder to avoid wearing down the battery, or when the picture seen on the LCD screen is poor. Notes You cannot use LCD and EVF simultaneously. The shoulder pad You can adjust the position of the shoulder pad by loosening the screws illustrated below. Tighten - Sony HXR-MC2000U | Operation Guide - Page 20
media The recording media of your camcorder are displayed on the screen as follows. * Internal memory Memory card * In the default setting, both movies and photos are recorded on this recording media. You can perform recording, playback and editing operations on the selected medium. Tips - Sony HXR-MC2000U | Operation Guide - Page 21
and SDXC memory cards are called SD cards. "Memory Stick PRO Duo" media of up to 32 GB and SD memory cards of up to 64 GB have been tested and proven to operate with your camcorder. Notes MultiMediaCard cannot be used with this camcorder. Images recorded on SDXC memory cards cannot be played - Sony HXR-MC2000U | Operation Guide - Page 22
Database File.] screen may appear if you insert a new memory card. In that case, touch [YES]. If you record only photos on the memory card, touch [ [YES] [YES] . To eject the memory card Open the cover and lightly push the memory card in once. Do not open the cover during recording. When - Sony HXR-MC2000U | Operation Guide - Page 23
on the internal memory. Movies are recorded with high definition image quality (HD). Tips To change the recording media, see page 20. 2 Slide the POWER switch to ON while pressing the green button. You can switch recording modes by pressing MODE. Press MODE to light up the desired recording - Sony HXR-MC2000U | Operation Guide - Page 24
Press MODE to light up the (Movie for about 3 seconds, then disappear after turning on your camcorder or switching the recording (movie/photo)/playback modes. To display movies is about 13 hours. When a movie file exceeds 2 GB, the next movie file is created automatically. It will take several - Sony HXR-MC2000U | Operation Guide - Page 25
During this time, do not apply shock or vibration to the camcorder, or remove the battery or AC Adaptor. Access lamp (p. 22) is lit or flashing display. In this case, set [GUIDEFRAME] to [ON] (p. 81), and record images using the outer frame displayed on the screen as a guide. [ STEADYSHOT] - Sony HXR-MC2000U | Operation Guide - Page 26
to adjust the focus, then press it fully. Flashes Lights up When disappears, the photo is recorded. Tips See page 104 on the recordable number of photos. To change the image size, touch (MENU) [Show - Sony HXR-MC2000U | Operation Guide - Page 27
power zoom lever suddenly. The operation sound of the power zoom lever may also be recorded. You cannot change the zoom speed of the zoom lever on the handle. The minimum possible distance between camcorder , Scene detection and Camera-shake detection. When the camcorder detects the subject, - Sony HXR-MC2000U | Operation Guide - Page 28
Scene detection (Backlight), (Landscape), (Twilight), (Spotlight), (Low light), (Macro) The camcorder selects the most effective setting automatically, depending on the scene. Camera-shake detection (Walk), (Tripod) The camcorder detects whether camerashake occurs or not, and makes the optimum - Sony HXR-MC2000U | Operation Guide - Page 29
FX] mode of [ REC MODE]. Save a movie recorded with [HD FX] mode onto Blu-ray Discs or external storage devices (p. 62, 64). You cannot use Dual Rec or the Smile Shutter function when you set [ REC MODE] to [HD FX]. Tips Movies are recorded with AVCHD 1920 1080/60i format when the FX or FH - Sony HXR-MC2000U | Operation Guide - Page 30
smiles automatically (Smile Shutter) A photo is recorded automatically when the camcorder detects the smile of a person. An orange frame appears around a conditions, and the setting of your camcorder. When [ REC MODE] is set to [HD FX], you cannot use the Smile Shutter function. Tips You can - Sony HXR-MC2000U | Operation Guide - Page 31
. When [ REC MODE] is set to [HD FX], you cannot use Dual Rec. Tips shutter speed, it appears as if frozen on the image. At a lower shutter speed, the subject appears as if it flowing. [AE SHIFT] (p. 80) [WB SHIFT] (p. 80) To assign the menu items to the RING Press and hold the MANUAL - Sony HXR-MC2000U | Operation Guide - Page 32
with your camcorder attached to a tripod is recommended. When you record images under a fluorescent lamp, sodium lamp, or mercury lamp, horizontal stripes may appear, flicker may occur, or color may change. In this case, change the shutter speed according to the power supply frequency in - Sony HXR-MC2000U | Operation Guide - Page 33
Playback on the camcorder In the default setting, movies and photos that are recorded on the internal memory are played. Tips To change the recording media, see page 20. 1 Slide the POWER switch to ON while pressing the green button. 2 Press (VIEW IMAGES). The VISUAL INDEX screen appears - Sony HXR-MC2000U | Operation Guide - Page 34
fast-reverse Next OPTION To fast-forward To pause/play Notes You may not be able to play back the images with other devices than camcorder. Tips When playback from the selected movie reaches the last movie, the screen returns to the INDEX screen. Touch / during pause to play back - Sony HXR-MC2000U | Operation Guide - Page 35
While playing back movies, touch adjust with / You can also adjust the sound volume by using / from . (OPTION) MENU. Viewing photos Your camcorder displays the selected photo. Previous To the VISUAL INDEX screen Tips When viewing photos recorded on the memory card, To start/stop - Sony HXR-MC2000U | Operation Guide - Page 36
Useful functions for playing movies and photos Searching for desired images by date (Date Index) You can search for desired images by date efficiently. Notes You cannot use the Date Index function for photos on the memory card. Press (VIEW IMAGES). The VISUAL INDEX screen appears. - Sony HXR-MC2000U | Operation Guide - Page 37
wearing glasses or hats, or who do not face towards the camera. Make sure that you set [FACE DETECTION] to [ of your high definition image quality (HD) movies with music and visual date, then touch . If no range is set, your camcorder plays the movies starting from those of the date displayed - Sony HXR-MC2000U | Operation Guide - Page 38
To erase all scenarios, touch (MENU) [Show others] [ SCENARIO ERASE] (under [EDIT] category) [ERASE ALL] [YES] [YES] . You can erase also 1.1 to 5 times the original size. Magnification can be adjusted with the power zoom lever. You can save a maximum of 8 scenarios. If - Sony HXR-MC2000U | Operation Guide - Page 39
Touch the screen at the point you want to display in the center of the displayed frame. The point where you touched on the screen is moved to the center of the display frame. To restart the slide show Touch again. Notes You cannot operate playback zoom during slide show. Tips You - Sony HXR-MC2000U | Operation Guide - Page 40
AC Adaptor to obtain AC power (p. 14). Refer also to the instruction manuals supplied with the device to be connected. Jacks on your camcorder Open the jack cover and connect the cable. HDMI OUT R-AUDIO-L VIDEO Y Pb/Cb Pr/Cr Connecting to a high definition TV High definition image quality (HD - Sony HXR-MC2000U | Operation Guide - Page 41
Recording/Playback Type Camcorder Cable : Signal flow TV Menu Setting A/V connecting cable (supplied) (White) (Red) [Show others] menu [OUTPUT SETTINGS] (under [GENERAL SET] category) [COMPONENT] AUDIO [1080i/480i] (p. 91) Component video cable (sold separately) COMPONENT IN (Green) - Sony HXR-MC2000U | Operation Guide - Page 42
(STD) movies are played back in standard definition image quality (STD). COMPONENT IN VIDEO AUDIO VIDEO/AUDIO Type Camcorder Cable : Signal flow TV Menu Setting A/V connecting cable (supplied) (White) (Red) [Show others] menu [OUTPUT SETTINGS] (under [GENERAL SET] category) [COMPONENT - Sony HXR-MC2000U | Operation Guide - Page 43
send both video/audio signals. The HDMI OUT jack outputs high quality images and digital audio. On "Photo TV HD" This camcorder is compatible with the "Photo TV HD" standard. "Photo TV HD" allows for highly-detailed, photo-like depiction of subtle textures and colors. By connecting Sony's Photo TV - Sony HXR-MC2000U | Operation Guide - Page 44
and photos in advance. Do not remove the battery pack or the AC Adaptor from your camcorder while deleting the images. It may damage the are called "thumbnails." 1 Touch (MENU) [Show others] [DELETE] (under [EDIT] category). 2 To delete movies, touch [ DELETE] [ DELETE] or [ DELETE - Sony HXR-MC2000U | Operation Guide - Page 45
photos on the playback screen from OPTION MENU. 1 Touch (MENU) [Show others] [PROTECT] (under [EDIT] category). 2 To protect movies, touch [ PROTECT] [ PROTECT]/ [ PROTECT]. To protect photos, touch screen. 4 Touch [YES] . Making good use of your camcorder US 45 - Sony HXR-MC2000U | Operation Guide - Page 46
by date]. 1 Touch (MENU) [Show others] [ DIVIDE] (under [EDIT] category). 2 Touch the movie to be divided. The selected movie starts playback. 3 divide it (p. 45). Do not remove the battery pack or the AC Adaptor from your camcorder while dividing the movie. It may damage the - Sony HXR-MC2000U | Operation Guide - Page 47
the saved Highlight Playback scenario (p. 38), the movie is deleted from the scenario. Only simple editing is available on the camcorder. Use the supplied software "PMB" for more advanced editing. Tips You can divide a movie on the playback screen from OPTION MENU. Capturing a photo - Sony HXR-MC2000U | Operation Guide - Page 48
definition image quality (HD) [ 0.2M camcorder to the wall outlet (wall socket) using the supplied AC Adaptor to prevent your camcorder from running out of power camcorder and stored onto the recording media are called "original." Touch (MENU) [Show others] [MOVIE DUB] (under [EDIT - Sony HXR-MC2000U | Operation Guide - Page 49
before the operation. Notes Connect your camcorder to the wall outlet (wall socket) using the supplied AC Adaptor to prevent your camcorder from running out of power during copying. Touch (MENU) [Show others] [PHOTO COPY] (under [EDIT] category). The [PHOTO COPY] screen appears - Sony HXR-MC2000U | Operation Guide - Page 50
of the movies that you have selected. The original movies are not changed even if you edit or erase the movies added to the Playlist. Creating the Playlist Notes High definition image quality (HD) movies and standard definition image quality (STD) movies are added to an individual Playlist - Sony HXR-MC2000U | Operation Guide - Page 51
on the LCD screen to confirm the image. Touch to return to the previous screen. Touch [YES] . Notes Do not remove the battery pack or the AC Adaptor from your camcorder while adding movies to the Playlist. It may damage the recording media. Also, do not eject the memory card while - Sony HXR-MC2000U | Operation Guide - Page 52
a movie from a Playlist, the original movie is not deleted. To change the order within the Playlist Touch (MENU) [Show others] [PLAYLIST EDIT] (under [EDIT] category). Touch [ MOVE]/[ MOVE]. Select the movie to be moved. The selected movie is marked with . Touch the image on the - Sony HXR-MC2000U | Operation Guide - Page 53
"PMB" from the supplied CD-ROM beforehand. Notes Do not format the media of your camcorder from a computer. Your camcorder may not operate correctly. This camcorder captures high definition footage in the AVCHD format. Using the enclosed PC software, high definition footage can be copied onto - Sony HXR-MC2000U | Operation Guide - Page 54
in a multi-boot environment. *2 64-bit editions and Starter (Edition) are not supported. Windows Image Mastering API (IMAPI) supplied software "PMB" is not supported by Macintosh computers. To import the movies and photos to the computer, please contact Apple Inc.. Confirm that your camcorder - Sony HXR-MC2000U | Operation Guide - Page 55
Turn on your camcorder, then connect the camcorder to the computer using the supplied USB cable. Restart [Continue] on the computer screen. Follow the on-screen instructions to install the software. Connect the camcorder to the computer during the installation of "PMB." Depending on - Sony HXR-MC2000U | Operation Guide - Page 56
from your computer after recording. If you import images without using supplied "PMB," files automatically created (due to the 2 GB limit) may not be concatenated. Even if you usually use other editing software, use the supplied software "PMB" to import images to the computer to ensure files are - Sony HXR-MC2000U | Operation Guide - Page 57
image quality (HD) movies or photos recorded on your camcorder are described here. Select the method that suits your disc player. Player Choosing a method and disc type Blu-ray Disc playback devices (a Blu-ray Disc player, PlayStation3, etc.) AVCHD format playback devices (a Sony Blu-ray Disc - Sony HXR-MC2000U | Operation Guide - Page 58
high definition image quality (HD) disc is created. You can play a high definition image quality (HD) disc on AVCHD format playback devices, such as a Sony Blu-ray Disc player and of the PlayStation3 system software. The PlayStation3 may not be available in some countries/regions. US 58 - Sony HXR-MC2000U | Operation Guide - Page 59
any other software than "PMB" starts automatically, shut it down. 2 Turn on your camcorder, then connect the camcorder to the computer using the supplied USB cable. The [USB SELECT] screen appears on the camcorder screen. 3 Press [DISC BURN] on the LCD screen. 4 Follow the instructions on the - Sony HXR-MC2000U | Operation Guide - Page 60
Turn on the computer beforehand. Notes Connect your camcorder to the wall outlet (wall socket) using the supplied AC Adaptor for this operation (p. 14). 1 Turn on your camcorder, then connect the camcorder to the computer using the supplied USB cable. 3 Click [Import]. Refer to "PMB Help - Sony HXR-MC2000U | Operation Guide - Page 61
-click the movie to be edited on "PMB," then click [Show Edit Palette] on the right side of the screen [Save Frame]. See "PMB Help" (p. 56) for details. Creating an AVCHD disc You can create an AVCHD disc by putting together high definition image quality (HD) movies previously imported to your - Sony HXR-MC2000U | Operation Guide - Page 62
this plug-in according to the on-screen instructions. Connect your computer to the internet when you install [BD Add-on Software]. Place an unused Blu-ray Disc in the disc drive, and click [Create Blu-ray Disc (HD)] in step 4 of "Creating an AVCHD disc" (p. 61). Other procedures are the same as - Sony HXR-MC2000U | Operation Guide - Page 63
and drag and drop onto the window for selecting movies. 5 Follow the instructions on the screen to create a disc. It may take a long time [Video Disc Copier] to start the software. See "Video Disc Copier" help on the operation. You cannot copy high definition image quality (HD) movies - Sony HXR-MC2000U | Operation Guide - Page 64
your camcorder to the wall outlet (wall socket) using the supplied AC adaptor (p. 14). Refer to the instruction manual supplied with supplied software "PMB." 1 Connect the AC Adaptor and the power cord (mains lead) to the DC IN jack of your camcorder and the wall outlet (wall socket). US 64 - Sony HXR-MC2000U | Operation Guide - Page 65
(HD) movies: Max. 3,999 Standard definition image quality (STD) movies: 9,999 Photos: 9,999 frames × COPY] (when selecting photos). Follow the on-screen instructions to select the recording media and image selection methods. camcorder screen. Saving images with an external device US 65 - Sony HXR-MC2000U | Operation Guide - Page 66
camcorder (p. 40). You can play back the high definition image quality (HD) movies on your computer using [Player for AVCHD]. Start [Player for AVCHD camcorder If the external media has the AC power page 64 to save images in the external media. AVCHD format compatible device Player Sony Blu- - Sony HXR-MC2000U | Operation Guide - Page 67
also to the instruction manual supplied with the DVD writer. Notes Connect your camcorder to the wall outlet (wall socket) using the supplied AC Adaptor for this operation (p. 14). Only unused discs of the following types can be used: 12cm DVD-R 12cm DVD+R The device does not support two - Sony HXR-MC2000U | Operation Guide - Page 68
Touch [END] [EJECT DISC] on the camcorder screen. Remove the disc after the operation is completed. Perform this operation in the following cases: When dubbing a desired image you select movies with high definition image quality (HD), the screen to select the image quality of - Sony HXR-MC2000U | Operation Guide - Page 69
on the disc may be cut off. Disc creation HD) is converted to standard definition image quality (STD), image quality conversion takes longer than the actual recording. To play back a disc on the DVD writer Connect the AC Adaptor and the power cord (mains lead) to the DC IN jack of your camcorder - Sony HXR-MC2000U | Operation Guide - Page 70
writer. Refer also to the instruction manuals supplied with the device to be connected. Notes Connect your camcorder to the wall outlet (wall socket) using the supplied AC Adaptor for this operation (p. 14). Sony DVD writer may not be available in some countries/regions. Always maintain the - Sony HXR-MC2000U | Operation Guide - Page 71
HD) movies will be dubbed with standard definition image quality (STD). A/V (audio/video) OUT jack Start playback on your camcorder, and record it on the recording device. Refer to the instruction manuals supplied . To record the date/time, or camera settings data, touch (MENU) [Show - Sony HXR-MC2000U | Operation Guide - Page 72
camcorder has various menu items under each of eight menu categories. MANUAL SETTINGS (Items to adjust for scene condition) p. 77 SHOOTING SET (Items for customized shooting) p. 81 PHOTO SETTINGS (Items for recording photos) p. 85 PLAYBACK (Items for playback) p. 86 EDIT (Items for editing - Sony HXR-MC2000U | Operation Guide - Page 73
on MY MENU. You can register 6 menu items on each MY MENU of the MOVIE, PHOTO, and PLAYBACK. Example: deleting [SPOT MTR/FCS] and registering [LOW LUX] Customizing your camcorder Touch (MENU). Touch [MY MENU SETTING]. Touch [MOVIE]. Touch [SPOT MTR/FCS]. Touch . Touch - Sony HXR-MC2000U | Operation Guide - Page 74
, touch another tab. (There may be no tab.) The tabs and items that appear on the screen depend on the recording/playback status of your camcorder at the time. US 74 - Sony HXR-MC2000U | Operation Guide - Page 75
MANUAL 81 STEADYSHOT 82 CONVERSION LENS 82 LOW LUX 82 FACE DETECTION 82 PRIORITY DIGITAL ZOOM 83 AUTO BACK LIGHT 84 RING SETTING 84 X.V.COLOR 28 DATA CODE 86 (EDIT) category DELETE DELETE 44 DELETE by select 49 COPY by date 49 PLAYLIST EDIT ADD/ ADD 50 ADD by date/ ADD - Sony HXR-MC2000U | Operation Guide - Page 76
LEVEL LCD COLOR DISPLAY SET OUTPUT SETTINGS TV TYPE COMPONENT HDMI RESOLUTION DISP OUTPUT CLOCK/ LANG CLOCK SET AREA SET DST SET/SUMMERTIME LANGUAGE SET POWER SETTINGS A.SHUT OFF OTHER SETTINGS CALIBRATION REC LAMP 20 20 88 88 88 97, 101 97, 101 35, 90 90 90 90 90 90 90 - Sony HXR-MC2000U | Operation Guide - Page 77
MANUAL SETTINGS (Items to adjust for scene condition camcorder and the subject. PORTRAIT (Soft portrait) () Brings out the subject such as people or flowers while creating a soft background. SPOTLIGHT**( ) Prevents people's faces from appearing excessively white when subjects are lit by strong light - Sony HXR-MC2000U | Operation Guide - Page 78
conditions change quickly Under video lamps in a studio, or under sodium lamps or incandescent-like color lamps ONE PUSH ( ) The white balance will be adjusted according to the ambient light. Touch [ONE PUSH]. Frame a white object such as a piece of paper, to fill the screen under the same - Sony HXR-MC2000U | Operation Guide - Page 79
cases. (This information will not display correctly if a conversion lens (sold separately) is being used.) When the focus mode is switched from automatic to manual When you set focus manually You can also adjust the setting manually by using the RING (p. 31). US 79 Customizing your camcorder - Sony HXR-MC2000U | Operation Guide - Page 80
lever to the W side.) ON ( ) The zoom (p. 27) moves to the top of the T (telephoto) side automatically , or touch if the subject is black or the light is dim. You can adjust the automatic exposure [AUTO]. You can also adjust the setting manually using the RING (p. 31). US 80 WB SHIFT - Sony HXR-MC2000U | Operation Guide - Page 81
(Recording mode) See page 29. GUIDEFRAME You can display the frame and check that the subject is horizontal or vertical. The frame is not recorded. OFF Does not display the guide frame. ON Displays the guide frame. Customizing your camcorder Tips Positioning the subject at the cross point of - Sony HXR-MC2000U | Operation Guide - Page 82
light. OFF The LOW LUX function is not used. ON ( ) The LOW LUX function is used. FACE DETECTION Detects the faces of your subjects and adjusts the focus/color/exposure automatically. Also, it adjusts the image quality of face parts more finely, in the case of the high definition image quality (HD - Sony HXR-MC2000U | Operation Guide - Page 83
LCD screen, the face with a double-lined frame has priority (p. 30). SMILE DETECTION The shutter is released when the camcorder detects a smile (Smile Shutter). DUAL CAPTURE ( ) Only during movie recording, the shutter is released automatically, when the camcorder detects a smile. ALWAYS ON ( ) The - Sony HXR-MC2000U | Operation Guide - Page 84
up to 12× zoom is performed optically. AUTO BACK LIGHT Your camcorder adjusts the exposure for backlit subjects automatically. ON Adjusts to vertical ratio according to the TV connected. Refer also to the instruction manuals supplied with your TV. 16:9 WIDE Records movies to the full screen - Sony HXR-MC2000U | Operation Guide - Page 85
See page 104 for the number of recordable photos. STEADYSHOT You can compensate for camera shake. Set [ STEADYSHOT] to [OFF] ( ) when using a tripod (sold separately), then the image becomes natural. ON The SteadyShot function is is assigned for each memory card. US 85 Customizing your camcorder - Sony HXR-MC2000U | Operation Guide - Page 86
28. DATA CODE During playback, your camcorder displays the information (Date/time, Camera data) recorded automatically at the time of CAMERA DATA Displays camera setting data. DATE/TIME Date Time CAMERA DATA Movie Photo SteadyShot off Brightness White balance Gain Shutter speed - Sony HXR-MC2000U | Operation Guide - Page 87
Tips The data code is displayed on the TV screen if you connect your camcorder to a TV. Depending on the recording media condition, bars [--:--:--] appear. EDIT (Items for editing) See "Using menus" (p. 72) on the operation. DELETE See page 44. SCENARIO ERASE See page 38. PROTECT See page 45. - Sony HXR-MC2000U | Operation Guide - Page 88
more, [>999min] is displayed on the LCD screen. To close the battery information screen Touch . US 88 MANAGE MEDIA (Items for recording media YES] [YES] . Notes Connect your camcorder to the wall outlet (wall socket) using AC Adaptor supplied for this operation (p. 14). To avoid the loss - Sony HXR-MC2000U | Operation Guide - Page 89
FORMAT] screen, touch [EMPTY]. REPAIR IMG.DB F. See page 97, 101. Customizing your camcorder Notes Connect the AC Adaptor to the wall outlet (wall socket). You cannot perform [EMPTY] unless you connect the AC Adaptor to the wall outlet (wall socket). To avoid the loss of important images - Sony HXR-MC2000U | Operation Guide - Page 90
camcorder to the wall outlet (wall socket) using the supplied AC Adaptor, [BRIGHT] is automatically selected for the setting. When you select [BRIGHT], battery or indicators are displayed in the following cases. When you turn on your camcorder. The LCD screen is touched (Except rec & zoom - Sony HXR-MC2000U | Operation Guide - Page 91
ratio of high definition image quality (HD) movies is 16:9. When you connect your camcorder to a TV compatible with the ID-1/ID-2 system, set [TV TYPE] to [16:9]. The TV switches to full mode automatically. Refer also to the instruction manuals supplied with your TV. COMPONENT Select [COMPONENT - Sony HXR-MC2000U | Operation Guide - Page 92
screen such as the VISUAL INDEX screen. OTHER SETTINGS CALIBRATION See page 111. REC LAMP (Recording lamp) You can make the camera recording lamp on the front of your camcorder not to turn on. ON The camera recording lamp lights up. OFF The camera recording lamp does not light up. US 92 - Sony HXR-MC2000U | Operation Guide - Page 93
Sony dealer or local authorized Sony service facility. Your camcorder may be required to initialize or change the current internal memory of your camcorder, depending on the problem The power does not turn on. Attach a charged battery pack to the camcorder (p. 13). The plug of the AC Adaptor - Sony HXR-MC2000U | Operation Guide - Page 94
pack is too high or too low, you may not be able to charge it (p. 109). Attach the battery pack to the camcorder correctly (p. 13). If the problem persists, disconnect the AC Adaptor from the wall outlet (wall socket) and contact your Sony dealer. The battery pack may be damaged. The remaining - Sony HXR-MC2000U | Operation Guide - Page 95
format is not supported by your camcorder (p. 109). low. Turn off your camcorder and take it to a warm place. Leave the camcorder there for a while, then turn on the camcorder. Photos cannot be recorded. You cannot record photos together with [SMTH SLW REC]. When [ REC MODE] is set to [HD - Sony HXR-MC2000U | Operation Guide - Page 96
high definition image quality (HD) movies is 16:9 ( power is supplied from the AC Adaptor. Magnification changes when the recording mode is switched. You cannot use digital zoom when your camcorder microphone again in the same way as when you start recording movies. If you connect a microphone - Sony HXR-MC2000U | Operation Guide - Page 97
edited on a computer, etc. You removed the AC Adaptor or the battery LEVEL] (p. 83) set to [LOW], the recorded sound may be difficult to support playing back memory cards (p. 3). Editing movies/photos on your camcorder Unable to edit. Unable to edit using the component video cable, make sure - Sony HXR-MC2000U | Operation Guide - Page 98
pixel display. It is recommended you record images using the outer frame of [GUIDEFRAME] (p. 81) as a guide. The image appears distorted on the 4:3 TV. This happens correctly. Quit "PMB" and restart your computer. The camcorder is not recognized by the computer. Disconnect devices from the - Sony HXR-MC2000U | Operation Guide - Page 99
[LOW LUX], [TELE MACRO] Self-diagnosis display/Warning indicators If indicators appear on the LCD screen or viewfinder, check the following. If the problem persists even after you have tried to fix a couple of times, contact your Sony dealer or local authorized Sony service facility. In this case - Sony HXR-MC2000U | Operation Guide - Page 100
media (p. 64), delete HD FX], you cannot record photos while recording movies. (Warning indicator pertaining to smile shutter) The smile shutter cannot be used with the current setting of the camcorder instructions. Recording media Internal memory format error. The internal memory of the camcorder - Sony HXR-MC2000U | Operation Guide - Page 101
not work, copy the image using the supplied software. There is no Image Database File. Movies in Image Database File. Cannot record or play HD movies. Do you want to repair the Image speed of your camcorder. Use a memory card recommended for your camcorder (p. 21). Recovering data. Your camcorder - Sony HXR-MC2000U | Operation Guide - Page 102
memory card recommended for your camcorder (p. 21). Do not eject the memory card during writing. Data may be damaged. Reinsert the memory card, and follow the instructions on the LCD screen. Copying photos Editing the Playlist of high definition image quality (HD) movies Data protected. You - Sony HXR-MC2000U | Operation Guide - Page 103
in low temperatures. The recording and playback time will be shorter depending on the conditions under which you use your camcorder. Playing time Approximate time available when you use a fully charged battery pack. (unit: minute) Battery pack Image quality HD STD NP-F570 (supplied) 420 - Sony HXR-MC2000U | Operation Guide - Page 104
of 3,999 scenes with high definition image quality (HD), and 9,999 scenes with standard definition image quality (STD). The maximum continuous recording time of movies is approximately 13 hours. Your camcorder uses the VBR (Variable Bit Rate) format to automatically adjust image quality to suit - Sony HXR-MC2000U | Operation Guide - Page 105
the recording conditions. Notes The unique pixel array of Sony's ClearVid and the image processing system allow still image resolution equivalent list shows the bit-rate, pixels and aspect ratio of each recording mode (movie + audio, etc.). High definition image quality (HD): FX: Max. 24Mbps - Sony HXR-MC2000U | Operation Guide - Page 106
Using your camcorder abroad Power supply You can use your camcorder in any countries/regions using the AC Adaptor supplied with your camcorder within the AC 100 V to 240 V, 50 Hz/60 Hz range. Viewing high definition image quality (HD) movies In countries/regions where 1080/60i is supported, you - Sony HXR-MC2000U | Operation Guide - Page 107
Setting to the local time You can easily set the clock to the local time by setting a time difference when using your camcorder abroad. Touch (MENU) [Show others] [CLOCK/ LANG] (under [GENERAL SET] category) [AREA SET] and [DST SET]/[SUMMERTIME] (p. 92). World time difference Additional - Sony HXR-MC2000U | Operation Guide - Page 108
signal shot on a digital video camera recorder to be recorded on 8 cm DVD discs, hard disk drive, flash memory, memory card, etc. Recording and playback on your camcorder Based on the AVCHD format, your camcorder records with the high definition image quality (HD) mentioned below. In addition to - Sony HXR-MC2000U | Operation Guide - Page 109
related to operating conditions between your camcorder and an AC Adaptor/charger (sold separately). The "InfoLITHIUM" battery pack calculates the power consumption according to the operating conditions of your camcorder, and displays the remaining battery time in minutes. To charge the - Sony HXR-MC2000U | Operation Guide - Page 110
. This damages the LCD screen and the viewfinder. Operate your camcorder on DC 7.2 V (battery pack) or DC 8.4 V (AC Adaptor). For DC or AC operation, use the accessories recommended in these operating instructions. Do not let your camcorder get wet, for example, from rain or sea water. If your - Sony HXR-MC2000U | Operation Guide - Page 111
the cord. Do not damage the power cord (mains lead) such as by placing anything heavy on it. Do not use a deformed or damaged battery pack. Keep metal contacts clean. If the battery electrolytic liquid has leaked: Consult your local authorized Sony service facility. Wash off any liquid - Sony HXR-MC2000U | Operation Guide - Page 112
casing If the casing is soiled, clean the camcorder body with a soft cloth lightly moistened with water, and then wipe the casing battery Connect your camcorder to a wall outlet (wall socket) using the supplied AC Adaptor, and leave it with the POWER memory card on your camcorder or a computer, you - Sony HXR-MC2000U | Operation Guide - Page 113
: HD: MPEG-4 AVC/H.264 AVCHD format compatible STD: MPEG-2 PS Audio recording system: Dolby Digital 2ch Dolby Digital Stereo Creator Photo file format : DCF Ver.2.0 Compatible : Exif Ver.2.21 Compatible : MPF Baseline Compatible Recording media (Movie/Photo) Internal memory: 64 GB "Memory Stick PRO - Sony HXR-MC2000U | Operation Guide - Page 114
shutter speed 1/60 second) 3 lx (lux) (LOW LUX is set to [ON], shutter speed 1/30 second) *1 The unique pixel array of Sony Power requirements: DC 7.2 V (battery pack) DC 8.4 V (AC Adaptor) Average power consumption: During camera recording, using viewfinder or LCD screen at normal brightness: HD: - Sony HXR-MC2000U | Operation Guide - Page 115
in your camcorder. We provide this software based on license agreements with their owners of copyright. Based on requests by the owners of copyright of these software applications, we have an obligation to inform you of the following. Please read the following sections. Read "license1.pdf " in the - Sony HXR-MC2000U | Operation Guide - Page 116
and redistribute source code for these software programs under the conditions of the supplied GPL/LGPL. Source code is provided on the web. Use the following URL to download it. When downloading the source code, select DCR-SX20 as the model for your camcorder. http://www.sony.net/Products/Linux/ We - Sony HXR-MC2000U | Operation Guide - Page 117
83) LOW LUX (82) Manual focus (79) SCENE SELECTION (77) White balance (77) White balance (86) SteadyShot off (82) SPOT MTR/FCS (78)/ SPOT METER (78)/ EXPOSURE (79) AE SHIFT (80) WB SHIFT (80) Automatic mode (32) Image brightness manual setting mode (32) IRIS priority mode (32) SHUTTER SPEED priority - Sony HXR-MC2000U | Operation Guide - Page 118
Indicator Meaning INTELLIGENT AUTO (27) OPTION button (74) VIEW IMAGES button (33) Slide show button (39) 101-0005 Data file name (35) Protected image (45) Index button (35) Indicators and their positions are approximate and may differ from what you actually see. US 118 - Sony HXR-MC2000U | Operation Guide - Page 119
to it. (Headphone) jack Cable holder The cable holder is used for fixing the A/V connecting cable, etc. REC START/STOP button (24) Power zoom lever (27, 38) PHOTO button (26) POWER switch (16) Memory card slot (22) Access lamp (22) HDMI OUT jack (Output only) (40) The available - Sony HXR-MC2000U | Operation Guide - Page 120
lens adjustment lever (18) Hook for the Shoulder belt Attach the Shoulder belt (sold separately). BATT (battery) RELEASE button (14) Speaker Battery pack (13) CHG (charge) lamp (13) DC IN jack (13) (INTELLIGENT AUTO) button (27) MANUAL button (31) MODE button (23) (VIEW IMAGES - Sony HXR-MC2000U | Operation Guide - Page 121
Microphone (10) Slide cover (22) REC lamp (Camera recording lamp) The REC lamp lights up in red during recording. The REC lamp flashes if the recording media or battery power is low. Lens (G Lens) Lens hood Grip belt RING (31) Tripod receptacle Attach the tripod (sold - Sony HXR-MC2000U | Operation Guide - Page 122
40, 71 Abroad 106 AE SHIFT 80 AREA SET 92 AUDIO REC SET 83 AUTO BACK LIGHT 84 AVCHD 57 AVCHD format 108 B BATTERY INFO 88 Battery pack 13 BEACH 77 BEEP 90 Blu-ray Disc 62 C CALIBRATION 111 CAMERA DATA 86 Capturing a photo from a movie 47 Capturing photos from a movie 61 Charging the - Sony HXR-MC2000U | Operation Guide - Page 123
SMTH SLW REC 80 SNOW 77 Software 54 SOUND/DISP SET 90 Specifications 113 SPOT FOCUS 79 SPOTLIGHT 77 SPOT METER 78 SPOT MTR/FCS 78 STEADYSHOT 82, 85 SUMMERTIME 92 SUNRISE&SUNSET 77 Supplied items 2 T TELE MACRO 80 Telephoto 27 Thumbnail 44 Troubleshooting 93 TV 40 TV color systems - Sony HXR-MC2000U | Operation Guide - Page 124
- Sony HXR-MC2000U | Operation Guide - Page 125
- Sony HXR-MC2000U | Operation Guide - Page 126
- Sony HXR-MC2000U | Operation Guide - Page 127
- Sony HXR-MC2000U | Operation Guide - Page 128
http://www.sony.net/ Printed on 70% or more recycled paper using VOC (Volatile Organic Compound)-free vegetable oil based ink. Printed in Japan
-
 1
1 -
 2
2 -
 3
3 -
 4
4 -
 5
5 -
 6
6 -
 7
7 -
8
-
9
-
10
-
11
-
12
-
13
-
14
-
15
-
16
-
17
-
18
-
19
-
20
-
21
-
22
-
23
-
24
-
25
-
26
-
27
-
28
-
29
-
30
-
31
-
32
-
33
-
34
-
35
-
36
-
37
-
38
-
39
-
40
-
41
-
42
-
43
-
44
-
45
-
46
-
47
-
48
-
49
-
50
-
51
-
52
-
53
-
54
-
55
-
56
-
57
-
58
-
59
-
60
-
61
-
62
-
63
-
64
-
65
-
66
-
67
-
68
-
69
-
70
-
71
-
72
-
73
-
74
-
75
-
76
-
77
-
78
-
79
-
80
-
81
-
82
-
83
-
84
-
85
-
86
-
87
-
88
-
89
-
90
-
91
-
92
-
93
-
94
-
95
-
96
-
97
-
98
-
99
-
100
-
101
-
102
-
103
-
104
-
105
-
106
-
107
-
108
-
109
-
110
-
111
-
112
-
113
-
114
-
115
-
116
-
117
-
118
-
119
-
120
-
121
-
122
-
123
-
124
-
125
-
126
-
127
-
128
 |
 |
HXR-MC2000U/MC2000N
4-263-129-
11
(1)
2010 Sony Corporation
Before operating the unit, please read this manual thoroughly,
and retain it for future reference.
Operating Guide
Digital HD Video
Camera Recorder