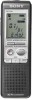
Sony ICD-P520 Operating Instructions
Sony ICD-P520 - Digital Voice Recorder Manual
 |
UPC - 027242711006
View all Sony ICD-P520 manuals
Add to My Manuals
Save this manual to your list of manuals |
Sony ICD-P520 manual content summary:
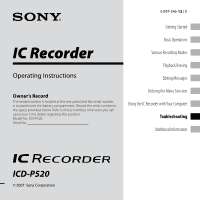
- Sony ICD-P520 | Operating Instructions - Page 1
Instructions Owner's Record The model number is located at the rear panel and the serial number is located inside the battery compartment. Record the serial number in the space provided below. Refer to these numbers whenever you call upon your Sony dealer regarding this product. Model No. ICD-P520 - Sony ICD-P520 | Operating Instructions - Page 2
digital instructions the user is manual could void your authority to operate this equipment. If you have any questions about this product, you may call: Sony Customer Information Services Center 1-800-222-7669 or http://www.sony.com/ Declaration of Conformity Trade Name : SONY Model : ICD-P520 - Sony ICD-P520 | Operating Instructions - Page 3
may also be governed by the terms of a separate user license agreement. This software is for Windows and cannot be used for Macintosh. The supplied connecting cable is for the IC recorder ICD-P520. You cannot connect other IC recorders. Information IN NO EVENT SHALL SELLER BE LIABLE FOR ANY - Sony ICD-P520 | Operating Instructions - Page 4
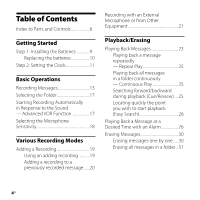
20 Recording with an External Microphone or from Other Equipment 21 Playback/Erasing Playing Back Messages 23 Playing back a message repeatedly - Repeat Play 25 Playing back all messages in a folder continuously - Continuous Play 25 Searching forward/backward during playback (Cue/Review).....25 - Sony ICD-P520 | Operating Instructions - Page 5
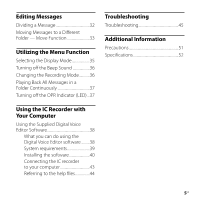
Indicator (LED)...37 Troubleshooting Troubleshooting 45 Additional Information Precautions 51 Specifications 52 Using the IC Recorder with Your Computer Using the Supplied Digital Voice Editor Software 38 What you can do using the Digital Voice Editor software..........38 System requirements - Sony ICD-P520 | Operating Instructions - Page 6
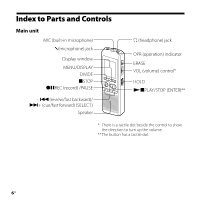
Index to Parts and Controls Main unit MIC (built-in microphone) (microphone) jack Display window MENU/DISPLAY DIVIDE xSTOP zXREC (record) /PAUSE - .(review/fast backward)/ >+ (cue/fast forward) (SELECT) Speaker i (headphone) jack OPR (operation) indicator ERASE VOL (volume) control* HOLD NxPLAY/ - Sony ICD-P520 | Operating Instructions - Page 7
HOLD Rear To cancel the HOLD function Slide the HOLD switch to "OFF" . Note When the HOLD function is activated during recording, cancel the HOLD function first to stop recording. Tip Even if the HOLD function is activated, you can stop the alarm playback. To stop the alarm or playback, press - Sony ICD-P520 | Operating Instructions - Page 8
Display window Folder indication Microphone sensitivity Alarm indicator Selected message number REC DATE (recorded date) indication REMAIN indicator Remaining memory indicator Remaining battery indicator Recording mode indication REC (recording) indicator Repeat play indicator EASY-S (Easy Search) - Sony ICD-P520 | Operating Instructions - Page 9
Getting Started Getting Started Step 1: Installing the Batteries 1 Slide and lift the battery compartment lid. If the battery compartment lid is accidentally detached, attach it as illustrated. 2 Insert two LR03 (size AAA) alkaline batteries with correct polarity, and close the lid. Make sure to - Sony ICD-P520 | Operating Instructions - Page 10
Recording: Approx. 11 hr. Playback: Approx. 7.5 hr. In the SP and LP modes Recording: Approx. 22 hr. Playback: Approx. 11 hr. (hr.: hours) * Using Sony unit is accessing data while "ACCESS" appears in the display window or the OPR indicator flashes in orange. While accessing, do not remove the - Sony ICD-P520 | Operating Instructions - Page 11
MENU/DISPLAY for more than 1 second until "MODE" appears in the display window. The unit enters the menu mode. Press - or + to display "SET DATE". Press PLAY/STOP. The year digits will flash. 2 Set the date. Press - or + to select the digits of the year. Press PLAY/STOP. The month - Sony ICD-P520 | Operating Instructions - Page 12
3 Set the time. Press - or + to select the digits of the hour. Press PLAY/STOP. The minute digits will flash. Set the minute. Press PLAY/STOP at the time signal. The display will return to "SET DATE". Press STOP to exit from the - Sony ICD-P520 | Operating Instructions - Page 13
Basic Operations Basic Operations Recording Messages Display window Recording mode Current message number Counter display* Remaining memory indicator * The display selected with the MENU/DISPLAY button appears. Built-in microphone OPR indicator (lights in red during recording.) REC/PAUSE STOP - Sony ICD-P520 | Operating Instructions - Page 14
flashes in the display window. release pause and resume recording Press REC/PAUSE. Recording resumes from that point. (To stop recording after pausing recording, press STOP.) To Do this listen to Press STOP to stop the current recording, then press recording PLAY/STOP. review the current - Sony ICD-P520 | Operating Instructions - Page 15
messages in the mixture of HQ, SP and LP modes, the maximum recording time will be between those for the HQ and LP modes. Due to the limitation of the IC recording system, this unit records in the minimum recording unit of approx. 2 seconds at most, therefore the following symptoms may occur - Sony ICD-P520 | Operating Instructions - Page 16
time display will also flash when the remaining time reaches 1 minute. When the memory is full, recording automatically stops and "FULL" will flash in the display window with an alarm sound. To continue recording, first erase some of the messages. Notes If you press REC/PAUSE when the memory - Sony ICD-P520 | Operating Instructions - Page 17
Automatically in Response to the Sound - Advanced VOR Function When VOR (voice operated recording) is set to "ON" in the menu, recording starts when the recorder detects sound. ("VOR" is displayed in the display window.) Recording stops when no sound is heard. ("VOR PAUSE" flashes in the display - Sony ICD-P520 | Operating Instructions - Page 18
Selecting the Microphone Sensitivity 1 Press MENU/DISPLAY for more than 1 second until "MODE" appears in the display window. 2 Press - or + to select "SENS" and press PLAY/STOP. 3 Press - or + to select "H (high sensitivity)" or "L (low sensitivity)" and press PLAY/ STOP. 4 Press STOP to - Sony ICD-P520 | Operating Instructions - Page 19
in the procedures below. 1 Press MENU/DISPLAY for more than 1 second until "MODE" appears in the display window. 2 Press - or + to display "REC-OP" and press PLAY/ STOP. The adding recording window will be displayed. 3 Press - or + to select "ON" and press PLAY/STOP. The setting is changed - Sony ICD-P520 | Operating Instructions - Page 20
the message. During playback of Message 3 Message 3 Message 4 After adding a recording Message 3 Message 4 Added recording When "OVER" is selected in the menu You can add an overwrite recording after the selected point in a recorded message. The part of the message after the selected point - Sony ICD-P520 | Operating Instructions - Page 21
" flashes, press REC/PAUSE again. The OPR indicator will light in red. An add or overwrite recording starts. 3 Press STOP to stop the recording. Notes You cannot add or overwrite a recording if the remaining memory is not long enough. The added or overwritten portion of a message will be - Sony ICD-P520 | Operating Instructions - Page 22
the steps in "Recording Messages" on page 13 to record messages. Notes Make sure that the plugs are connected securely. We recommend you make a trial recording to check the connections and volume control. When connecting equipment other than Sony's, refer to the instruction manual of the - Sony ICD-P520 | Operating Instructions - Page 23
) jack OPR indicator (lights in green during playback) VOL Playback/Erasing When playing back a previously recorded message, start from Step 1. When playing back a message you have just finished recording, start from Step 3. 1 Select the folder. See "Selecting the Folder" on page 17. 2 Select the - Sony ICD-P520 | Operating Instructions - Page 24
3 Start playback. Press PLAY/STOP. Adjust the volume with the VOL control. After playing back one message, the unit stops at the beginning of the next message. When the continuous play function is set to "CONT ON" (page 37), the unit stops after playing all messages in a folder. When the last - Sony ICD-P520 | Operating Instructions - Page 25
CONT in the menu. When you set CONT to "ON," you can play back all messages in a folder continuously. Searching forward/ backward during playback (Cue/Review) To search forward, keep + pressed during playback and release the button at the point you wish to resume playback. To search backward, keep - Sony ICD-P520 | Operating Instructions - Page 26
menu, you can advance approx. 10 seconds by pressing +. This function is useful when locating a desired point in a long recording. ("EASY-S" is displayed in the display window.) Playing Back a Message at a Desired Time with an Alarm You can sound an alarm and start playback of a selected message - Sony ICD-P520 | Operating Instructions - Page 27
no message has been recorded in the selected folder will flash in the display window. 3 Set the alarm digits and press PLAY/STOP. The month digits will flash. 3 Press - or + to select the month digits and press PLAY/ STOP. The day digits will flash. 4 Press - or + to select the day digits - Sony ICD-P520 | Operating Instructions - Page 28
the alarm will sound.) During playback, "ALARM" will flash in the display window. When the playback ends, the unit will stop automatically at the beginning If the alarm time comes during recording, alarm will sound for 10 seconds after the recording is finished and playback begins. "" will flash - Sony ICD-P520 | Operating Instructions - Page 29
Playback/Erasing If more than one alarm time comes during recording, only the first message will be played back. When the alarm time comes when the unit is in the menu mode, alarm will sound and - Sony ICD-P520 | Operating Instructions - Page 30
mode. A beep will sound and the message number and "ERASE" will flash while the whole message is played back 10 times. You can erase the recorded messages one by one or all messages in a folder at a time. Note that once - Sony ICD-P520 | Operating Instructions - Page 31
2 Press ERASE while the message is being played back. The message is erased and the remaining messages will be renumbered. (For example, if you erase Message 3, Message 4 will be renumbered as Message 3. When erasing is completed, the unit will stop at the beginning of the following message.) To - Sony ICD-P520 | Operating Instructions - Page 32
message number and "DIVIDE" flash three times. The message will be divided into two; however, the messages will be recorded without a break. Tip You can divide a message during recording pause. When you press DIVIDE during playback: The message is divided into two at the point you pressed the - Sony ICD-P520 | Operating Instructions - Page 33
a message is divided, you cannot combine the divided messages with the IC recorder. To combine the divided messages, use the supplied application software. Moving Messages to a Different Folder - Move Function You can move the recorded messages to another folder. 1 While the unit is stopped, select - Sony ICD-P520 | Operating Instructions - Page 34
4 Press - or + to select the folder to which you want to move the message. 5 Press PLAY/STOP. The message is moved in the destination folder. 6 Press STOP to exit the menu mode. To cancel moving the message(s) Press STOP before step 5. Note The move function does not duplicate a message in - Sony ICD-P520 | Operating Instructions - Page 35
for more than 3 seconds in the stop mode, the display will show the current time, regardless of the display mode setting. Counter: Elapsed playback/recording time in one message Remaining time (REMAIN): In the playback mode: The remaining time of one message indication. In the stop and - Sony ICD-P520 | Operating Instructions - Page 36
with the high quality sound (monaural sound). SP: You can record with better sound (monaural sound). LP: You can record for longer time (monaural sound). 1 Press MENU/DISPLAY for more than 1 second until "MODE" appears in the display window. 2 Make sure that "MODE" is displayed and press PLAY/STOP - Sony ICD-P520 | Operating Instructions - Page 37
in operation. 1 Press MENU/DISPLAY for more than 1 second until "MODE" appears in the display window. 2 Press - or + to display "LED" and press PLAY/STOP. "ON (or Press STOP to exit the menu mode. Note When the IC recorder is connected to the USB connector of your computer, the OPR indicator - Sony ICD-P520 | Operating Instructions - Page 38
Using the IC Recorder with Your Computer Using the Supplied Digital Voice Editor Software What you can do using the Digital Voice Editor software The Digital Voice Editor software allows you to transfer the messages to your display monitor, to save them on your computer's hard disk, and to play back - Sony ICD-P520 | Operating Instructions - Page 39
/Windows® 98 Second Edition/ Windows® Millennium Edition/ Windows® NT.) Notes You cannot use the software with a Macintosh machine. A handmade computer, a computer whose operating system is installed or upgraded by the user, or a computer with multi-boot operating environment are not supported - Sony ICD-P520 | Operating Instructions - Page 40
The IC recorder may not be recognized or the Software may not be installed successfully. Be sure to close all running programs before installing the Digital Voice Editor software. When installing or uninstalling the software in Windows® 2000 Professional, make sure to log on Windows as the user - Sony ICD-P520 | Operating Instructions - Page 41
installed a previous version of the Digital Voice Editor or any version of the "Memory Stick Voice Editor" The dialog box to uninstall the previous version may be displayed. (Messages are not removed.) Follow the instructions on the screen to uninstall the software and then the installation of the - Sony ICD-P520 | Operating Instructions - Page 42
the file is recorded. Handling of a file is limited among the PCs bearing the same owner name input during the Digital Voice Editor installation. Sony Digital Voice Editor 3] and then [Uninstall]. The uninstaller starts up. 2 Follow the displayed instructions. Note If you wish to move the software - Sony ICD-P520 | Operating Instructions - Page 43
the computer are turned on or off. To USB connector of IC recorder Connecting cable (supplied) To USB connector of your computer Notes Be sure to install the Digital Voice Editor software before connecting the IC recorder to your computer. Otherwise, a message like [Found New Hardware Wizard - Sony ICD-P520 | Operating Instructions - Page 44
Referring to the help files For details on each operation, refer to the help files. Help 44GB - Sony ICD-P520 | Operating Instructions - Page 45
Troubleshooting Troubleshooting Before taking the unit for repair, check the following sections. Should any problem persist after you have made these checks, consult your nearest Sony dealer. IC recorder Symptom Remedy The unit does not operate. The batteries have been inserted with incorrect - Sony ICD-P520 | Operating Instructions - Page 46
varies from the maximum HQ mode recording time to the maximum LP mode recording time (page 15). No more recording can be made when 99 messages each have been recorded in a folder. Due to the limitation of the IC recording system, this unit records in the minimum recording unit. If the length of - Sony ICD-P520 | Operating Instructions - Page 47
Remedy The remaining time displayed in the display window is shorter than that displayed in the supplied Digital Voice Editor software. The unit requires a certain amount (page 9). correctly. Please note that recorded messages may be erased during service or repair work. Troubleshooting 47GB - Sony ICD-P520 | Operating Instructions - Page 48
connected. The IC recorder does not operate. Remedy The free disk or memory space on the computer is too small. Check the hard disk and memory space. You are trying to install the software into the operating system that the Digital Voice Editor software does not support. In Windows® XP Media - Sony ICD-P520 | Operating Instructions - Page 49
. (Refer to the instruction manual of the computer.) The volume of WAV files can be changed and saved using the "Increase Volume" feature of the Microsoft Sound Recorder. You cannot play back a message whose file format the Digital Voice Editor software does not support. Depending on the file - Sony ICD-P520 | Operating Instructions - Page 50
inside the IC recorder may be damaged. There may be conflict between the software and other driver or application. Do not install the "Memory Stick Voice Editor" software and the Digital Voice Editor Ver. 2x software after you installed the Digital Voice Editor software. The Digital Voice Editor - Sony ICD-P520 | Operating Instructions - Page 51
, benzine or thinner. If you have any questions or problems concerning your unit, please consult your nearest Sony dealer. Backup recommendations To avoid potential risk of data loss caused by accidental operation or malfunction of the IC recorder, we recommend that you save a backup copy of your - Sony ICD-P520 | Operating Instructions - Page 52
IC recorder section Recording media Built-in flash memory 256 MB, Monaural recording Actual usable capacity may be smaller. Recording accessories Operating instructions software (CD-ROM) (1) Optional accessories Electret Condenser Microphone ECM-DM5P, ECM-CZ10, ECM-TL1 (for telephone recording - Sony ICD-P520 | Operating Instructions - Page 53
services, see the following web page: www.gracenote.com/corporate All other trademarks and registered trademarks are trademarks or registered trademarks of their respective holders. Furthermore a���n���d a�r�e��n��o��t mentioned in each case in this manual. The "Digital Voice Editor" uses software - Sony ICD-P520 | Operating Instructions - Page 54
54GB - Sony ICD-P520 | Operating Instructions - Page 55
Additional Information 55GB - Sony ICD-P520 | Operating Instructions - Page 56
Printed on 70% or more recycled paper using VOC (Volatile Organic Compound)-free vegetable oil based ink. Printed in China
-
 1
1 -
 2
2 -
 3
3 -
 4
4 -
 5
5 -
 6
6 -
 7
7 -
8
-
9
-
10
-
11
-
12
-
13
-
14
-
15
-
16
-
17
-
18
-
19
-
20
-
21
-
22
-
23
-
24
-
25
-
26
-
27
-
28
-
29
-
30
-
31
-
32
-
33
-
34
-
35
-
36
-
37
-
38
-
39
-
40
-
41
-
42
-
43
-
44
-
45
-
46
-
47
-
48
-
49
-
50
-
51
-
52
-
53
-
54
-
55
-
56
 |
 |
IC Recorder
Operating Instructions
© 2007
Sony Corporation
ICD-P520
3-097-346-
12
(1)
Owner’s Record
The model number is located at the rear panel and the serial number
is located inside the battery compartment. Record the serial number in
the space provided below. Refer to these numbers whenever you call
upon your Sony dealer regarding this product.
Model No. ICD-P520
Serial No.
Getting Started
Basic Operations
Various Recording Modes
Playback/Erasing
Editing Messages
Utilizing the Menu Function
Using the IC Recorder with Your Computer
Toubleshooting
Additional Information