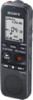
Sony ICD-PX312 Operating Instructions - Page 12
Step 2: Preparing a Power Source - recorder
 |
UPC - 027242809529
View all Sony ICD-PX312 manuals
Add to My Manuals
Save this manual to your list of manuals |
Page 12 highlights
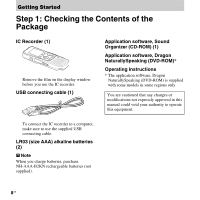
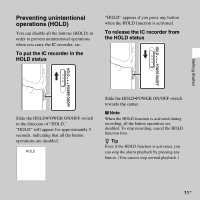
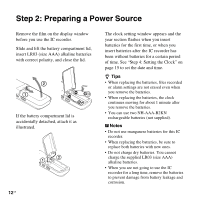
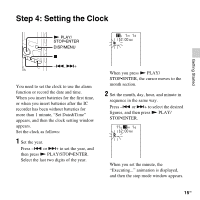
Step 2: Preparing a Power Source Remove the film on the display window before you use the IC recorder. Slide and lift the battery compartment lid, insert LR03 (size AAA) alkaline batteries with correct polarity, and close the lid. If the battery compartment lid is accidentally detached, attach it as illustrated. 12 GB The clock setting window appears and the year section flashes when you insert batteries for the first time, or when you insert batteries after the IC recorder has been without batteries for a certain period of time. See "Step 4: Setting the Clock" on page 15 to set the date and time. z Tips • When replacing the batteries, files recorded or alarm settings are not erased even when you remove the batteries. • When replacing the batteries, the clock continues moving for about 1 minute after you remove the batteries. • You can use two NH-AAA-B2KN rechargeable batteries (not supplied). P Notes • Do not use manganese batteries for this IC recorder. • When replacing the batteries, be sure to replace both batteries with new ones. • Do not charge dry batteries. You cannot charge the supplied LR03 (size AAA) alkaline batteries. • When you are not going to use the IC recorder for a long time, remove the batteries to prevent damage from battery leakage and corrosion.
-
 1
1 -
2
-
3
-
4
-
5
-
6
-
 7
7 -
 8
8 -
 9
9 -
 10
10 -
 11
11 -
 12
12 -
 13
13 -
 14
14 -
 15
15 -
 16
16 -
 17
17 -
18
-
19
-
20
-
21
-
22
-
23
-
24
-
25
-
26
-
27
-
28
-
29
-
30
-
31
-
32
-
33
-
34
-
35
-
36
-
37
-
38
-
39
-
40
-
41
-
42
-
43
-
44
-
45
-
46
-
47
-
48
-
49
-
50
-
51
-
52
-
53
-
54
-
55
-
56
-
57
-
58
-
59
-
60
-
61
-
62
-
63
-
64
-
65
-
66
-
67
-
68
-
69
-
70
-
71
-
72
-
73
-
74
-
75
-
76
-
77
-
78
-
79
-
80
-
81
-
82
-
83
-
84
-
85
-
86
-
87
-
88
-
89
-
90
-
91
-
92
-
93
-
94
-
95
-
96
-
97
-
98
-
99
-
100
-
101
-
102
-
103
-
104
-
105
-
106
-
107
-
108
-
109
-
110
-
111
-
112
-
113
-
114
-
115
-
116
-
117
-
118
-
119
-
120
-
121
-
122
-
123
-
124
-
125
-
126
-
127
-
128
-
129
-
130
-
131
-
132
 |
 |
