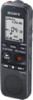
Sony ICD-PX312 Operating Instructions - Page 9
Index to parts and controls, Front - review
 |
UPC - 027242809529
View all Sony ICD-PX312 manuals
Add to My Manuals
Save this manual to your list of manuals |
Page 9 highlights
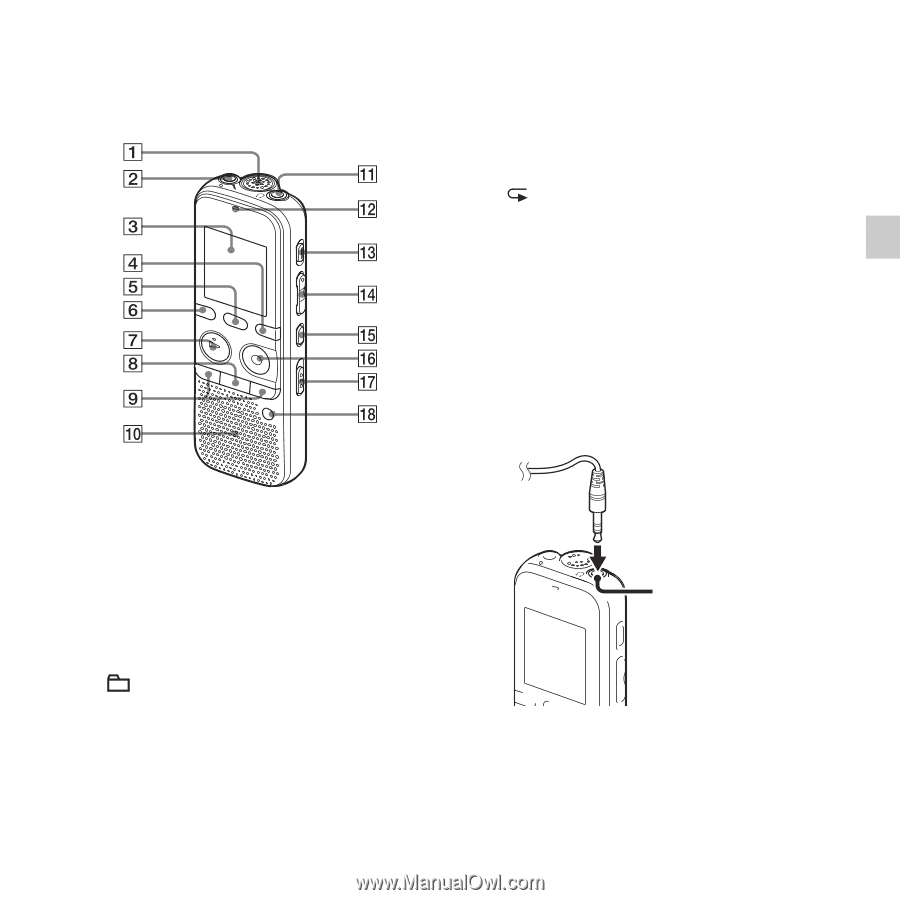
Index to parts and controls Front K i (headphone) jack*2 L Operation indicator M ERASE button N VOL (volume) -/+*1 button O (repeat) A-B button P z REC/PAUSE button Q NOISE CUT switch R T-MARK (track mark) button *1 These buttons and the jack have a tactile dot. Use it as a reference point for operations, or to identify each terminal. *2 Connect a pair of headphones (not supplied) to the i (headphone) jack. When noise is heard, clean the plug of the headphones. Getting Started A Built-in microphone B m (microphone) jack*1 C Display window D DISP/MENU button E SCENE button F (folder) button G N PLAY/STOP•ENTER*1 button H x (stop) button I -. (review/fast backward), >+ (cue/fast forward) buttons J Speaker i (headphone) jack 9GB
-
 1
1 -
2
-
3
-
 4
4 -
 5
5 -
 6
6 -
 7
7 -
 8
8 -
 9
9 -
 10
10 -
 11
11 -
 12
12 -
 13
13 -
 14
14 -
15
-
16
-
17
-
18
-
19
-
20
-
21
-
22
-
23
-
24
-
25
-
26
-
27
-
28
-
29
-
30
-
31
-
32
-
33
-
34
-
35
-
36
-
37
-
38
-
39
-
40
-
41
-
42
-
43
-
44
-
45
-
46
-
47
-
48
-
49
-
50
-
51
-
52
-
53
-
54
-
55
-
56
-
57
-
58
-
59
-
60
-
61
-
62
-
63
-
64
-
65
-
66
-
67
-
68
-
69
-
70
-
71
-
72
-
73
-
74
-
75
-
76
-
77
-
78
-
79
-
80
-
81
-
82
-
83
-
84
-
85
-
86
-
87
-
88
-
89
-
90
-
91
-
92
-
93
-
94
-
95
-
96
-
97
-
98
-
99
-
100
-
101
-
102
-
103
-
104
-
105
-
106
-
107
-
108
-
109
-
110
-
111
-
112
-
113
-
114
-
115
-
116
-
117
-
118
-
119
-
120
-
121
-
122
-
123
-
124
-
125
-
126
-
127
-
128
-
129
-
130
-
131
-
132
 |
 |
9
GB
Getting Started
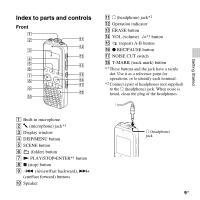
Index to parts and controls
Front
A
Built-in microphone
B
m
(microphone) jack*
1
C
Display window
D
DISP/MENU button
E
SCENE button
F
(folder) button
G
N
PLAY/STOP•ENTER*
1
button
H
x
(stop) button
I
–
.
(review/fast backward),
>
+
(cue/fast forward) buttons
J
Speaker
K
i
(headphone) jack*
2
L
Operation indicator
M
ERASE button
N
VOL (volume) –/+*
1
button
O
(repeat) A-B button
P
z
REC/PAUSE button
Q
NOISE CUT switch
R
T-MARK (track mark) button
*
1
These buttons and the jack have a tactile
dot. Use it as a reference point for
operations, or to identify each terminal.
*
2
Connect a pair of headphones (not supplied)
to the
i
(headphone) jack. When noise is
heard, clean the plug of the headphones.
i
(headphone)
jack